15 minutes, Intermediate
This sample is a fully reactive version of the Spring PetClinic application using Spring WebFlux.

The steps to run the application are provided below. You can run the application with no installation using Gitpod and Cassandra as DBaas for free or locally. To get started with a free-forever, zero-install Cassandra database click here 🚀
 Architecture overview
Table of contents
Run the application
1. Start the database
✅ Create a free-forever Cassandra database with DataStax Astra: click here to get started 🚀

✅ Use the form to create a new database
On the Astra home page locate the Add Database button

Select the free tier plan, this is a true free tier, free forever and no payment method asked 🎉🎉

Select the proper region and click the configure button. The number of regions and cloud providers are limited in the free tier but please notice you can run the DB on any cloud with any VPC Peering.

Fill in the database name, keyspace name, username and password. Please remember your password as you will be asked to provide it when the application starts the first time.

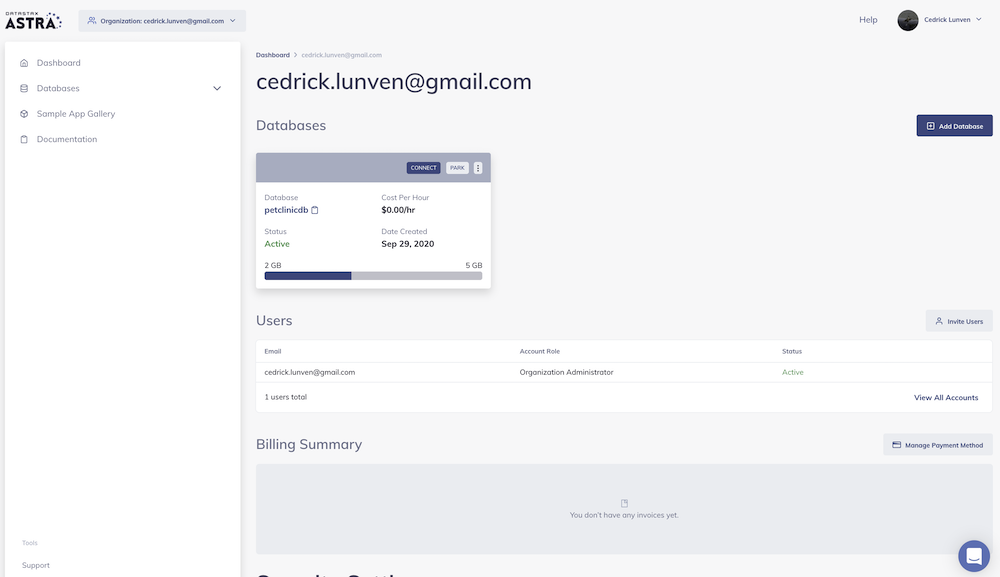
✅ View your Database and connect
View your database. It may take 2-3 minutes for your database to spin up. You will receive an email at that point.
👁️ Expected output
Initializing

Once the database is ready, notice how the status changes from Pending to Active and Astra enables the CONNECT button.

2. Copy credentials to connect
✅ Navigate to your credentials
Locate the combo Organization: <Your email> on the top navigation. On the right side of your organization, click the ellipsis (...) then click your <Your email>.

You should land on the following screen. Scroll down to the bottom of the page to locate the Service Account in Security Settings
✅ Create Service Account
Create a service account by clicking the Add Service Account button above the section as shown below

When the panel opens on the right, click Add

✅ Copy credentials to your clipboard
Click the ellipsis at end of Service Account row to open menu and select Copy Credentials

The credentials you copied to the clipboard look like the following JSON, we will use this in gitpod to enable connectivity.
{
  "clientId":"149de2c7-9b07-41b3-91ad-9453dee4dc54",
  "clientName":"cedrick.lunven@datastax.com",
  "clientSecret":"aaaaaaaaa-aaaa-aaaa-aaaa-aaaaaaaaaaaa"
}
3. Start in Gitpod
✅ Open Gitpod (with creds copied to clipboard)

When you first launch gitpod, it builds the image.

Git pod pulls the image.

✅ Paste credentials in Gitpod terminal
Once Gitpod loads the workspace, you'll be asked to paste your service account credentials in the Gitpod terminal at the bottom of the screen. The setup.sh script at the root of the repository is what asks this question.

✅ Open Swagger UI in browser
When gitpod finishes building the app, a new tab will open in your browser showing the following.

🎉 Celebrate!
You've successfully built the Spring Petclinic Reactive backend application!

✅ Start the Web UI :
You may have noticed another terminal named spring-petclinic-angular. This is where the UI should start.

After answering the question about analytics usage, you should be able to access the UI on a new tab.
NOTE If you want to run everything locally, reference the LOCAL_README.md
Understand the architecture
Internal Architecture our of component
Let's have a look inside the main component spring-petclinic-reactive to see which libraries and frameworks have been used.

-
Spring-boot: Spring Boot makes it easy to create stand-alone, production-grade Spring based Applications that you can "just run". We take an opinionated view of the Spring platform and third-party libraries so you can get started with minimum fuss. Most Spring Boot applications need minimal Spring configuration. -
Spring-Security: Spring Security is a powerful and highly customizable authentication and access-control framework. It is the de-facto standard for securing Spring-based applications. Spring Security is a framework that focuses on providing both authentication and authorization to Java applications. Like all Spring projects, the real power of Spring Security is found in how easily it can be extended to meet custom requirements. -
Spring-WebFlux: Spring sub framework allowing to create Reactive Rest Endpoint. -
Spring-Actuator: Expose Endpoints to expose metrics to third party system: health, infos, jmx,prometheus,... -
Spring-Test: Enabled unit testing and mocking with Spring configuration and beans. -
Spring-Cloud: Spring Cloud provides tools for developers to quickly build some of the common patterns in distributed systems (e.g. configuration management, service discovery, circuit breakers, intelligent routing, micro-proxy, control bus, one-time tokens, global locks, leadership election, distributed sessions, cluster state). Coordination of distributed systems leads to boiler plate patterns, and using Spring Cloud developers can quickly stand up services and applications that implement those patterns. They will work well in any distributed environment, including the developer’s own laptop, bare metal data centres, and managed platforms such as Cloud Foundry. -
SpringFox(Swagger): Annotation based rest documentation generation and test client generation (swagger-ui).

Logical Architecture
Here, you can find a description of the logical architecture components:
-
spring-parclinic-angular: This is the existing project that provides a user interface implementation using Angular. It has been used as well for other backend projects like the spring-petclinic-rest -
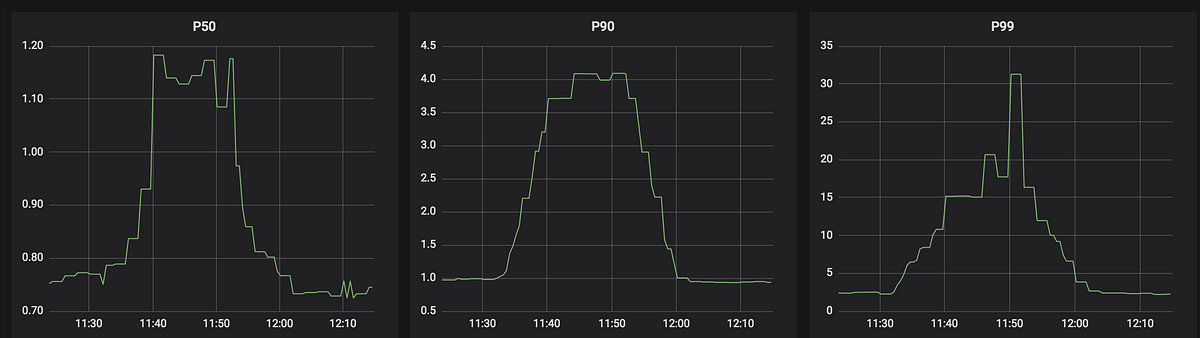
prometheus: Our component exposes some metrics through the actuator endpoint. A registry will push this information into the Prometheus database (docker-based).

Grafana: Allows to create dashboards based on data stored in prometheus.

zipkin: Our component includes thespring-cloud-sleuthdependency allowing Brave to push metrics usage of the API to the distributed tracing component Zipkin. To enable this tracing set the propertyzipkin.enabledto true inapplication.yaml. To start zipkin usedocker-compose up -d
  zipkin:
    enabled: true
    baseUrl: http://localhost:9411
    sender:
      type: web

-
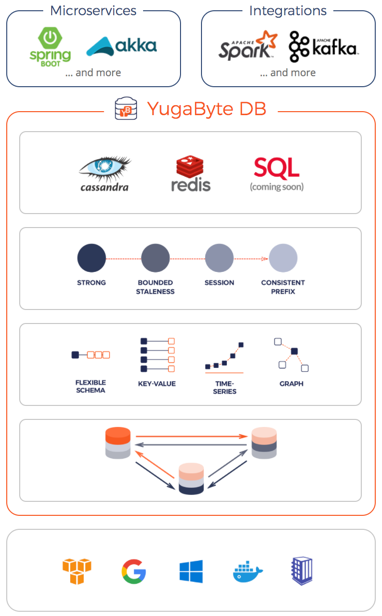
Apache Cassandra: A NoSQL database -
DataStax Astra: Apache Cassandra available in the Cloud for free as a managed service (DBaas)
Data Model diagram
The underlying data model implemented in Apache Cassandra is different from the one you would have defined with a relational database.

To enable scalability, Apache Cassandra does not support joins or integrity constraints. Therefore we used some denormalization.
We also created some secondary indices to queries columns that are not the PARTITION KEY. These secondary indices work well in this case because the cardinality is low (e.g, few pets for an owner).
The application generates the objects related to the data model (e.g., tables, indices, udts) at startup.
C. Contributing
The issue trackeris the preferred channel for bug reports, features requests and submitting pull requests.
For pull requests, editor preferences are available in the editor config for easy use in common text editors. Read more and download plugins at http://editorconfig.org.