Serverless architecture is an attractive solution for both small businesses and large enterprises. The former gains the ability to go to market quickly while the latter are able to reduce IT costs by abstracting away complexity. One of the key players in serverless architecture is AWS with its Lambda offering. Lambda is a simple way to execute small portions of code on demand and without the need to provision any servers. Alongside the growth in Lambda’s popularity has come a greater interest in combining it with our Cassandra managed service. As such, we thought it would be a good time to investigate the pros and cons of using Lambda with Cassandra and to share some tips.
This will be a three-part series of blog posts. The first post will focus on developing a POC at next to no cost and will look like a tutorial. The focus here is mostly functional. The second post will focus on performance. The last will cover security and cost savings.
In this POC we are going to build a minimalistic REST API with Cassandra as our backend storage. Here is what we will use:
- Instaclustr managed service free trial (14 day free trial on t2.small nodes)
- AWS Lambda free tier (1 million requests per month, 400,000 GB-seconds)
- AWS API Gateway free tier (1 million API calls per month for new customers)
Running this tutorial should incur next to no cost. Obviously, you are responsible for maintaining your usage within the free tier AWS allowance, and Instaclustr free trial. Running this tutorial assumes you have some general AWS knowledge, though you don’t need to have experience with AWS Lambda or AWS API Gateway.
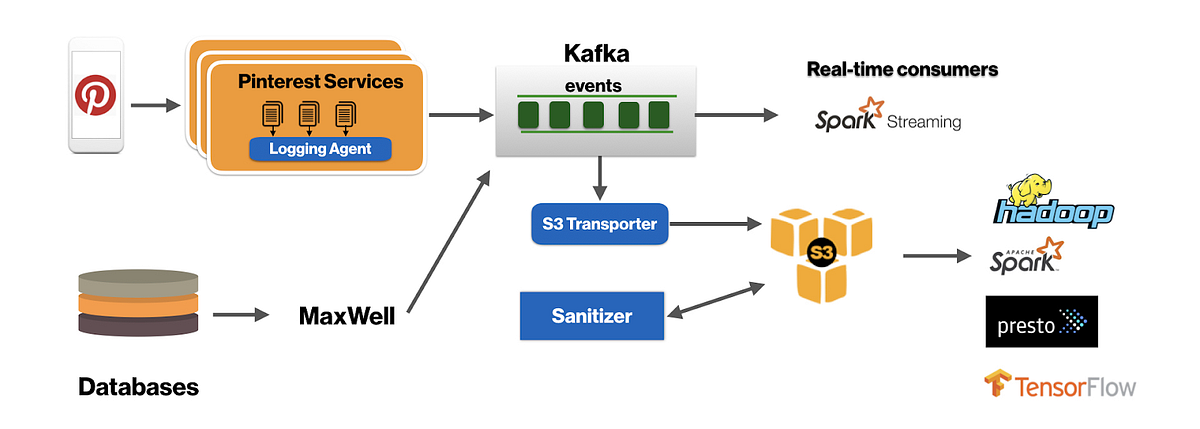
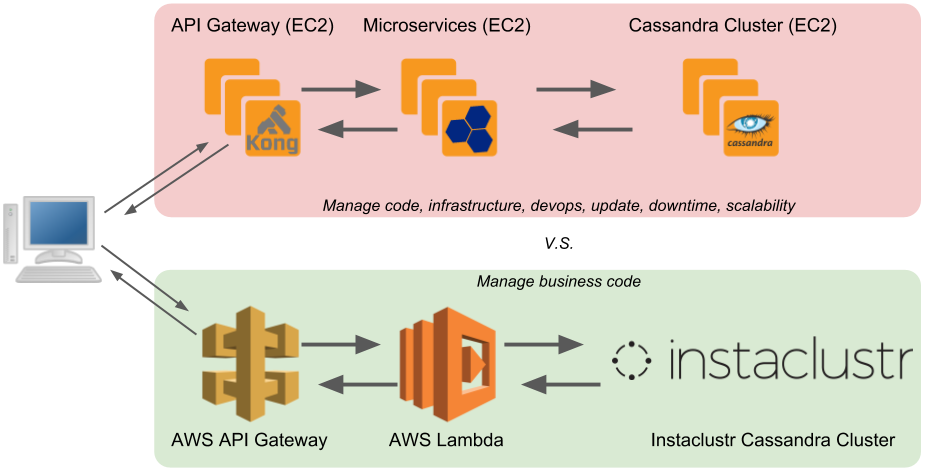
The architecture is quite simple:

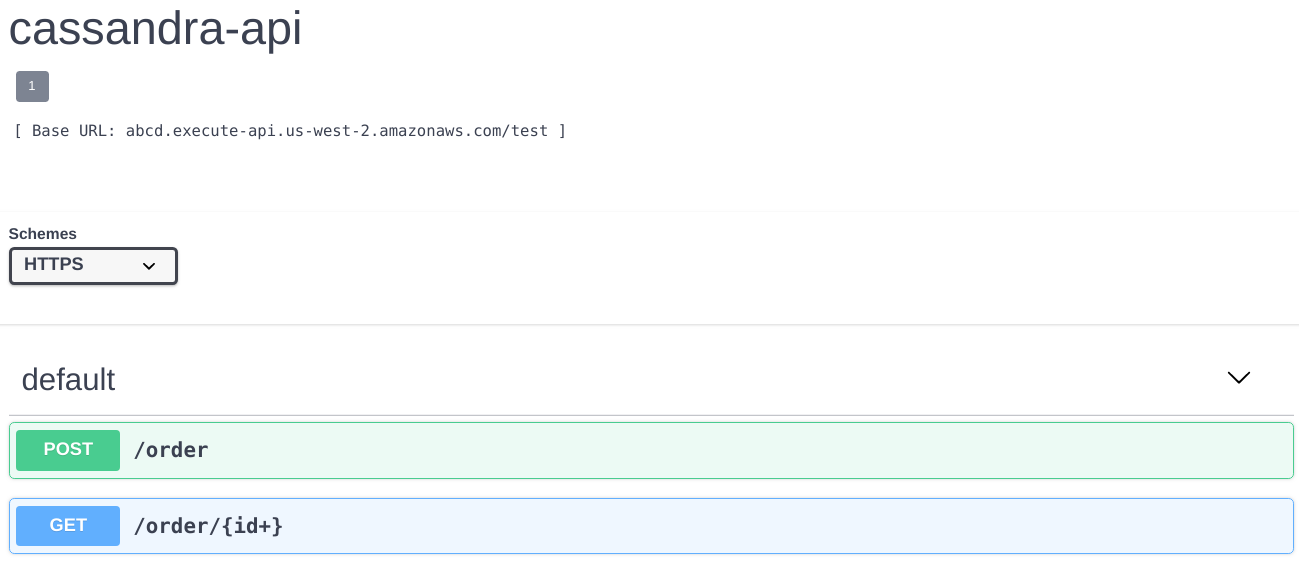
The REST API will be minimalistic: We are going to create a service to create and retrieve orders. Here is an example using Swagger:
Step1: Create a Cassandra Cluster on AWS.
This is extremely easy using Instaclustr’s managed service. You can use the 14-day free trial to create a 3 node t2.small cluster. This type of cluster is perfect for basic functional testing. Let’s break down this process:
Step 1.a. Create an Instaclustr Account:
Once you create your account, you will be able to run a 14 day trial cluster for free.
Step 1.b Create a Cluster, with the Following Properties:
Name: aws-lambda-small
Applications: Apache Cassandra 3.11.2 (latest as of today)
- No add-ons
- Infrastructure provider: AWS
- Region: Choose something close to you. I’ll be using US West (Oregon)
- Custom Name: Let’s leave it to the default, i.e. AWS_VPC_US_WEST_2 for me as I am running in Oregon. If you are running in another region, take note as you will need to use the data center name later in this tutorial
- Data Centre Network: Let’s leave it to the default, i.e. 10.224.0.0/16
- Node Size: You will need to choose the Starter node (t2.small)
- EBS Encryption: not required
- Replication Factor: Let’s choose the most common replication factor when using Cassandra: 3
- Nodes: 3
- Network: We are going to tick the box to use private IP for node broadcast. The client will need to connect to Cassandra using the private IP.
- Security: You can let Instaclustr add your local IP address to the firewall, thought that’s not required.
- Password auth: For simplicity, we are going to disable password authentication and user authorization. As your client can only connect to the cluster via private IP, this is not a huge risk for a Proof of Concept. Don’t do that in production.
- Client – Node encryption this is not supported for nodes that are this small
And that’s it! Click on Create Cluster, and you will have it running within 5 minutes.
Step 2: Configure the AWS VPC Infrastructure.
This configuration step is to enable communication between the AWS Lambda you will create, and the Cassandra cluster you just created. It may seem like a boring ‘plumbing’ step, but pay close attention as you will not get traffic to flow correctly if you miss a step.
Step 2.a Create an AWS Account.
If you don’t have one, create an AWS account. You will need to provide a credit card.
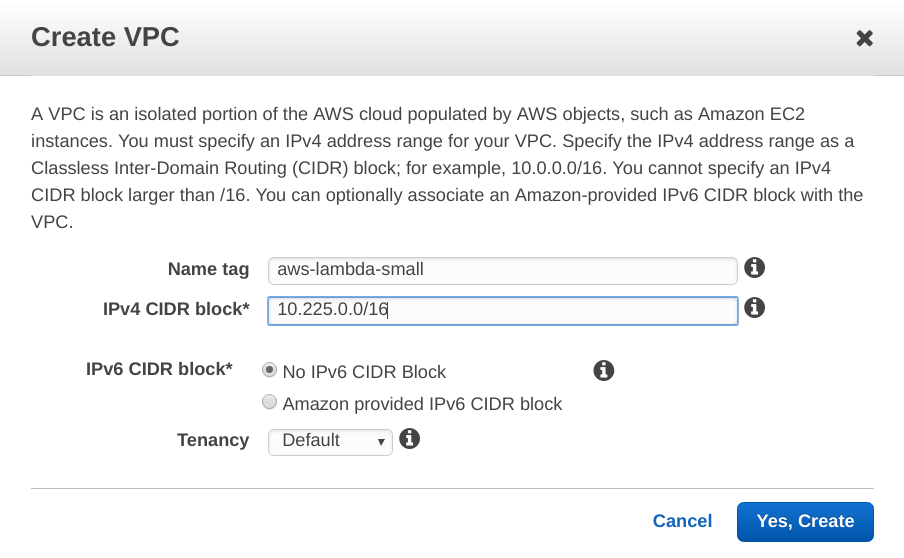
Step 2.b Create a VPC in your AWS Account
Use the same region you chose for your Cassandra cluster. Importantly, choose a CIDR block that does not overlap with the CIDR block you choose for your Cassandra cluster. For example, 10.225.0.0/16
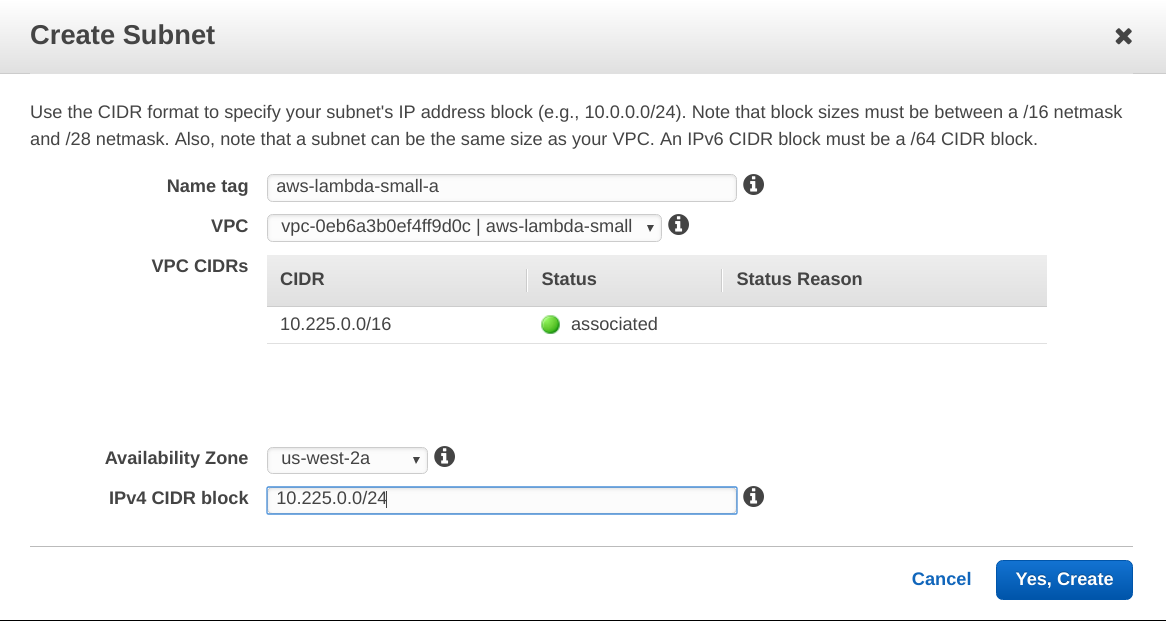
Step 2.c. Create a subnet per availability zone.
You will want to do that to achieve High Availability with your AWS Lambda. In my case, I use the subnet CIDR block as follow: 10.225.0.0/24 for us-west-2a; 10.225.1.0/24 for us-west-2b; and 10.225.2.0/24 for us-west-2c.
Step 2.d. Request VPC Peering between your Cassandra Cluster and your New VPC.
The request needs to be initiated from the Instaclustr console. Look for the Settings section of your cluster at the bottom. You will need to provide your AWS account number, the id of your aws-lambda-small VPC, and it’s corresponding CIDR (in my case, 10.225.0.0/16). You should choose the option to have your VPC network added to the cluster firewall. Once you submit the VPC peering request, you need to accept it on your AWS account, and you need to update your VPC route table to route the traffic to Cassandra. In my case, the traffic to 10.224.0.0/16 needs to be routed to the new VPC peering connection.
You can see the full details in this support article.
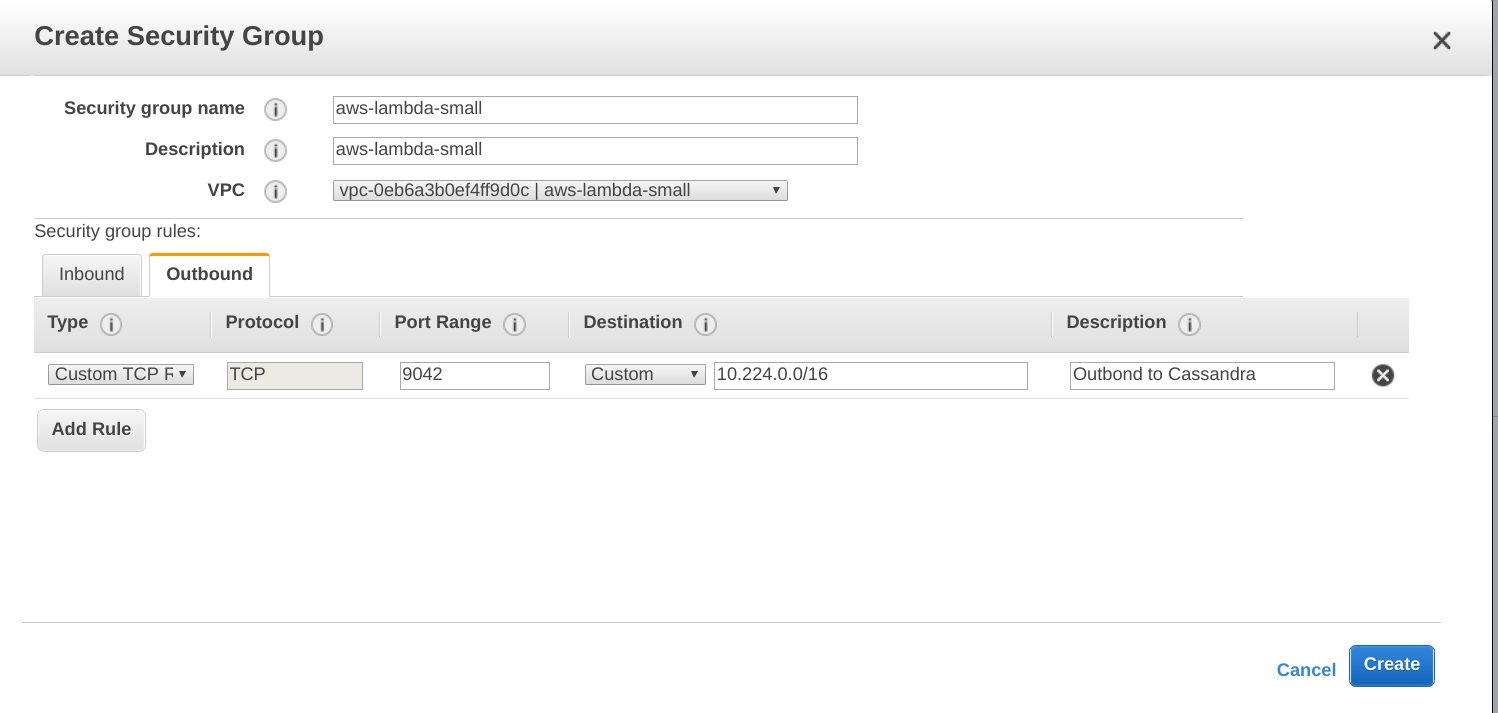
Step 2.e. Create a Security Group.
You need to create a security group for you AWS Lambda as the Lambda containers will be executed in the VPC. At a minimum, a lot of outbound traffic to TCP port 9042 (Cassandra port) towards your Cassandra cluster, in my case 10.224.0.0/16
Step 3: Create your AWS Lambda.
AWS Lambda are small portions of code that can be executed on demand on AWS, without the need for the user to provision an instance. Behind the scenes, Lambda are executed as containers. The very first time the Lambda is executed, AWS will instantiate the container and run the code. Once the Lambda application exits, AWS will freeze the container and keep it around ready to execute new Lambda requests. If it remains unused, the Lambda container is destroyed.
To achieve the best performance, code executed on Lambda can be split into initialization and execution. For working with Cassandra, we will create the cluster connection (which can take a few seconds), and create the prepared statement in the initialization phase, so that only the first execution will incur the initialization overhead, and subsequent execution will be much faster. For the purpose of this POC, I will create two Lambda that executes Python code. The first Lambda is responsible for creating the Cassandra data model schema and will be called only once. The second Lambda will receive the PUT and GET requests from the API gateway and will execute the write and read code.
Step 3.a. Navigate to the AWS Lambda page, and Click to Create a Function
Name: cassandra-schema-init
Runtime: Python 2.7
Role: Create new role from template(s)
- Role name aws-lambda-small
- Policy templates: According to the documentation, you should be using “VPCAccess” that will allow the Lambda to create the NetworkInterface to run in the VPC. However, VPCAccess is not in the list of templates as of now. So just leave empty and we will fix that in a few steps.
Step 3.b. Create and Upload the Python Code for cassandra-schema-init
You will see that the AWS console lets you edit code directly. However, as we need to add some dependencies (cassandra-driver), we will need to edit the code from our computer and package the code with the dependencies. Change the “Code entry type” to “Upload a .ZIP file.” On your computer, create a directory, such as aws-lambda-schema, and start by downloading the dependencies.
If you are using Linux you can use the Python package manager ‘pip’ to install everything. To get the cassandra-driver, run this command: pip install cassandra-driver -t .pip install twisted -tcassandra-driver and twisted will take a few minutes. Good time for a coffee break.
The Python code to create the schema is simple. Save the following into the file cassandra_lambda.py:
Your aws-lambda-schema directory should now contain cassandra_lambda.py, and all the dependencies downloaded by pip. The next step is to zip the contents of the directory and upload it to the AWS console. Importantly, do not zip the directory. You need to zip the contents of the directory in one file. AWS is sensitive about that.
Step 3.c. Configure AWS Lambda Settings from the AWS Console
Function code: If you named your file cassandra_lambda.py, then make sure to update the Handler with cassandra_lambda.lambda_handler
The environment variables. In my case given the Cassandra IP addresses and the name of the data center:
- endpoint 10.224.17.181,10.224.97.78,10.224.188.162
- local_dc AWS_VPC_US_WEST_2
Those are used in the code.
Basic settings: You will want to increase the timeout since initializing the Cassandra connection and updating the schema can take a few seconds. Ten seconds should be enough.
Network section: you need to set your Lambda to execute in your aws-lambda-small VPC. Select the security group and three subnets you created earlier.
Execution Role: You will need to create a new role using a template. The one that was created earlier did not automatically have permissions to create network interfaces. Now that you have chosen the VPC in the Network section, AWS will be able to automatically add the VPC Access policy to the role. Let’s call the role aws-lambda-small-vpc. No need to choose a template from the Policy.
click on Save at the top right.
Step 3.d. Test the Lambda cassandra-schema-init
Just click on “Test” at the top right. You will be prompted to configure a test event. This Lambda does not respond to events as it is used only for initializing the Cassandra schema. You can use the default Hello World event.
If everything works well, you should see some success logs on the AWS Lambda console and your schema will be created. Now let’s create the Lambda that will handle the POST and GET calls for your API. In this example, we will create a single Lambda to handle both POST and GET. In practice, you will need to consider the pros and cons of having multiple Lambdas for multiple methods.
Step 3.e. Create a New Lambda: cassandra-api
Name: cassandra-api
Runtime: Python 2.7
Role: Choose an existing role
Existing role: service-role/aws-lambda-small-vpc which is the one you created earlier
Step 3.f. Configure the Lambda cassandra-api
Function code:
- Code entry type: Upload a ZIP file
- Handler:
cassandra_lambda.lambda_handler– That’s assuming you will name your python file cassandra_lambda.py
Environment variables:
- endpoint 10.224.18.118,10.224.75.58,10.224.133.133
- local_dc AWS_VPC_US_WEST_2
Basic settings: set the timeout to 10 sec.
Network: use VPC, and choose the existing subnets/securitygroups.
Click on Save at the top right of the screen.
Step 3.g. Create and Upload the Code for cassandra-api
Similar to what you did for cassandra-schema-init, you will need to create a directory, download the dependencies with pip, create and edit the file cassandra_lambda.py, zip the contents (remember, don’t zip the parent directory) and finally upload that to AWS.
Use the following code:
| 1 2 3 4 5 6 7 8 9 10 11 12 13 14 15 16 17 18 19 20 21 22 23 24 25 26 27 28 29 30 31 32 33 34 35 36 37 38 39 40 41 42 43 44 45 46 47 48 49 50 51 52 53 54 55 56 57 58 59 60 61 62 63 64 65 66 67 68 69 70 71 72 73 74 75 76 77 78 79 |
import time import uuid import json import os import boto3 from base64 import b64decode from cassandra.cluster import Cluster from cassandra.auth import PlainTextAuthProvider from cassandra.policies import DCAwareRoundRobinPolicy from cassandra.io.twistedreactor import TwistedConnection from cassandra import ConsistencyLevel # Keep track of container id, for perf testing. container_id=uuid.uuid4() # Get Cassandra endpoint from aws Lambda env variables ENDPOINT = os.environ['endpoint'] LOCAL_DC = os.environ['local_dc'] # the cassandra session, and prepared statement will cassandra_session = None cassandra_insert = None cassandra_lookup = None # the code to handle POST calls. # In practice, you will want to use your favorite API framework, i.e. Flask def post(event): myjson = json.loads(event['body']) order_id=uuid.uuid4() name = myjson['name'] address = myjson['address'] phone = myjson['phone'] item = myjson['item'] cassandra_session.execute(cassandra_insert, [order_id, name, address, phone, item]) return { 'isBase64Encoded': False, 'statusCode': 200, 'body': json.dumps({"order_id": str(order_id)}), 'headers': {} } # the code to handle GET calls # In practice, you will want to use your favorite API framework, i.e. Flask def get(event): order_id = event['pathParameters']['id'] rows = cassandra_session.execute(cassandra_lookup, [uuid.UUID(order_id)]) if not rows: return { 'isBase64Encoded': False, 'statusCode': 404, 'body': {}, 'headers': {} } return { 'isBase64Encoded': False, 'statusCode': 200, 'body': json.dumps({"order_id": order_id, "name": rows[0].name, "address": rows[0].address, "phone": rows[0].phone, "item": rows[0].item}), 'headers': {} } method_map = {'GET': get, 'POST': post} def Lambda_handler(event, context): global container_id, cassandra_session, cassandra_insert, cassandra_lookup print('Running container', container_id) if not cassandra_session: cluster = Cluster(ENDPOINT.split(","),connection_class=TwistedConnection, load_balancing_policy=DCAwareRoundRobinPolicy(local_dc=LOCAL_DC)) cassandra_session = cluster.connect() cassandra_session.default_consistency_level = ConsistencyLevel.QUORUM cassandra_insert = cassandra_session.prepare("INSERT INTO ks.tb (order_id, name, address, phone, item) VALUES (?, ?, ?, ?, ?)") cassandra_lookup = cassandra_session.prepare("SELECT name, address, phone, item FROM ks.tb WHERE order_id = ?") method = event['httpMethod'] return method_map[method](event) |
You might want to use the AWS command line interface (aws-cli) at this stage. Assuming you have configured your AWS profile(s), this could look like:
By the way, as you may have noticed, you will have to zip the python files and the dependencies quite often. To accelerate this, have a look at the -u option of the zip command (Linux / OSX): it will only update the archive with the changed file (which should only be your python file), making the process much faster.
Step 3.h Test your cassandra-api
If you look at the code of cassandra-api, you will see that the GET and PUT methods expect some json extracted from the body of an HTTP request. We are going to set up two tests: one for GET, and one for POST.
Click on Test (top right)
Configure your test event:
- Event name: post
- Content of the event: use the following.
| 1 2 3 4 5 6 7 8 9 10 11 12 13 14 15 16 17 18 19 20 21 22 23 24 25 26 27 28 29 30 31 32 33 34 35 36 |
{ "resource": "/order", "path": "/order", "httpMethod": "POST", "headers": null, "queryStringParameters": null, "pathParameters": null, "stageVariables": null, "requestContext": { "path": "/order", "accountId": "597284863061", "resourceId": "rmbyew", "stage": "test-invoke-stage", "requestId": "dca8be26-7816-11e8-a831-6dbe534d0ae4", "identity": { "cognitoIdentityPoolId": null, "cognitoIdentityId": null, "apiKey": "test-invoke-api-key", "cognitoAuthenticationType": null, "userArn": "arn:aws:iam::597284863061:user/christophe-workshop", "apiKeyId": "test-invoke-api-key-id", "userAgent": "aws-internal/3", "accountId": "597284863061", "caller": "AIDAJBAW4OXNUFHSWCLF4", "sourceIp": "test-invoke-source-ip", "accessKey": "ASIAIS5LPR47MN7RRAVA", "cognitoAuthenticationProvider": null, "user": "AIDAJBAW4OXNUFHSWCLF4" }, "resourcePath": "/order", "httpMethod": "POST", "extendedRequestId": "JA-z9HWIjoEFqdA=", "apiId": "f6ugtbwyjg" }, "body": "{\n \"name\" :\"joe\",\n \"address\" : \"Sydney\",\n \"phone\": \"0123456789\",\n \"item\": \"pizza\"}" } |
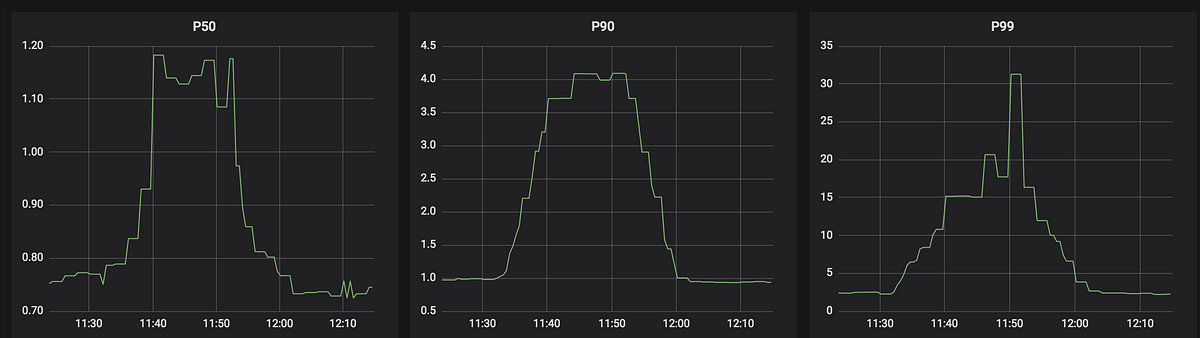
Now test your POST a few times. Keep track of one value for order_id uuid as you will need it in a moment. Did you notice the first invocation took longer (maybe a few seconds), while other invocations took a few milliseconds? That’s because at the first invocation, there is some overhead:
- AWS creates one container to run the Lambda
- AWS create a network interface in the VPC, and attaches it to the Lambda
- The Lambda initializes the Cassandra connection.
AWS will keep around your container for some indeterminate amount of time. Most user reports that the container will stay around for a few hours after the last invocation. That’s something to keep in mind. Importantly, in our test, we are doing serial invocations of our Lambda. If running in parallel, multiple containers will be created by AWS (Lambda auto scale), and the initialization cost will be paid a few times. We will see in our next blog how to optimize this.
Let’s try our GET method. For that, create a new Test (Configure test events). Let’s call it “get”, and let’s use the following event:
| 1 2 3 4 5 6 7 8 9 10 11 12 13 14 15 16 17 18 19 20 21 22 23 24 25 26 27 28 29 30 31 32 33 34 35 36 37 38 39 |
{ "resource": "/order/{id+}", "path": "/order/INSERT_YOUR_UUID", "httpMethod": "GET", "headers": null, "queryStringParameters": null, "pathParameters": { "id": "INSERT_YOUR_UUID" }, "stageVariables": null, "requestContext": { "path": "/order/{id+}", "accountId": "597284863061", "resourceId": "wm947q", "stage": "test-invoke-stage", "requestId": "f88fdaa2-781a-11e8-8075-79171804d71a", "identity": { "cognitoIdentityPoolId": null, "cognitoIdentityId": null, "apiKey": "test-invoke-api-key", "cognitoAuthenticationType": null, "userArn": "arn:aws:iam::597284863061:user/christophe-workshop", "apiKeyId": "test-invoke-api-key-id", "userAgent": "aws-internal/3", "accountId": "597284863061", "caller": "AIDAJBAW4OXNUFHSWCLF4", "sourceIp": "test-invoke-source-ip", "accessKey": "ASIAIS5LPR47MN7RRAVA", "cognitoAuthenticationProvider": null, "user": "AIDAJBAW4OXNUFHSWCLF4" }, "resourcePath": "/order/{id+}", "httpMethod": "GET", "extendedRequestId": "JBDHtGUFjoEFfEg=", "apiId": "f6ugtbwyjg" }, "body": null, "isBase64Encoded": false } |
You will need to update (in two places) the code above to replace INSERT_YOUR_UUID with a uuid of an order you posted earlier. Using this you can test your GET command.
You now have a one time use Lambda for creating the schema and you have Lambdas that handle POST and GET requests. For now, you can only trigger a test manually. The next step is to hook this up with the API gateway so that requests can be triggered programmatically from the internet.
Step 4: Create the AWS API gateway.
Step 4.a Create an empty API.
Navigate to the AWS API Gateway console, and create a New API.
Name: cassandra-api
Endpoint Type: Regional
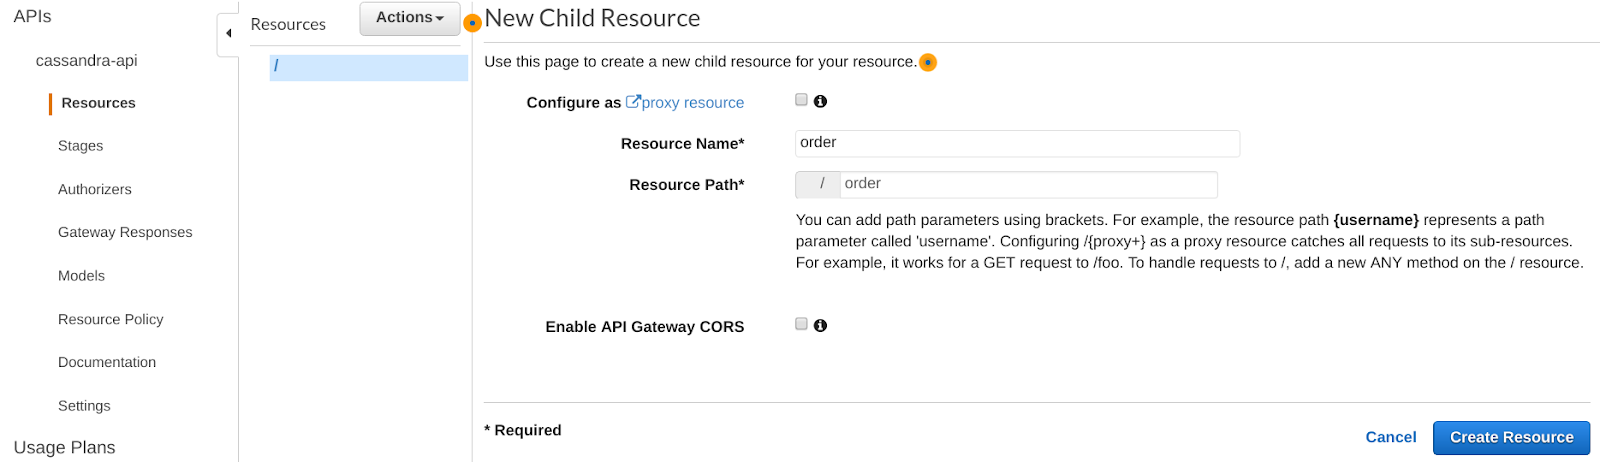
Step 4.b. Create a new order resource.
Click on Actions drop-down menu and create a new order Resource:
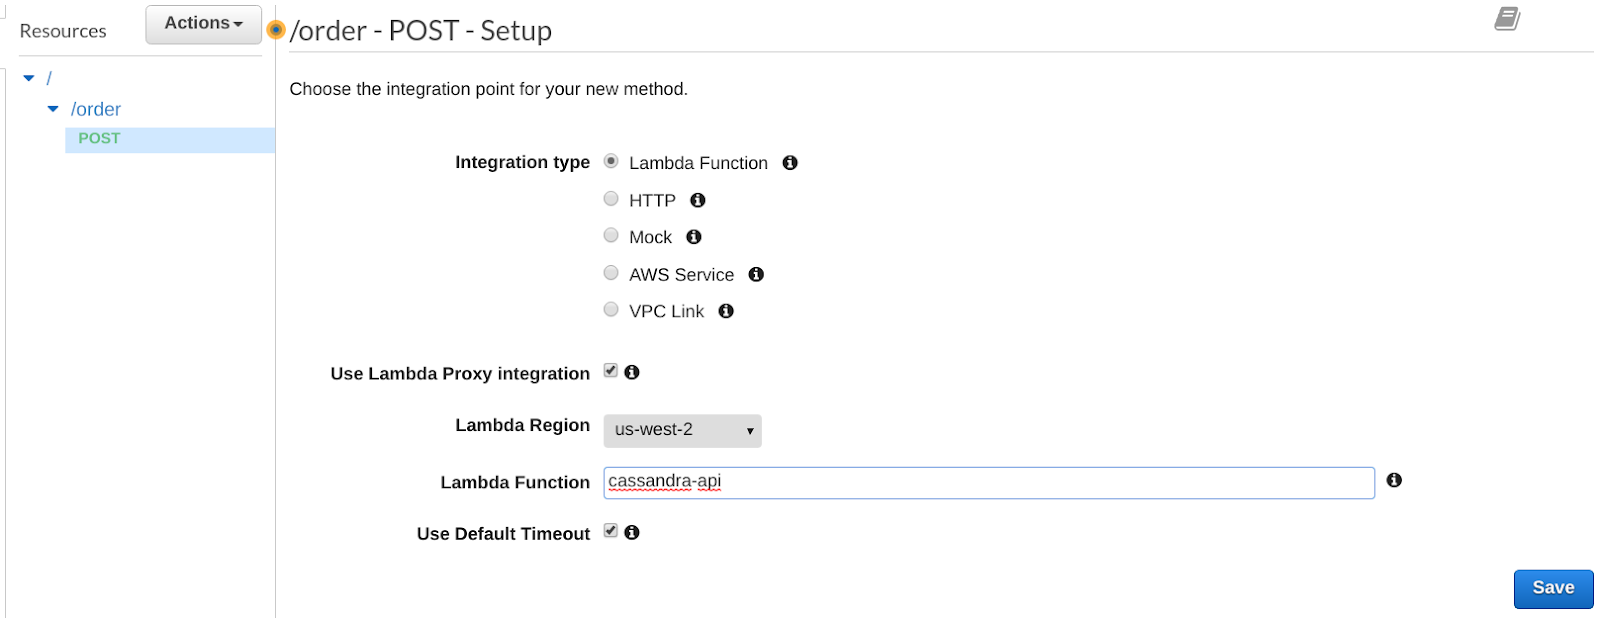
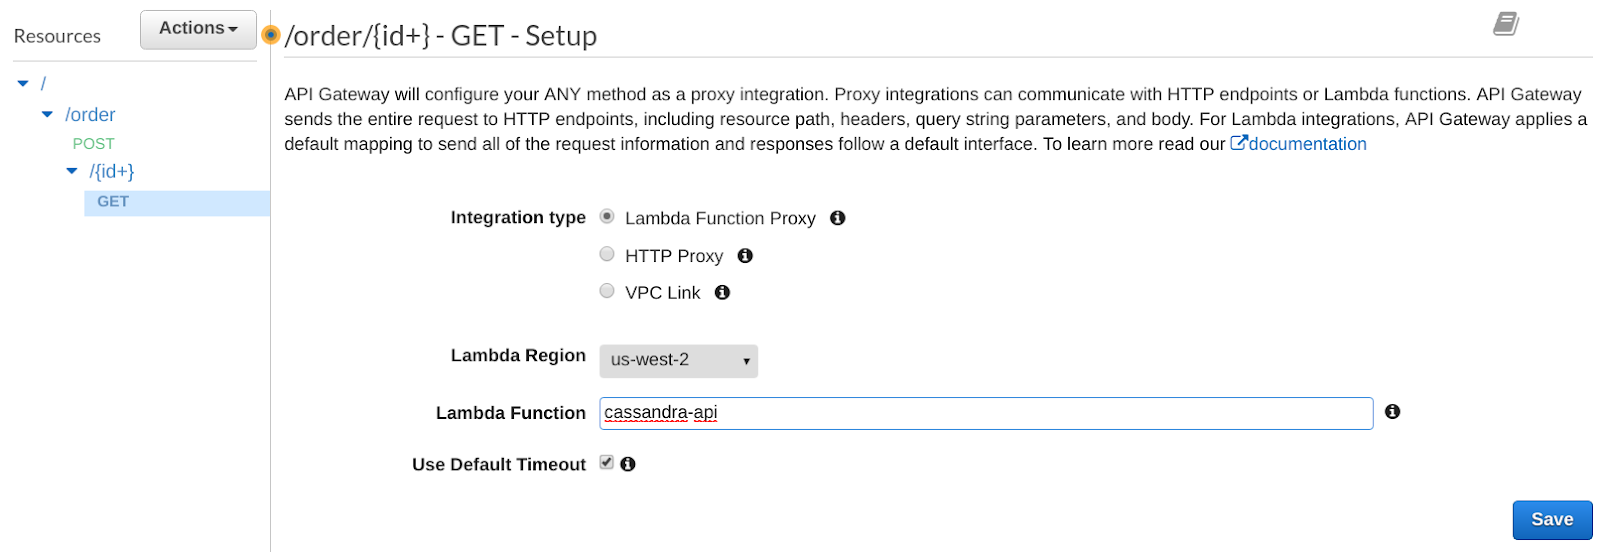
Step 4.c. Create a POST method
Make sure the /order resource is selected, then click on the drop down menu Actions and create a new POST method, configured as follow:
Let’s test your POST method. Make sure to select the POST method, then click on TEST. All you need to do is to add a Request Body string, such as:
If everything works well, you should get an order_id back. Copy the order_id as you will use it soon.
Step 4.d. Create a greedy resource
Make sure /order resource is select, click on Actions and create a new resource configured as follow:
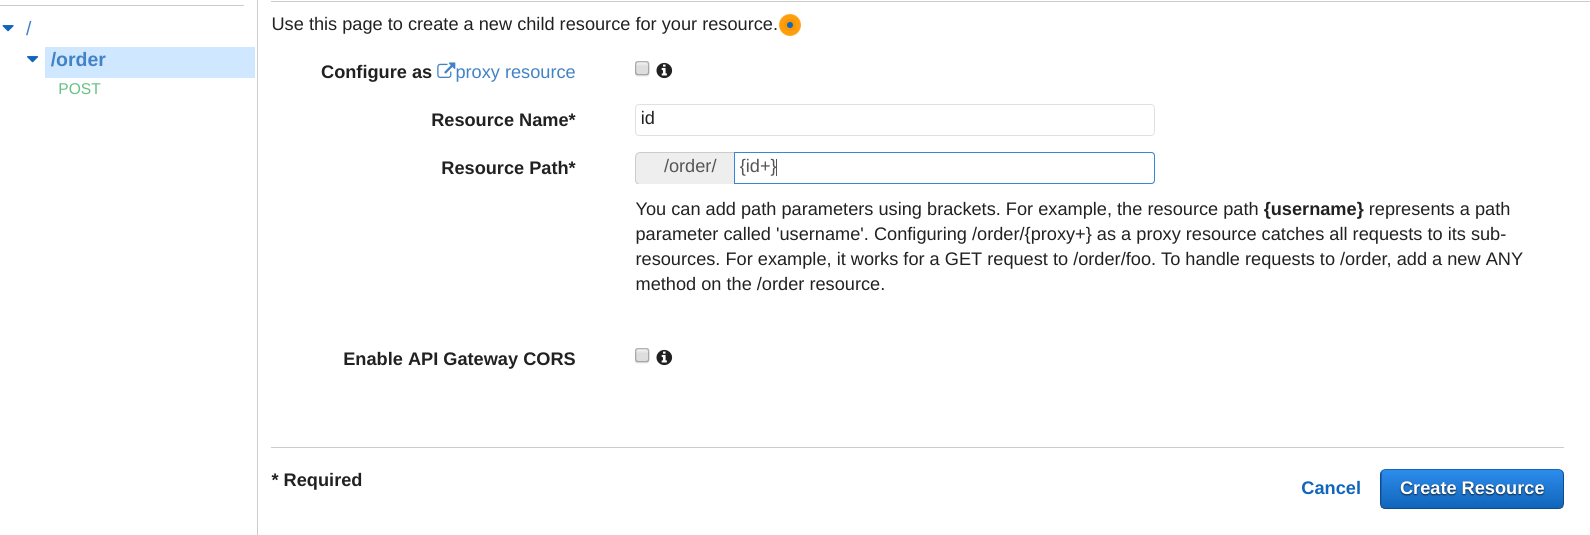
You will see that it automatically created the ANY method. You can delete it, and create a GET method:
Let’s test our GET method. Make sure to select the GET method, then click on TEST. This time you will provide the order_id uuid (from Step 4.c.) in the PATH {id} box. If everything works well, you should get back the order.
Step 4.e. Deploy your API.
Click on the Actions drop down menu, and deploy API. Give it a Deployment stage name, let’s use “test”
The first thing you will want to do is to throttle your API to a low number, i.e. 1 per seconds, just to make sure your API won’t be called a large number of times, as the cost will apply beyond the free tier.
Step 4.f Create an API Key (optional)
If you want to control the access to your API, you might consider creating an API Key as follow.
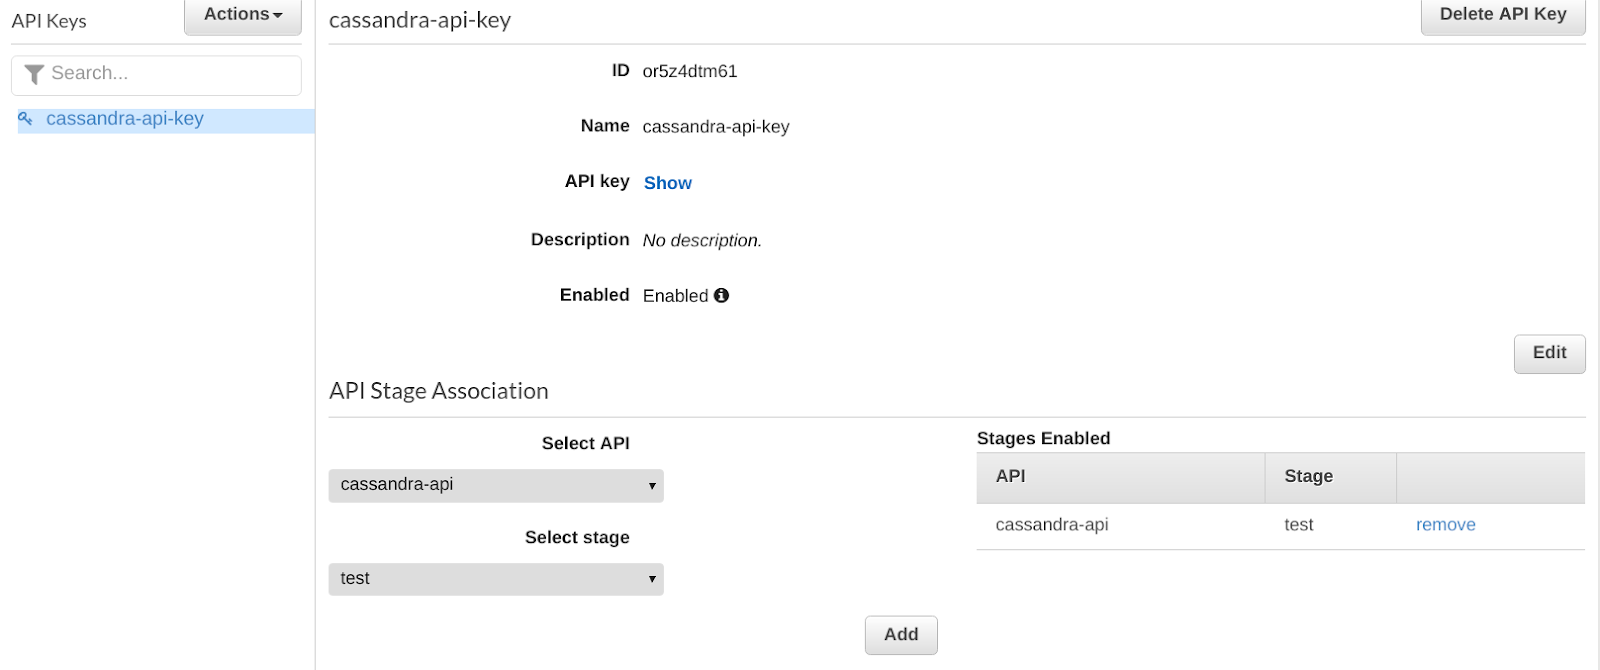
Click on Show to revel the key, and keep it for later usage.
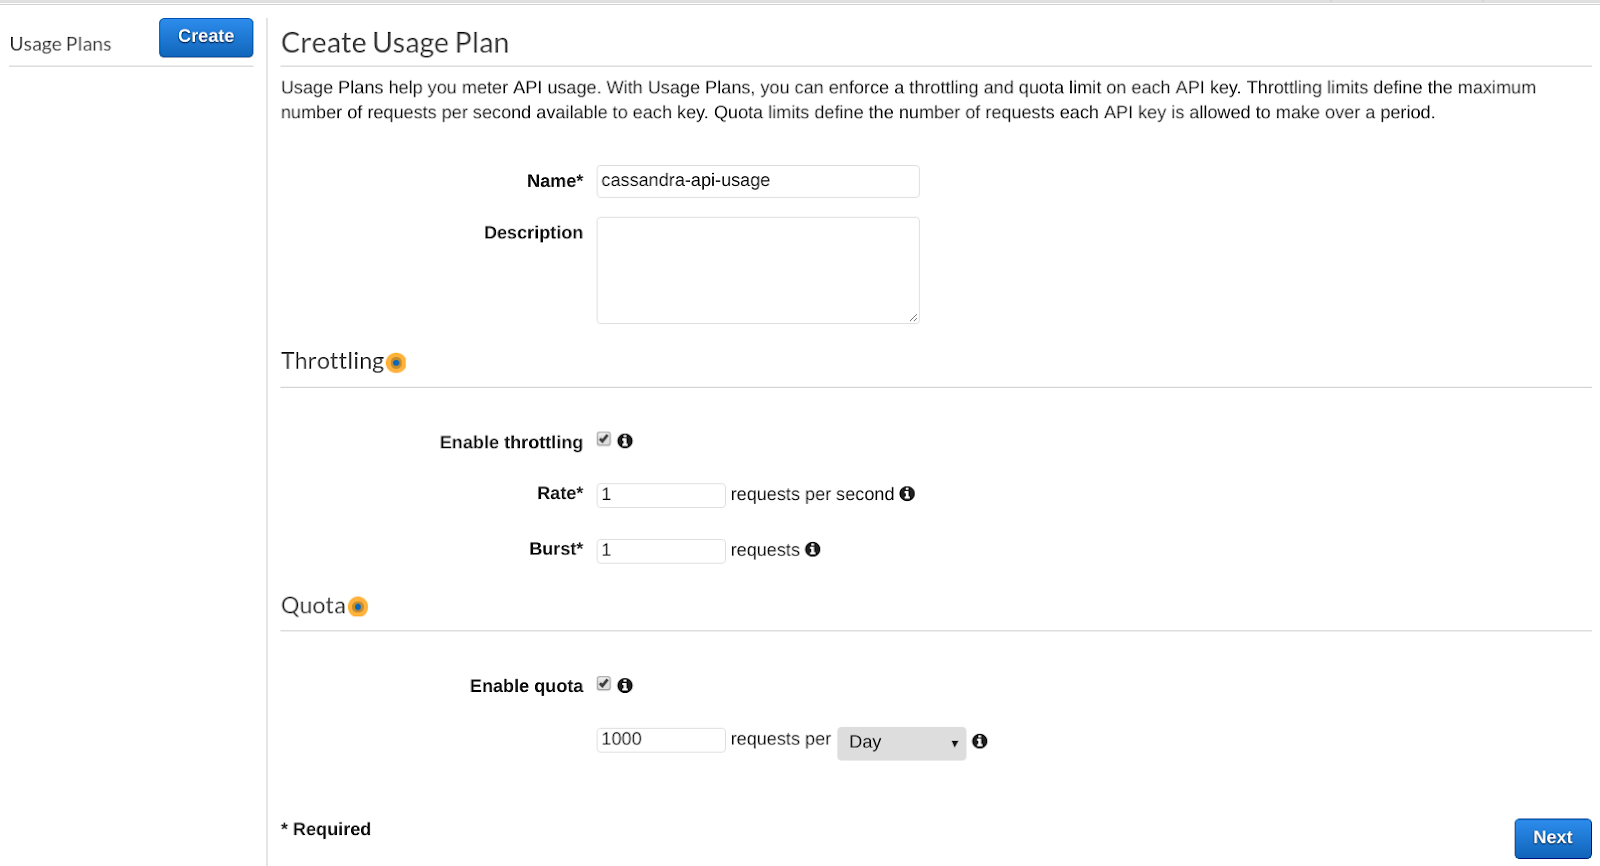
Step 4.g Create a usage plan for your API key (optional)
Usage plan lets you control how an API key can be used. Click on Usage Plans. You might need to click on Enable Usage Plans first. The AWS page is a little bit buggy here, and you might need to reload the page a few time with your browser.
Once you have access to the create button, create your Usage Plan, and associate it with the cassandra-api API, with the test Stage. Then associate the Usage Plan with the API key you created.
Step 4.h Add Authentication to your GET and POST Method (optional)
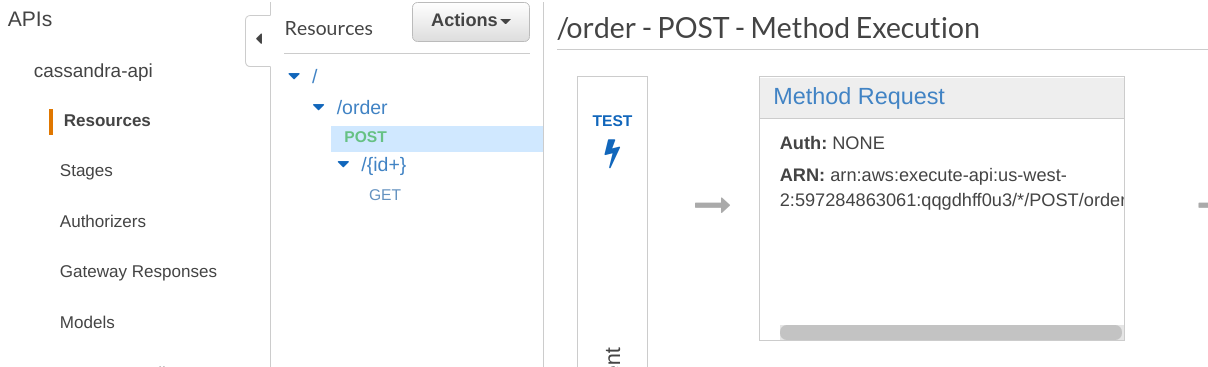
You will need to navigate to the POST resource, and click on the Method Request

Then, set the API Key Required to True. Repeat for the GET method. Don’t forget to redeploy your API (use the same stages: test).
Step 4.i Test your API from your Computer.
First, retrieve your API endpoint by navigating to the Stages section of your API and clicking on the POST method. This will provide you with the Invoke URL.
Second, make sure you have your API Keys.
You can now do a post from a curl / postman etc… Below is an example with curl, in which I am providing an AWS API KEY. If you didn’t configure the API Key, you don’t need to provide it.
Assuming the id of the new resource is: fb72a94f-c0d9-4bd5-a355-fc8014d125fd, you can retrieve your resource with the following curl command:
We built a simple scalable REST API using AWS API Gateway to receive API calls, AWS Lambda to execute code, and Cassandra as our backend storage. This POC can be built at next to no cost as Instaclustr provides 14 day free trial on the small developer cluster, and using AWS gateway / AWS Lambda for this POC should remain within the free tier usage (you might still have some small cost, i.e. a few dollars, for data transfer, or for using cloudwatch). This POC demonstrates the simplicity of using a serverless approach where the code is executed by AWS Lambda without managing any ec2 instances. Furthermore the data is stored in a fully managed, scalable, highly available and low latency database – Cassandra.
The next step would be to consider performance, which will be the focus of our next blog post.