In last post of this series we learnt how to install cassandra on Rhel 6. In this post we will look into additional configuration parameter that is needed to configure in order to facilitate other nodes to join the cassandra cluster.
If you have missed earlier posts of this series then you can read them from below links:
2: Understanding Cassandra Read/Write Mechanism
3: Installing Cassandra on RHEL6
At the moment we have one node cassandra cluster. Before going ahead and installing cassandra on other nodes, we will first perform following configuration changes in cassandra.yaml file.
Navigate to cassandra.yaml file which is located in cassandra_install_dir/conf folder. Open the file in editor of your choice and look for following options:
- Listen_address: Address where gossip will be listening to. This address can’t be localhost or 0.0.0.0, because the rest of nodes will try to connect to this address.
- RPC_address: This is the address where thrift will be listening. We must put a existing IP address (it may be localhost, if we want to), or 0.0.0.0 if we want to listen through all of them. This is the address to which client applications interact with cassandra DB.
- Seeds: Seed nodes are the nodes which will provide cluster info to the new nodes which are bootstrapped and are ready to join the cluster. Seed nodes become a reference for any new nodes to join cluster in trustable way.
This settings we need to configure in cassandra.yaml file on each node which we want to put into the cluster.
Note: Be sure to install the same version of Cassandra as is installed on the other nodes in the cluster.
Procedure to add new nodes in cassandra cluster:
1: Install Cassandra on the new nodes, but do not start Cassandra.
2: Set the following properties in the cassandra.yaml and, depending on the snitch, the cassandra-topology.properties or cassandra-rackdc.properties configuration files:
- auto_bootstrap – This property is not listed in the default cassandra.yaml configuration file, but it might have been added and set to false by other operations. If it is not defined in cassandra.yaml, Cassandra uses true as a default value. For this operation, search for this property in the cassandra.yaml file. If it is present, set it to true or delete it..
- cluster_name – The name of the cluster the new node is joining. Ensure that cluster name is same for all nodes which will be part of cluster.
- listen_address – Can usually be left blank. Otherwise, use IP address or hostname that other Cassandra nodes use to connect to the new node.
- endpoint_snitch – The snitch Cassandra uses for locating nodes and routing requests. In my lab I am using simple snitch which is present as default in cassandra.yaml file and so I did not change or edit this.
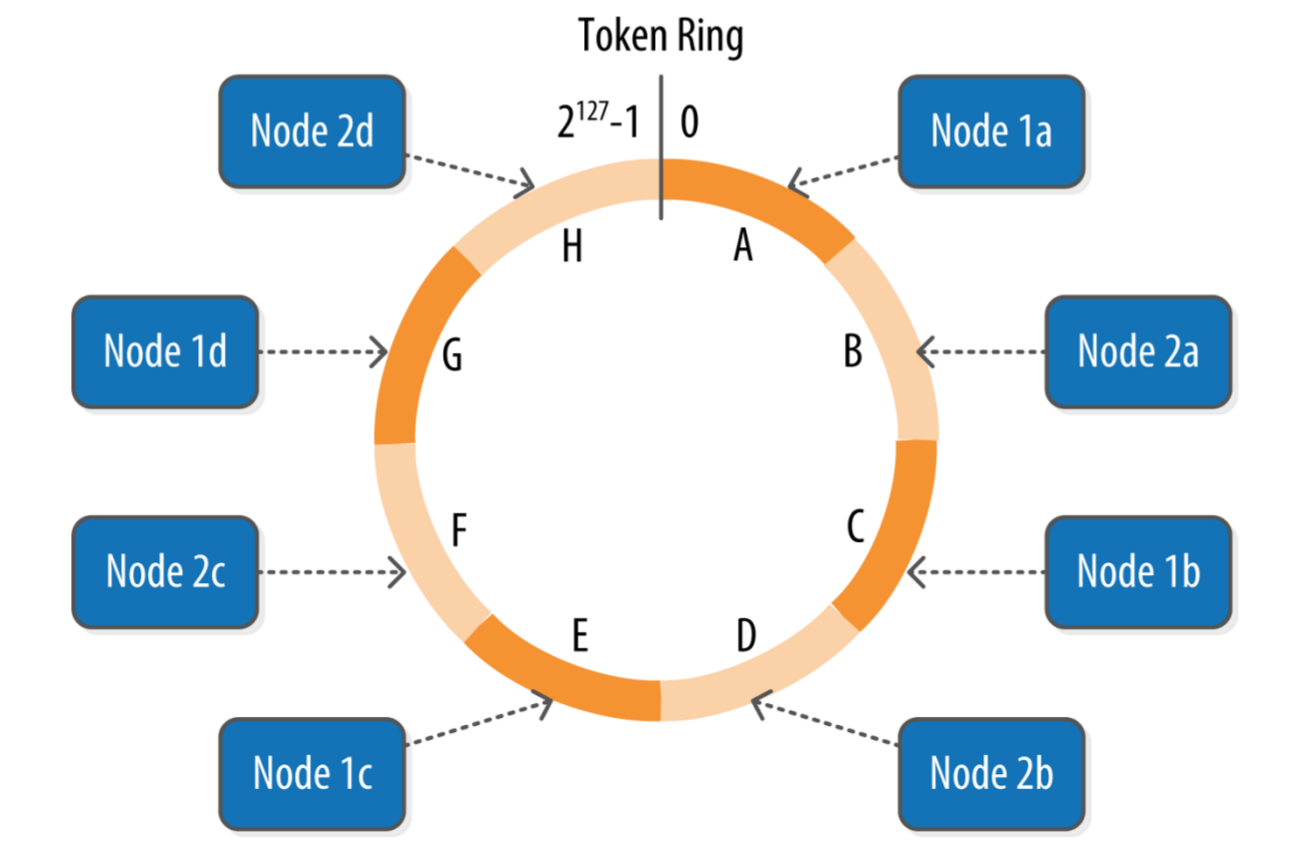
- num_tokens – The number of vnodes to assign to the node. If the hardware capabilities vary among the nodes in your cluster, you can assign a proportional number of vnodes to the larger machines.
- seeds – Determines which nodes the new node contacts to learn about the cluster and establish the gossip process. Make sure that the -seeds list includes the address of at least one node in the existing cluster.
Post installing cassandra on your second node and making the configuration change as stated above, go ahead and start cassandra service on second node and do a watch on nodetool status on cassandra node 1 and you will see the new node joining the cluster.
Nodetool Status Output
Every 2.0s: /opt/apache-cassandra/bin/nodetool status Sun Jan 8 23:31:44 2017
Datacenter: datacenter1
=======================
Status=Up/Down
|/ State=Normal/Leaving/Joining/Moving
— Address Load Tokens Owns (effective) Host ID Rack
UN 192.168.109.70 214.99 KiB 256 100.0% 14ba62c6-59e4-404b-a6a6-30c9503ef3a4 rack1
UN 192.168.109.71 103.47 KiB 256 100.0% 3b19bc83-f483-4a60-82e4-109c90c49a14 rack1
we have to repeat the same steps for each node which we want to place in our cluster.
I hope this post is informational to you. Feel free to share this on social media if it is worth sharing. Be sociable