I've been messing with Apache Spark quite a bit lately. If you aren't familiar, Spark is a general purpose engine for large scale data processing. Initially it comes across as simply a replacement for Hadoop, but that would be selling it short. Big time. In addition to bulk processing (goodbye MapReduce!), Spark includes:
- SQL engine
- Stream processing via Kafka, Flume, ZeroMQ
- Machine Learning
- Graph Processing
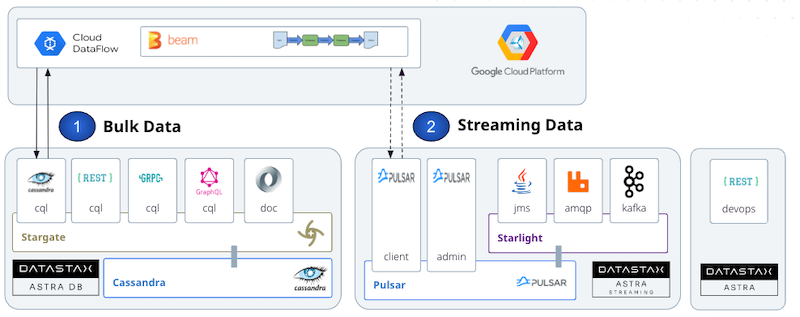
Sounds awesome, right? That's because it is, babaganoush. The next question is where do we store our data? Spark works with a number of projects, but my database of choice these days is Apache Cassandra. Easy scale out and always up. It's approximately this epic:

If you haven't used Apache Cassandra yet, that's ok. I've included some links at the end of the post to help you get started.
We're going to set up a really simple Spark job that does a data migration for Cassandra. We'll be copying 1 table to another, but changing the table structure. Currently Spark / Cassandra jobs require the open source connector from DataStax.
I'm going to be using IntelliJ, (community version is free) and hard coding a few things that'll make it easy to test Spark jobs from IntelliJ itself. In a future post I'll go over how to actually deploy spark into production.
For convenience / reference, I've pushed the working code as a standalone project up to github.
You'll need to have a Cassandra server up and running locally to execute the Spark job.
Let's suppose we have a system with a users table. In that table, we store a user's name, and their favorite food. We want to be able to create a table that maps food to users. For performance reasons, we want this in a single table. At a CQL prompt, create the tables and add sample data:
CREATE KEYSPACE tutorial WITH replication = {'class': 'SimpleStrategy', 'replication_factor': 1};
use tutorial;
CREATE TABLE tutorial.user (
name text primary key,
favorite_food text
);
create table tutorial.food_to_user_index ( food text, user text, primary key (food, user));
insert into user (name, favorite_food) values ('Jon', 'bacon');
insert into user (name, favorite_food) values ('Luke', 'steak');
insert into user (name, favorite_food) values ('Al', 'salmon');
insert into user (name, favorite_food) values ('Chris', 'chicken');
insert into user (name, favorite_food) values ('Rebecca', 'bacon');
insert into user (name, favorite_food) values ('Patrick', 'brains');
insert into user (name, favorite_food) values ('Duy Hai', 'brains');
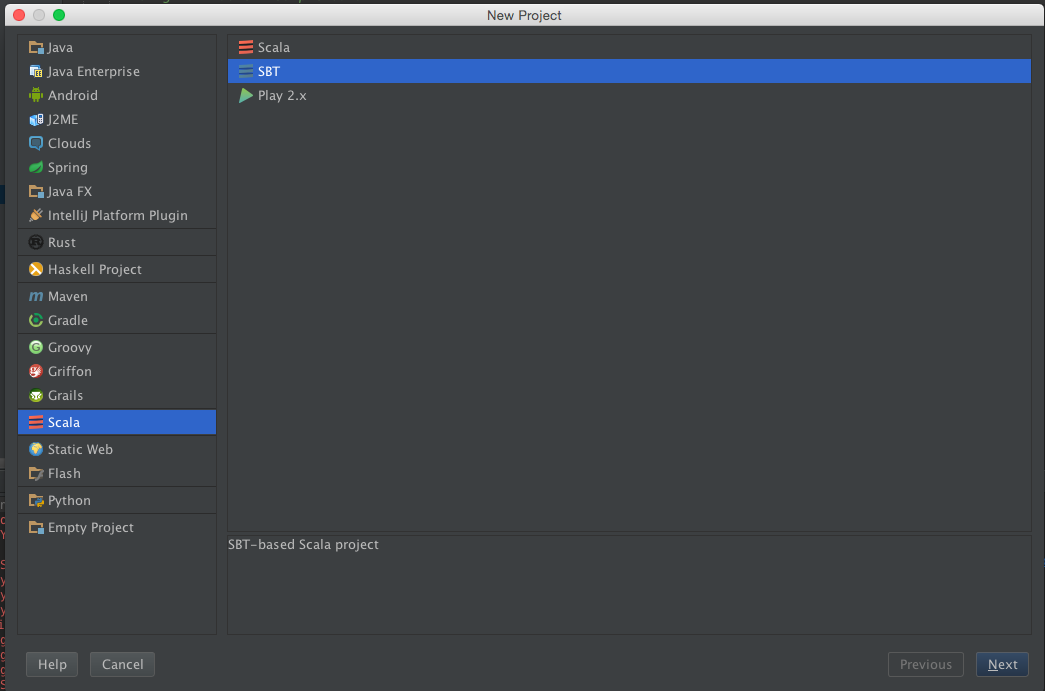
With your sample data all set up, go ahead and create your project. Choose Scala -> SBT.
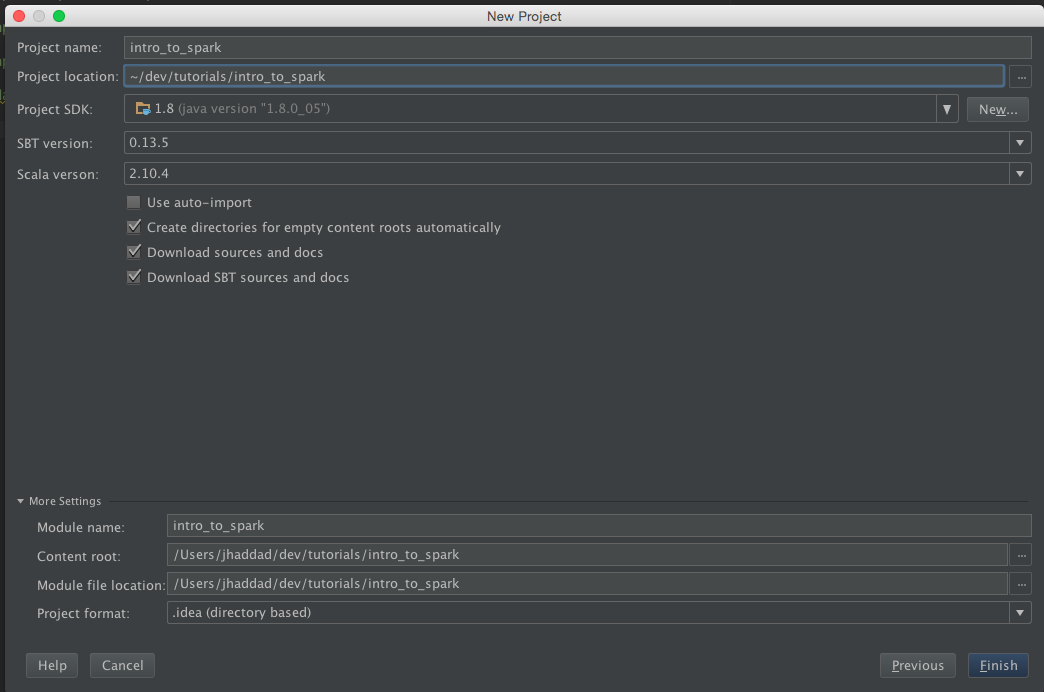
Make sure you pick Scala 2.10.4 as your Scala version.
We're going to need to edit our SBT file to include the Spark and Cassandra dependencies. Open up build.sbt and add the libraryDependencies of Spark and the Spark connector. It should look like the following:
name := "intro_to_spark"
version := "1.0"
scalaVersion := "2.10.4"
libraryDependencies += "org.apache.spark" %% "spark-core" % "1.2.0"
libraryDependencies += "com.datastax.spark" %% "spark-cassandra-connector" %  "1.1.0" withSources() withJavadoc()
Right click and create a new Scala file under src/main/scala, and pick Object. I called mine DataMigration. Go ahead and open it up for editing. For this example it'll contain all the code we need.
The first thing that we're going to do is to import the SparkContext and SparkConf. These classes are used to represent the Spark Cluster and set up configuration, respectively.
import org.apache.spark.{SparkContext,SparkConf}
To talk to Apache Cassandra, we need to import the connector. The connector adds functionality to the spark context - specifically the ability to create RDDs (Spark's term for a distributed dataset) from Cassandra tables.
import com.datastax.spark.connector._
Next we're going to create our object. An object in Scala is a singleton. It's very useful for Spark jobs. Our object has a main method:
object DataMigration {
  def main(args: Array[String]): Unit = {
Alright, time for some meat. We're going to set up the SparkConf (the configuration) now. We want to tell it where to find Cassandra.
val conf = new SparkConf(true)
  .set("spark.cassandra.connection.host", "127.0.0.1")
We create our Spark Context here by providing the Spark configuration. The first parameter, local, is hard coded here to make development easier. We're going to name the job "test" and provide the Spark Configuration we created earlier.
val sc = new SparkContext("local", "test", conf)
We need to define a case class to represent a Cassandra row. This comes in handy later.
case class FoodToUserIndex(food: String, user: String)
Next, we get a reference to our user table (cleverly named user_table) through the context. The .cassandraTable method takes a keyspace and a table name. We get back an RDD, which we can perform operations on, like mapping, and filtering.
val user_table = sc.cassandraTable("tutorial", "user")
This line's a little tricky. What we're doing is saying, hey, user_table! Let's perform an operation on every row you've got! The map takes a function; the function will be applied to every row in the table. Each row in the table will be "r" in the below example. For each row, we're going to create a new FoodToUserIndex case class. The parameters of the case class are the favorite_food and name from the user row. We're going to store this in the food_index immutable variable.
val food_index = user_table.map(r => new FoodToUserIndex(r.getString("favorite_food"), r.getString("name")))
Functional programming can be a bit tricky. Don't give up! Break it down to small pieces, and then put it all together.
Here's where the data gets written to the new table. We can take an RDD, and save it to Cassandra with... saveToCassandra(keyspace, table_name). That's actually the end of the code.
    food_index.saveToCassandra("tutorial", "food_to_user_index")
  }
}
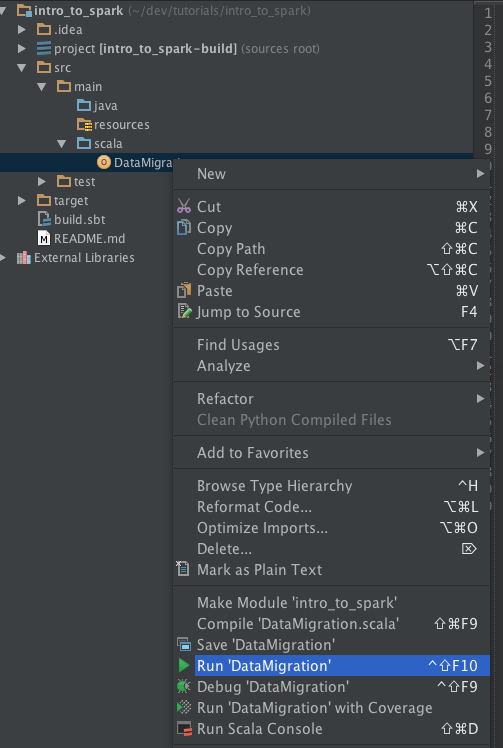
OK, time to run the Spark job. If you didn't create your tutorial keyspace, tables, and sample data already, you'll need to do it now or the job will fail miserably. To run the job right in IntelliJ, right click, and "run".
Assuming the job completes successfully, you should now be able to select data out of your table in Cassandra:
cqlsh:tutorial> select * from food_to_user_index ;
 food    | user
---------+---------
  salmon |      Al
   steak |    Luke
 chicken |   Chris
  brains | Duy Hai
  brains | Patrick
   bacon |     Jon
   bacon | Rebecca
(7 rows)
cqlsh:tutorial> select * from food_to_user_index where food = 'bacon';
 food  | user
-------+---------
 bacon |     Jon
 bacon | Rebecca
(2 rows)
Guess what? You just ran your first Spark job talking to Cassandra. The good news is, you can do a ton more than just simple map() calls. I'll be posting followups on using Spark streaming and machine learning in the near future.
The code in all it's glory can be found in my GitHub. Please pull and try it for yourself. If you don't want to use my IDE of choice, the build tools on the command line are perfectly fine. Simply do the following:
sbt compile
sbt run
Well, that about does it. I hope you've found this useful. If you're interested in further learning materials: