Data is critical to modern business and operational teams need to have a Disaster Recovery Plan (DRP) to deal with the risks of potential data loss. At TLP, we are regularly involved in the data recovery and restoration process and in this post we will share information we believe will be useful for those interested in initiating or improving their backup and restore strategy for Apache Cassandra. We will consider some common solutions, and detail the solution we consider the most efficient in AWS + EBS environments as it allows the best Recovery Time Objective (RTO) and is relatively easy to implement.
- Why Do We Need to Backup Cassandra Data?
- Backup and Restore Solutions
- Using Snapshots
- Using Native Incremental Backups
- Open-source Tools: TableSnap
- Commercial Solutions (Datastax Enterprise, datos.io)
- The Manual Copy/Paste Option
- The ‘Copy/Paste’ Approach on AWS EC2 with EBS Volumes
- Let’s compare!
Why Do We Need to Backup Cassandra Data?
Apache Cassandra data is replicated, it makes sense to take a moment to understand why backups still matters for the distributed databases.
In certain cases when a cluster is poorly configured it can be prone to total data loss. Examples of such cases are:
- Using only a datacenter or non-physically distributed hardware
- Placing all nodes in one rack
- Using SAN for storage (other than within a rack and properly configured)
If the hardware being rely on crashes in any of the above cases, the data might be definitely lost. Thus, it is vital to have a backup even prior to fixing any design mistakes. This holds even if the RPO (Recovery Point Objective), the date of your last backup, was a week ago. Losing a week of data is better than losing years of data, in most cases.
Note that a backup strategy cannot replace a well distributed system, mostly because restore is a slow and heavy process and will always generate a small gap - a period of time during which data will be lost. However, it can prevent a bigger, or total, data loss.
In fact, even when Apache Cassandra is well configured, it makes sense to have some backups. Imagine an operator needs to wipe the data on a staging or testing cluster and runs the command rm -rf /var/lib/cassandra/* in parallel via Chef or Capsitrano, only to find out the command was accidentally run in the production cluster instead (wrong terminal, bad alias, bad script configuration, etc…). If you are responsible for this cluster, or are just the person unlucky enough to have pressed the wrong button, you will be very glad to have a backup somewhere.
Apache Cassandra will gently replicate any operation on a node throughout the cluster, including user mistakes that could potentially lose data, such as DROP TABLE X or TRUNCATE TABLE Y. Luckily for people facing this, there is a safeguard as automatic snapshots are taken by default (see the snapshots section below).
But if the problem comes from heavy batch of standard operations (INSERT / UPDATE / DELETE), it is sometimes better to go back to a known safe point and accept losing some data than trying to deal with this new situation.
A backup strategy is not foolproof, rather it just reduces the odds that something goes very wrong to a very low level. Having a full set of cluster data somewhere else, on a cold storage can be very useful. Even though it costs money and effort to put a backup and restore strategy in place, it is insignificant compared to a possible total loss of data.
Backup and Restore Solutions
Any backup strategy will be limited by technical possibilities, as there is often a lot of data to move around when making a backup of a Cassandra cluster. Budget considerations are the second biggest constraints in many cases, as is task prioritization. Building the backup strategy is about finding the best tradeoff between these constraints and the desired RPO and RTO.
Other considerations are how valuable the data is, how the risk data events is evaluated, and on the maximum data loss that is acceptable. The only recommendation we would make in this regard is to plan for your worst case scenario.
Depending on the cluster, distinct solutions can be extremely efficient or perform very poorly and not reach RPO and RTO goals. What matters in order to make the right call is to understand your needs and what performances each solution provides in your own environment. There are a number of articles already covering the most common backup and restore solutions, such as https://devops.com/things-know-planning-cassandra-backup/, thus we are going to focus here on presenting one of these options, that is probably less well known, but is an excellent way to backup on AWS when using EBS Volumes.
Specifically, in the following sections we will review the RPO, RTO, set up and running costs, and ease of setup for the following backup methods: Snapshots Incremental backups TableSnap Some commercial solutions The copy/paste method AWS Snapshots/EBS Attach.
Using Snapshots
After flushing all in-memory writes to disk, snapshots creates hard links of each SSTable that is part of the snapshot scope. Doing a snapshot is a simple command and comes with no immediate impacts on performance, capacity storage, or money.
Running a snapshot on all the nodes and for all the keyspaces solves the potential inconsistencies issues related to copying the data out of the production disk, as the snapshot can be taken relatively simultaneously on all the nodes and will take an instantaneous ‘picture’ of the data at a specific moment.
As compaction merges SSTables and depending on the compaction pace, the snapshots start consuming significant space on disk. Thus, they will need to be removed as soon as they are extracted from the disk and put into a safe place. Critically for the utility of this approach, removal has to be handled manually, as Apache Cassandra does not automatically remove snapshots.
Extracting the data from the machines and then copying it to the new machines leads to a relatively bad RPO and RTO as the dataset per node grows. The transfer of such a large amount of data is also likely to raise costs making this operation prohibitively expensive to be performed often enough to be useful, thus not allowing for a good RPO in most cases.
Using Native Incremental Backups
Incremental backups allow the operator to take snapshots of the missing SSTables since the latest snapshot, removing the need to snapshot all the data every time. This significantly reduces the snapshot size after the first full snapshot, reducing both the cost of extraction from the local machine and cold storage.
Thus native incremental backups provide a much better RPO than the full snapshot method alone, considering that data extraction time to the external storage is part of the backup.
On the downside, incremental backups are made of a lot of rather small SSTables that will need to be compacted together at the recovery time, possibly inducing a slow start from new machines after an outage and creating the need to catch up with compactions. If this is pushed to an extreme and data is spread across a lot of SSTables, the read latency could make the node completely unresponsive due to the resources used for compactions and the need for reads to open a lot of SSTables on disk, thus lowering RTO.
When picking this option, it is vital to still make a full snapshot from time to time in order to prevent the situation mentioned above. For more information on incremental backups, this article is a bit old, but very well detailed: http://techblog.constantcontact.com/devops/cassandra-and-backups/
Open-source Tools: TableSnap
Some open-source tools are based on the snapshots or incremental backups methods, described above. These tools aim to make operators’ lives easier by providing some automation to manage snapshots and extract them to the cold storage.
TableSnap copies any new SSTable in the Apache Cassandra data folder as soon as it is created, thus providing a very good RPO and the ability to go back to a specific point in time. However, it comes at the price of streaming more data than if it were just sending incremental data less frequently. This is because each compaction generates an entirely new SSTables from existing SSTables. The newly generated SSTables are then streamed to the backup destination. Regardless of whether the data exists in old SSTables at the backup destination, the new SSTables will be streamed to the backup destination. If considering this option you will want to have a look at TableSnap, which lives here: https://github.com/JeremyGrosser/tablesnap. You should also consider reading: https://www.linkedin.com/pulse/snap-cassandra-s3-tablesnap-vijaya-kumar-hosamani/.
Commercial Solutions (Datastax Enterprise, datos.io)
In the same way, there are a handful of commercial solutions that handle backups for you. The best known is the backup / restore feature included in DSE - https://www.datastax.com/products/datastax-enterprise. However, this does not work with Apache Cassandra (or open source / community version) and in order to leverage this feature, the entire DSE product will need to be purchased and used. Another alternative that has been around for a while is http://datos.io/. In fact, they do their own comparison of existing backup solutions for Cassandra here: http://datos.io/2017/02/02/choose-right-backup-solution-cassandra/.
The Manual Copy/Paste Option
While this is normally an inefficient backup solution, we spent some time working with it and had some interesting results. This section will explore the copy/paste option in detail and evaluate the utility. Specifically the scenario involving extracting all the data from the node and putting it back on a new node or cluster.
Because each node is responsible for a specific range, building a new node or a new cluster for the restore process will change the token distribution, and it is something that can be hard to control when restoring data, especially when using vnodes. Copying the data from all the keyspaces on all the nodes will induce a very messy restore procedure, or a fairly slow one using the sstableloader for example. This is not really reliable or efficient.
A way to workaround this problem is to store the entire data folder for each Cassandra node. This way when restoring a node or a cluster, it is possible to have the information about the schema and token range distribution saved alongside the data, in the system keyspace.
With this strategy when the node bootstraps, it detects the IP change, but this is handled and the replacement nodes come back online with the latest copy of the data, including the schema description and the token ranges distribution. This kind of backup stores the data and all the metadata used by Apache Cassandra next to it, which is really convenient, but has its limitations.
Limitations
Using this strategy the cluster and datacenter names must be identical to the original cluster. Using the exact same configuration to restore is the best approach, just changing the seeds in cassandra.yaml and the ‘dynamic’ part of the configuration, listen_address, rpc_address, mostly IP related informations.
In addition, the topology configuration must be identical to the original cluster; that is, each rack must contain the same number of nodes as the original cluster. When data is placed back on the new nodes, data copied from nodes in rack 1 must be placed on the new nodes in rack 1 and so on for each of the other racks in the cluster.
Demonstration of the Manual Copy/Paste Approach
To explain how to do this process and show it working, here is a short and simple example using CCM.
In this example we use a predefined dataset and CCM to reduce the time taken to create the example. In practice this will work the same way with bigger datasets, but will likely take more time if copying the data from an external source of course. It will just be linearly slower to backup and restore as the dataset per node grows.
Here are the files we are going to use:
$ cat schema.cql
DROP KEYSPACE IF EXISTS tlp_lab;
CREATE KEYSPACE tlp_lab WITH replication = {'class': 'NetworkTopologyStrategy', 'datacenter1' : 2};
CREATE TABLE tlp_lab.test_backup_restore (id text,  column1 text, PRIMARY KEY (id, column1));
$ cat insert.cql
INSERT INTO tlp_lab.test_backup_restore (id, column1) VALUES ('1', '100');
INSERT INTO tlp_lab.test_backup_restore (id, column1) VALUES ('1', '200');
INSERT INTO tlp_lab.test_backup_restore (id, column1) VALUES ('1', '300');
INSERT INTO tlp_lab.test_backup_restore (id, column1) VALUES ('2', '100');
INSERT INTO tlp_lab.test_backup_restore (id, column1) VALUES ('2', '200');
INSERT INTO tlp_lab.test_backup_restore (id, column1) VALUES ('2', '300');
INSERT INTO tlp_lab.test_backup_restore (id, column1) VALUES ('3', '100');
INSERT INTO tlp_lab.test_backup_restore (id, column1) VALUES ('3', '200');
INSERT INTO tlp_lab.test_backup_restore (id, column1) VALUES ('3', '300');
INSERT INTO tlp_lab.test_backup_restore (id, column1) VALUES ('4', '100');
INSERT INTO tlp_lab.test_backup_restore (id, column1) VALUES ('4', '200');
INSERT INTO tlp_lab.test_backup_restore (id, column1) VALUES ('4', '300');
INSERT INTO tlp_lab.test_backup_restore (id, column1) VALUES ('5', '100');
INSERT INTO tlp_lab.test_backup_restore (id, column1) VALUES ('5', '200');
INSERT INTO tlp_lab.test_backup_restore (id, column1) VALUES ('5', '300');
Let’s start by creating the data and make sure the memtables are flushed to an on-disk SSTable, as follows:
$ ccm node1 cqlsh -- -f schema.cql
$ ccm node1 cqlsh -- -f insert.cql
Then let’s query the data and make sure we got all the expected data;
$ ccm node1 cqlsh -- -e "SELECT * FROM tlp_lab.test_backup_restore;"
 id | column1
----+---------
  4 |     100
  4 |     200
  4 |     300
  3 |     100
  3 |     200
  3 |     300
  5 |     100
  5 |     200
  5 |     300
  2 |     100
  2 |     200
  2 |     300
  1 |     100
  1 |     200
  1 |     300
(15 rows)
Looks good, all the data is there, and we can make sure the memtable was flushed and the SSTables have been written to the disk:
$ ./flush.sh
$ ll /Users/alain/.ccm/6xCassandra-3-11-1/node*/data0/tlp_lab/test_backup_restore-9e8e3ce006b111e89daea3c19988ea88
/Users/alain/.ccm/6xCassandra-3-11-1/node1/data0/tlp_lab/test_backup_restore-9e8e3ce006b111e89daea3c19988ea88:
total 72
drwxr-xr-x  11 alain  staff   352 Jan 31 18:07 .
drwxr-xr-x   3 alain  staff    96 Feb  2 10:13 ..
-rw-r--r--   1 alain  staff    43 Jan 31 18:07 mc-1-big-CompressionInfo.db
-rw-r--r--   1 alain  staff    78 Jan 31 18:07 mc-1-big-Data.db
-rw-r--r--   1 alain  staff    10 Jan 31 18:07 mc-1-big-Digest.crc32
-rw-r--r--   1 alain  staff    16 Jan 31 18:07 mc-1-big-Filter.db
-rw-r--r--   1 alain  staff    10 Jan 31 18:07 mc-1-big-Index.db
-rw-r--r--   1 alain  staff  4613 Jan 31 18:07 mc-1-big-Statistics.db
-rw-r--r--   1 alain  staff    47 Jan 31 18:07 mc-1-big-Summary.db
-rw-r--r--   1 alain  staff    92 Jan 31 18:07 mc-1-big-TOC.txt
/Users/alain/.ccm/6xCassandra-3-11-1/node2/data0/tlp_lab/test_backup_restore-9e8e3ce006b111e89daea3c19988ea88:
total 72
drwxr-xr-x  11 alain  staff   352 Jan 31 18:07 .
drwxr-xr-x   5 alain  staff   160 Jan 31 18:07 ..
drwxr-xr-x   2 alain  staff    64 Jan 31 18:07 backups
-rw-r--r--   1 alain  staff    43 Jan 31 18:07 mc-1-big-CompressionInfo.db
-rw-r--r--   1 alain  staff    52 Jan 31 18:07 mc-1-big-Data.db
-rw-r--r--   1 alain  staff     9 Jan 31 18:07 mc-1-big-Digest.crc32
-rw-r--r--   1 alain  staff    16 Jan 31 18:07 mc-1-big-Filter.db
-rw-r--r--   1 alain  staff     5 Jan 31 18:07 mc-1-big-Index.db
-rw-r--r--   1 alain  staff  4610 Jan 31 18:07 mc-1-big-Statistics.db
-rw-r--r--   1 alain  staff    47 Jan 31 18:07 mc-1-big-Summary.db
-rw-r--r--   1 alain  staff    92 Jan 31 18:07 mc-1-big-TOC.txt
/Users/alain/.ccm/6xCassandra-3-11-1/node3/data0/tlp_lab/test_backup_restore-9e8e3ce006b111e89daea3c19988ea88:
total 0
drwxr-xr-x  3 alain  staff   96 Jan 31 18:07 .
drwxr-xr-x  5 alain  staff  160 Jan 31 18:07 ..
drwxr-xr-x  2 alain  staff   64 Jan 31 18:07 backups
/Users/alain/.ccm/6xCassandra-3-11-1/node4/data0/tlp_lab/test_backup_restore-9e8e3ce006b111e89daea3c19988ea88:
total 72
drwxr-xr-x  11 alain  staff   352 Jan 31 18:07 .
drwxr-xr-x   5 alain  staff   160 Jan 31 18:07 ..
drwxr-xr-x   2 alain  staff    64 Jan 31 18:07 backups
-rw-r--r--   1 alain  staff    43 Jan 31 18:07 mc-1-big-CompressionInfo.db
-rw-r--r--   1 alain  staff    78 Jan 31 18:07 mc-1-big-Data.db
-rw-r--r--   1 alain  staff     9 Jan 31 18:07 mc-1-big-Digest.crc32
-rw-r--r--   1 alain  staff    16 Jan 31 18:07 mc-1-big-Filter.db
-rw-r--r--   1 alain  staff    10 Jan 31 18:07 mc-1-big-Index.db
-rw-r--r--   1 alain  staff  4614 Jan 31 18:07 mc-1-big-Statistics.db
-rw-r--r--   1 alain  staff    47 Jan 31 18:07 mc-1-big-Summary.db
-rw-r--r--   1 alain  staff    92 Jan 31 18:07 mc-1-big-TOC.txt
/Users/alain/.ccm/6xCassandra-3-11-1/node5/data0/tlp_lab/test_backup_restore-9e8e3ce006b111e89daea3c19988ea88:
total 72
drwxr-xr-x  11 alain  staff   352 Jan 31 18:07 .
drwxr-xr-x   5 alain  staff   160 Jan 31 18:07 ..
drwxr-xr-x   2 alain  staff    64 Jan 31 18:07 backups
-rw-r--r--   1 alain  staff    43 Jan 31 18:07 mc-1-big-CompressionInfo.db
-rw-r--r--   1 alain  staff   104 Jan 31 18:07 mc-1-big-Data.db
-rw-r--r--   1 alain  staff    10 Jan 31 18:07 mc-1-big-Digest.crc32
-rw-r--r--   1 alain  staff    16 Jan 31 18:07 mc-1-big-Filter.db
-rw-r--r--   1 alain  staff    15 Jan 31 18:07 mc-1-big-Index.db
-rw-r--r--   1 alain  staff  4618 Jan 31 18:07 mc-1-big-Statistics.db
-rw-r--r--   1 alain  staff    47 Jan 31 18:07 mc-1-big-Summary.db
-rw-r--r--   1 alain  staff    92 Jan 31 18:07 mc-1-big-TOC.txt
/Users/alain/.ccm/6xCassandra-3-11-1/node6/data0/tlp_lab/test_backup_restore-9e8e3ce006b111e89daea3c19988ea88:
total 72
drwxr-xr-x  11 alain  staff   352 Jan 31 18:07 .
drwxr-xr-x   5 alain  staff   160 Jan 31 18:07 ..
drwxr-xr-x   2 alain  staff    64 Jan 31 18:07 backups
-rw-r--r--   1 alain  staff    43 Jan 31 18:07 mc-1-big-CompressionInfo.db
-rw-r--r--   1 alain  staff    82 Jan 31 18:07 mc-1-big-Data.db
-rw-r--r--   1 alain  staff    10 Jan 31 18:07 mc-1-big-Digest.crc32
-rw-r--r--   1 alain  staff    16 Jan 31 18:07 mc-1-big-Filter.db
-rw-r--r--   1 alain  staff    10 Jan 31 18:07 mc-1-big-Index.db
-rw-r--r--   1 alain  staff  4614 Jan 31 18:07 mc-1-big-Statistics.db
-rw-r--r--   1 alain  staff    47 Jan 31 18:07 mc-1-big-Summary.db
-rw-r--r--   1 alain  staff    92 Jan 31 18:07 mc-1-big-TOC.txt
Create a Backup using Copy/Paste
Now let’s make a backup (a simple copy) of the entire data0 folder for all nodes.
In our test case, this would be enough:
$ for i in {1..6}; do cp -rp /Users/alain/.ccm/6xCassandra-3-11-1/node$i/data0 backup/node$i/; done
$ cd backups/
$ ll -d */*/
drwxr-xr-x  26 alain  staff  832 Jan 31 17:34 node1/system/
drwxr-xr-x   6 alain  staff  192 Jan 31 17:34 node1/system_auth/
drwxr-xr-x   5 alain  staff  160 Jan 31 17:34 node1/system_distributed/
drwxr-xr-x  12 alain  staff  384 Jan 31 17:34 node1/system_schema/
drwxr-xr-x   4 alain  staff  128 Jan 31 17:34 node1/system_traces/
drwxr-xr-x   3 alain  staff   96 Feb  2 10:13 node1/tlp_lab/
drwxr-xr-x  26 alain  staff  832 Jan 31 17:34 node2/system/
drwxr-xr-x   6 alain  staff  192 Jan 31 17:34 node2/system_auth/
drwxr-xr-x   5 alain  staff  160 Jan 31 17:34 node2/system_distributed/
drwxr-xr-x  12 alain  staff  384 Jan 31 17:34 node2/system_schema/
drwxr-xr-x   4 alain  staff  128 Jan 31 17:34 node2/system_traces/
drwxr-xr-x   5 alain  staff  160 Jan 31 18:07 node2/tlp_lab/
drwxr-xr-x  26 alain  staff  832 Jan 31 17:34 node3/system/
drwxr-xr-x   6 alain  staff  192 Jan 31 17:34 node3/system_auth/
drwxr-xr-x   5 alain  staff  160 Jan 31 17:34 node3/system_distributed/
drwxr-xr-x  12 alain  staff  384 Jan 31 17:34 node3/system_schema/
drwxr-xr-x   4 alain  staff  128 Jan 31 17:34 node3/system_traces/
drwxr-xr-x   5 alain  staff  160 Jan 31 18:07 node3/tlp_lab/
drwxr-xr-x  26 alain  staff  832 Jan 31 17:34 node4/system/
drwxr-xr-x   6 alain  staff  192 Jan 31 17:34 node4/system_auth/
drwxr-xr-x   5 alain  staff  160 Jan 31 17:34 node4/system_distributed/
drwxr-xr-x  12 alain  staff  384 Jan 31 17:34 node4/system_schema/
drwxr-xr-x   4 alain  staff  128 Jan 31 17:34 node4/system_traces/
drwxr-xr-x   5 alain  staff  160 Jan 31 18:07 node4/tlp_lab/
drwxr-xr-x  26 alain  staff  832 Jan 31 17:34 node5/system/
drwxr-xr-x   6 alain  staff  192 Jan 31 17:34 node5/system_auth/
drwxr-xr-x   5 alain  staff  160 Jan 31 17:34 node5/system_distributed/
drwxr-xr-x  12 alain  staff  384 Jan 31 17:34 node5/system_schema/
drwxr-xr-x   4 alain  staff  128 Jan 31 17:34 node5/system_traces/
drwxr-xr-x   5 alain  staff  160 Jan 31 18:07 node5/tlp_lab/
drwxr-xr-x  26 alain  staff  832 Jan 31 17:34 node6/system/
drwxr-xr-x   6 alain  staff  192 Jan 31 17:34 node6/system_auth/
drwxr-xr-x   5 alain  staff  160 Jan 31 17:34 node6/system_distributed/
drwxr-xr-x  12 alain  staff  384 Jan 31 17:34 node6/system_schema/
drwxr-xr-x   4 alain  staff  128 Jan 31 17:34 node6/system_traces/
drwxr-xr-x   5 alain  staff  160 Jan 31 18:07 node6/tlp_lab/
Simulation of a Major Outage
Then we simulate the loss of two nodes by shutting them down, as one would not affect the cluster, working with a Replication Factor of 2 (RF = 2).
$ ccm node1 stop
$ ccm node2 stop
$ ccm node3 nodetool status
Datacenter: datacenter1
=======================
Status=Up/Down
|/ State=Normal/Leaving/Joining/Moving
--  Address    Load       Tokens       Owns (effective)  Host ID                               Rack
DN  127.0.0.1  176.15 KiB  1            33.3%             b6497c83-0e85-425e-a739-506dd882b013  rack1
DN  127.0.0.2  149.68 KiB  1            33.3%             e4919f5a-3b89-4fd1-a163-aaae99aa5cbd  rack1
UN  127.0.0.3  149.02 KiB  1            33.3%             c6e8e8c4-25b1-444a-ac50-ff00505fbaf7  rack1
UN  127.0.0.4  129.8 KiB  1            33.3%             23bdc0df-1ba5-4bc7-be41-01436fa23925  rack1
UN  127.0.0.5  139.19 KiB  1            33.3%             fb438687-8c3e-4ad7-b83d-275948f4241f  rack1
UN  127.0.0.6  144.11 KiB  1            33.3%             63777a4b-af44-4fc2-baff-74c585d4a217  rack1
And now reading the data again, we notice the query is failing because some token ranges that were owned only by these 2 nodes are no longer available and we are requesting all the data.
$ ccm node3 cqlsh -- -e "SELECT * FROM tlp_lab.test_backup_restore;"
<stdin>:1:NoHostAvailable:
In this example, these two nodes are now considered completely lost and there is no way to get the data back. What we have are the backups we made, just in time.
Restore the Service and Data with Copy/Paste
To restore the service and the data, we first have to create two replacement nodes, without having them joining the cluster yet. With CCM it can be done like this:
ccm add node7 -i 127.0.0.7 -j 7700
ccm add node8 -i 127.0.0.8 -j 7800
Then we want to copy the data we saved from node1 to the new node7 and from the backup of node2 to node8 after cleaning any data possibly present:
$ rm -rf /Users/alain/.ccm/6xCassandra-3-11-1/node7/data0/*
$ rm -rf /Users/alain/.ccm/6xCassandra-3-11-1/node8/data0/*
$ cp -rp backup/node1/* /Users/alain/.ccm/6xCassandra-3-11-1/node7/data0/
$ cp -rp backup/node2/* /Users/alain/.ccm/6xCassandra-3-11-1/node8/data0/
Note: If some data or commit logs are already present, it could conflict with data we want to restore and even in worst case mess up the ownership as the commit logs files would be replayed, possibly on the system table as well. Always start in clean environment then restore old files.
All the data from node1 is now in node7, including the schema and information about the cluster:
$ cd /Users/alain/.ccm/6xCassandra-3-11-1/node7/data0
$ ll -d */*/
drwxr-xr-x   3 alain  staff    96 Jan 31 17:34 system/IndexInfo-9f5c6374d48532299a0a5094af9ad1e3/
drwxr-xr-x   3 alain  staff    96 Jan 31 17:34 system/available_ranges-c539fcabd65a31d18133d25605643ee3/
drwxr-xr-x   3 alain  staff    96 Jan 31 17:34 system/batches-919a4bc57a333573b03e13fc3f68b465/
drwxr-xr-x   3 alain  staff    96 Jan 31 17:34 system/batchlog-0290003c977e397cac3efdfdc01d626b/
drwxr-xr-x   3 alain  staff    96 Jan 31 17:34 system/built_views-4b3c50a9ea873d7691016dbc9c38494a/
drwxr-xr-x  35 alain  staff  1120 Feb  2 10:16 system/compaction_history-b4dbb7b4dc493fb5b3bfce6e434832ca/
drwxr-xr-x   3 alain  staff    96 Jan 31 17:34 system/hints-2666e20573ef38b390fefecf96e8f0c7/
drwxr-xr-x  19 alain  staff   608 Feb  2 10:12 system/local-7ad54392bcdd35a684174e047860b377/
drwxr-xr-x   3 alain  staff    96 Jan 31 17:34 system/paxos-b7b7f0c2fd0a34108c053ef614bb7c2d/
drwxr-xr-x   3 alain  staff    96 Jan 31 17:34 system/peer_events-59dfeaea8db2334191ef109974d81484/
drwxr-xr-x  27 alain  staff   864 Feb  2 10:16 system/peers-37f71aca7dc2383ba70672528af04d4f/
drwxr-xr-x   3 alain  staff    96 Jan 31 17:34 system/prepared_statements-18a9c2576a0c3841ba718cd529849fef/
drwxr-xr-x   3 alain  staff    96 Jan 31 17:34 system/range_xfers-55d764384e553f8b9f6e676d4af3976d/
drwxr-xr-x   3 alain  staff    96 Jan 31 17:34 system/schema_aggregates-a5fc57fc9d6c3bfda3fc01ad54686fea/
drwxr-xr-x   3 alain  staff    96 Jan 31 17:34 system/schema_columnfamilies-45f5b36024bc3f83a3631034ea4fa697/
drwxr-xr-x   3 alain  staff    96 Jan 31 17:34 system/schema_columns-296e9c049bec3085827dc17d3df2122a/
drwxr-xr-x   3 alain  staff    96 Jan 31 17:34 system/schema_functions-d1b675fe2b503ca48e49c0f81989dcad/
drwxr-xr-x   3 alain  staff    96 Jan 31 17:34 system/schema_keyspaces-b0f2235744583cdb9631c43e59ce3676/
drwxr-xr-x   3 alain  staff    96 Jan 31 17:34 system/schema_triggers-0359bc7171233ee19a4ab9dfb11fc125/
drwxr-xr-x   3 alain  staff    96 Jan 31 17:34 system/schema_usertypes-3aa752254f82350b8d5c430fa221fa0a/
drwxr-xr-x  27 alain  staff   864 Feb  2 10:16 system/size_estimates-618f817b005f3678b8a453f3930b8e86/
drwxr-xr-x  35 alain  staff  1120 Feb  2 10:16 system/sstable_activity-5a1ff267ace03f128563cfae6103c65e/
drwxr-xr-x   3 alain  staff    96 Jan 31 17:34 system/transferred_ranges-6cad20f7d4f53af2b6e20da33c6c1f83/
drwxr-xr-x   3 alain  staff    96 Jan 31 17:34 system/views_builds_in_progress-b7f2c10878cd3c809cd5d609b2bd149c/
drwxr-xr-x   3 alain  staff    96 Jan 31 17:34 system_auth/resource_role_permissons_index-5f2fbdad91f13946bd25d5da3a5c35ec/
drwxr-xr-x   3 alain  staff    96 Jan 31 17:34 system_auth/role_members-0ecdaa87f8fb3e6088d174fb36fe5c0d/
drwxr-xr-x   3 alain  staff    96 Jan 31 17:34 system_auth/role_permissions-3afbe79f219431a7add7f5ab90d8ec9c/
drwxr-xr-x   3 alain  staff    96 Jan 31 17:34 system_auth/roles-5bc52802de2535edaeab188eecebb090/
drwxr-xr-x   3 alain  staff    96 Jan 31 17:34 system_distributed/parent_repair_history-deabd734b99d3b9c92e5fd92eb5abf14/
drwxr-xr-x   3 alain  staff    96 Jan 31 17:34 system_distributed/repair_history-759fffad624b318180eefa9a52d1f627/
drwxr-xr-x   3 alain  staff    96 Jan 31 17:34 system_distributed/view_build_status-5582b59f8e4e35e1b9133acada51eb04/
drwxr-xr-x  27 alain  staff   864 Feb  2 10:16 system_schema/aggregates-924c55872e3a345bb10c12f37c1ba895/
drwxr-xr-x  19 alain  staff   608 Feb  2 10:16 system_schema/columns-24101c25a2ae3af787c1b40ee1aca33f/
drwxr-xr-x  27 alain  staff   864 Feb  2 10:16 system_schema/dropped_columns-5e7583b5f3f43af19a39b7e1d6f5f11f/
drwxr-xr-x  27 alain  staff   864 Feb  2 10:16 system_schema/functions-96489b7980be3e14a70166a0b9159450/
drwxr-xr-x  27 alain  staff   864 Feb  2 10:16 system_schema/indexes-0feb57ac311f382fba6d9024d305702f/
drwxr-xr-x  35 alain  staff  1120 Feb  2 10:16 system_schema/keyspaces-abac5682dea631c5b535b3d6cffd0fb6/
drwxr-xr-x  19 alain  staff   608 Feb  2 10:16 system_schema/tables-afddfb9dbc1e30688056eed6c302ba09/
drwxr-xr-x  27 alain  staff   864 Feb  2 10:16 system_schema/triggers-4df70b666b05325195a132b54005fd48/
drwxr-xr-x  27 alain  staff   864 Feb  2 10:16 system_schema/types-5a8b1ca866023f77a0459273d308917a/
drwxr-xr-x  27 alain  staff   864 Feb  2 10:16 system_schema/views-9786ac1cdd583201a7cdad556410c985/
drwxr-xr-x   3 alain  staff    96 Jan 31 17:34 system_traces/events-8826e8e9e16a372887533bc1fc713c25/
drwxr-xr-x   3 alain  staff    96 Jan 31 17:34 system_traces/sessions-c5e99f1686773914b17e960613512345/
drwxr-xr-x  11 alain  staff   352 Jan 31 18:07 tlp_lab/test_backup_restore-9e8e3ce006b111e89daea3c19988ea88/
At this point we can turn node7 up by simply starting Cassandra service, normally. As I am using CCM:
$ ccm node7 start
To reach this state, where node1 with ip 127.0.0.1 have been replaced by node7 with ip 127.0.0.7. Note that node7 is now using the old node1 Host ID: b6497c83-0e85-425e-a739-506dd882b013
$ ccm node3 nodetool status
Datacenter: datacenter1
=======================
Status=Up/Down
|/ State=Normal/Leaving/Joining/Moving
--  Address    Load       Tokens       Owns (effective)  Host ID                               Rack
DN  127.0.0.2  149.68 KiB  1            33.3%             e4919f5a-3b89-4fd1-a163-aaae99aa5cbd  rack1
UN  127.0.0.3  160.84 KiB  1            33.3%             c6e8e8c4-25b1-444a-ac50-ff00505fbaf7  rack1
UN  127.0.0.4  151.68 KiB  1            33.3%             23bdc0df-1ba5-4bc7-be41-01436fa23925  rack1
UN  127.0.0.5  161.16 KiB  1            33.3%             fb438687-8c3e-4ad7-b83d-275948f4241f  rack1
UN  127.0.0.6  166.05 KiB  1            33.3%             63777a4b-af44-4fc2-baff-74c585d4a217  rack1
UN  127.0.0.7  202.51 KiB  1            33.3%             b6497c83-0e85-425e-a739-506dd882b013  rack1
At this stage we can already access the data fully due to our configuration allowing a tolerance of one node being down:
$ ccm node3 cqlsh -- -e "SELECT * FROM tlp_lab.test_backup_restore;"
 id | column1
----+---------
  4 |     100
  4 |     200
  4 |     300
  3 |     100
  3 |     200
  3 |     300
  5 |     100
  5 |     200
  5 |     300
  2 |     100
  2 |     200
  2 |     300
  1 |     100
  1 |     200
  1 |     300
(15 rows)
Finally, after bringing node8 online, we have a fully operational cluster again. We can achieve that with the exact same steps using data from node2 this time.
Note: It is important to bring these new nodes up with the same configuration as the node that went down, except when the node IP is used of course, like in listen_address and possibly in rpc_address. Usually, having a management system such as Chef, Ansible, Salt, Puppet or using containers will make adding nodes very straightforward. In the worst case, Apache Cassandra will probably just not start.
This process can be repeated with all the nodes of the cluster if the entire cluster goes down and a new replacement cluster is to be built.
This solution is slow, expensive, hard to set up and error-prone if done manually. Yet it works and is quite robust if performed carefully (or even better, automatically).
The ‘Copy/Paste’ Approach on AWS EC2 with EBS Volumes
As demonstrated above, the basic ‘copy/paste’ option can be made to work. However, in an emergency situation when an entire cluster is down, the process could be difficult to manage and terribly slow for big datasets.
Some of the AWS features can take this basic backup and restore option to the next level. I have no interest in advertising for Amazon services, and even personally believe that not locking oneself with a provider or vendor is a great idea. However, in case you are already using AWS and EBS volumes, this solution might be very convenient and not really commit you much more than you already have with AWS. The set of tools offered by AWS for backups on EC2 with EBS volume storage are worth a look for those of you using this environment.
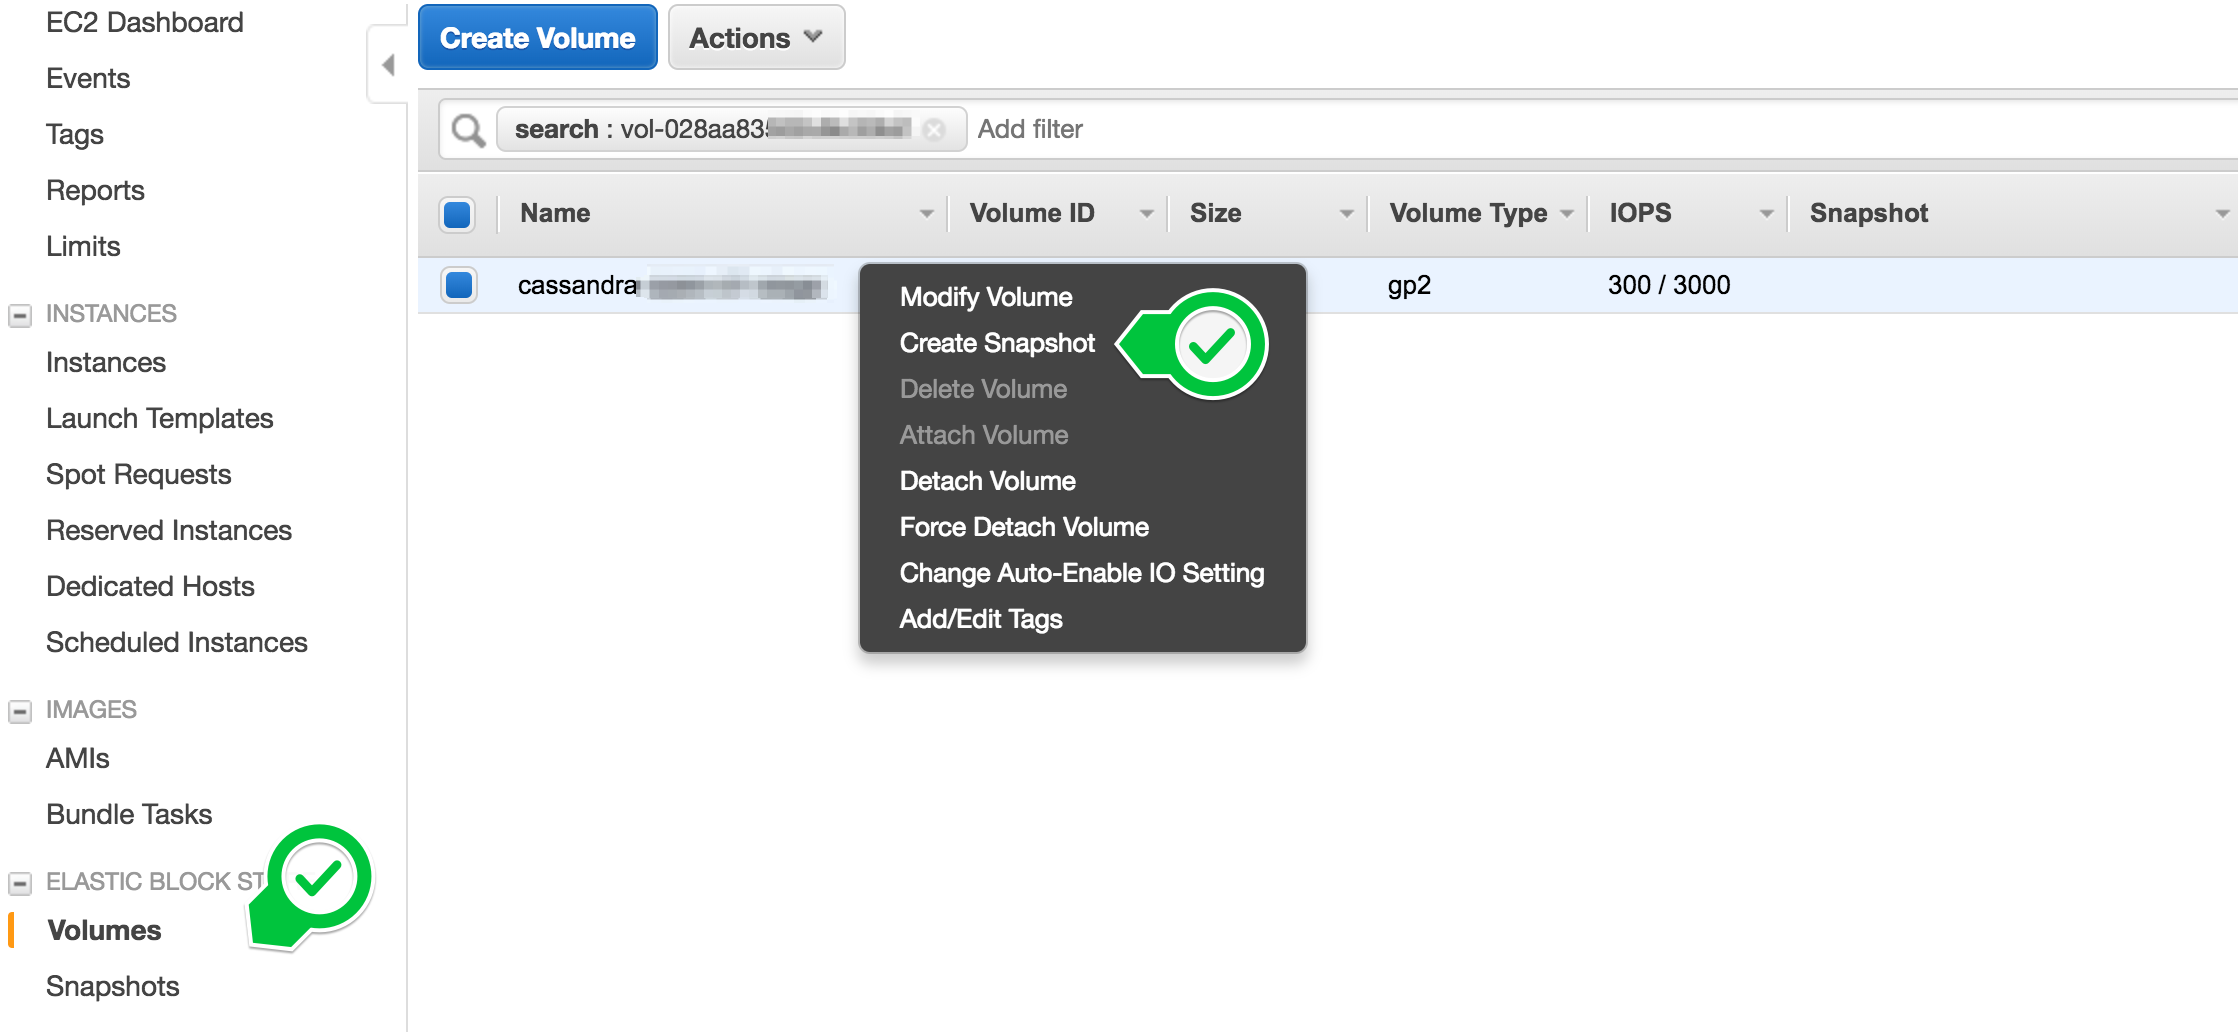
Instead of copying the the data folder out of the node as we saw earlier, AWS offers to snapshot the EBS volumes. The option is available through the console or API and makes asynchronous and incremental snapshots, transferred to S3 under the hood.
Because the snapshots are incremental, we can make frequent backups without technical issues or any substantial extra cost.
The procedure itself to make a full backup is to snapshot the EBS volume(s) used for Apache Cassandra data storage. To make it simple, a few clicks or lines of code will allow a full backup. It is way more convenient and performant to use the API and make a small script that request all the snapshots at once, even more so when the cluster contains a large number of nodes. Using this functionality results in a more consistent dataset and allows for the automation of backups according to a backup schedule and policy.
That’s it. At this point we have a backup, in a distant and redundant system. Truth is it takes ‘some time’ to make the backup, but Amazon handles it asynchronously and incrementally. We will observe impacts on performance carefully, specially for the first snapshot. Subsequent snapshot will be incremental, thus probably less impacting.
While a snapshot of all the EBS volumes attached to nodes in the cluster can be taken simultaneously, be sure that only a single snapshot is run against each EBS volume at a time to prevent harming the EBS volume performances.
It is a good idea to tag the cluster name, data center, Availability Zone (AZ), and IP address the disk belongs to in the snapshot metadata (name / description / …). This is to help identify the snapshot needed when a partial failure occurs, involving just part of the cluster(s).
Here is the description of the snapshot feature from AWS: https://docs.aws.amazon.com/AWSEC2/latest/UserGuide/ebs-creating-snapshot.html
Backup policy and automated snapshots
Once we have the script to take a snapshot, it is really straightforward to build a script responsible for maintaining a snapshot policy such as:
- Take / keep a snapshot every 30 min for the latest 3 hours, and
- Keep a snapshot every 6 hours for the last day, delete other snapshots, and
- Keep a snapshot every day for the last month, delete other snapshots.
A script in combination with a scheduler to call the script should be enough to have backups in place. Most probably the script will be called at a frequency determined by the lower interval between 2 backup. Here we would call the script every 30 min or less with the example above.
This script will contain the rules to use to make backups and calls to AWS API to take and delete snapshots depending on the date of the snapshot and the current date, or anything else you would like to use to trigger backups.
Using AWS Lambda service to execute the backups is possible and should be efficient. The backups being asynchronous, would mean the script should run completely in a matter of a seconds and the Lambda service cost is based on the execution time, thus it could be a good fit.
To run the script on a regular basis, AWS CloudWatch Events provide events based on time. It is possible to schedule the call to the script in charge of the backup policy this way.
About Lambda in AWS: https://docs.aws.amazon.com/lambda/latest/dg/welcome.html About AWS CloudWatch Events: https://docs.aws.amazon.com/AmazonCloudWatch/latest/events/WhatIsCloudWatchEvents.html
Restore procedure (AWS)
The restore procedure can be manual, which can be enough to handle a small outage involving a few nodes, or if there is no real time constraints for the RTO. For big clusters and in general, using the API and a script to restore the latest (or a specific) backup will make this process more reliable and scalable than using the AWS console. Often, using the console is nice to test things once, but unsuitable for large scale operations. The AWS API is far more powerful and lends itself well to automated tasks. For the example we will be using the console. Independently of the tool used, the process will always be the same to restore a node.
-
Reusing existing instances…
If the instance is still accessible but the data is corrupted or unaccessible, we can reuse the same nodes. The node is already configured as required and reusing the instance is practical. In this case:
- Locate the snapshot to use.
It has to be a snapshot taken from the node to be replaced. If we are replacing or re-creating an entire rack, be sure to use the snapshots for the AZ the rack is in.
-
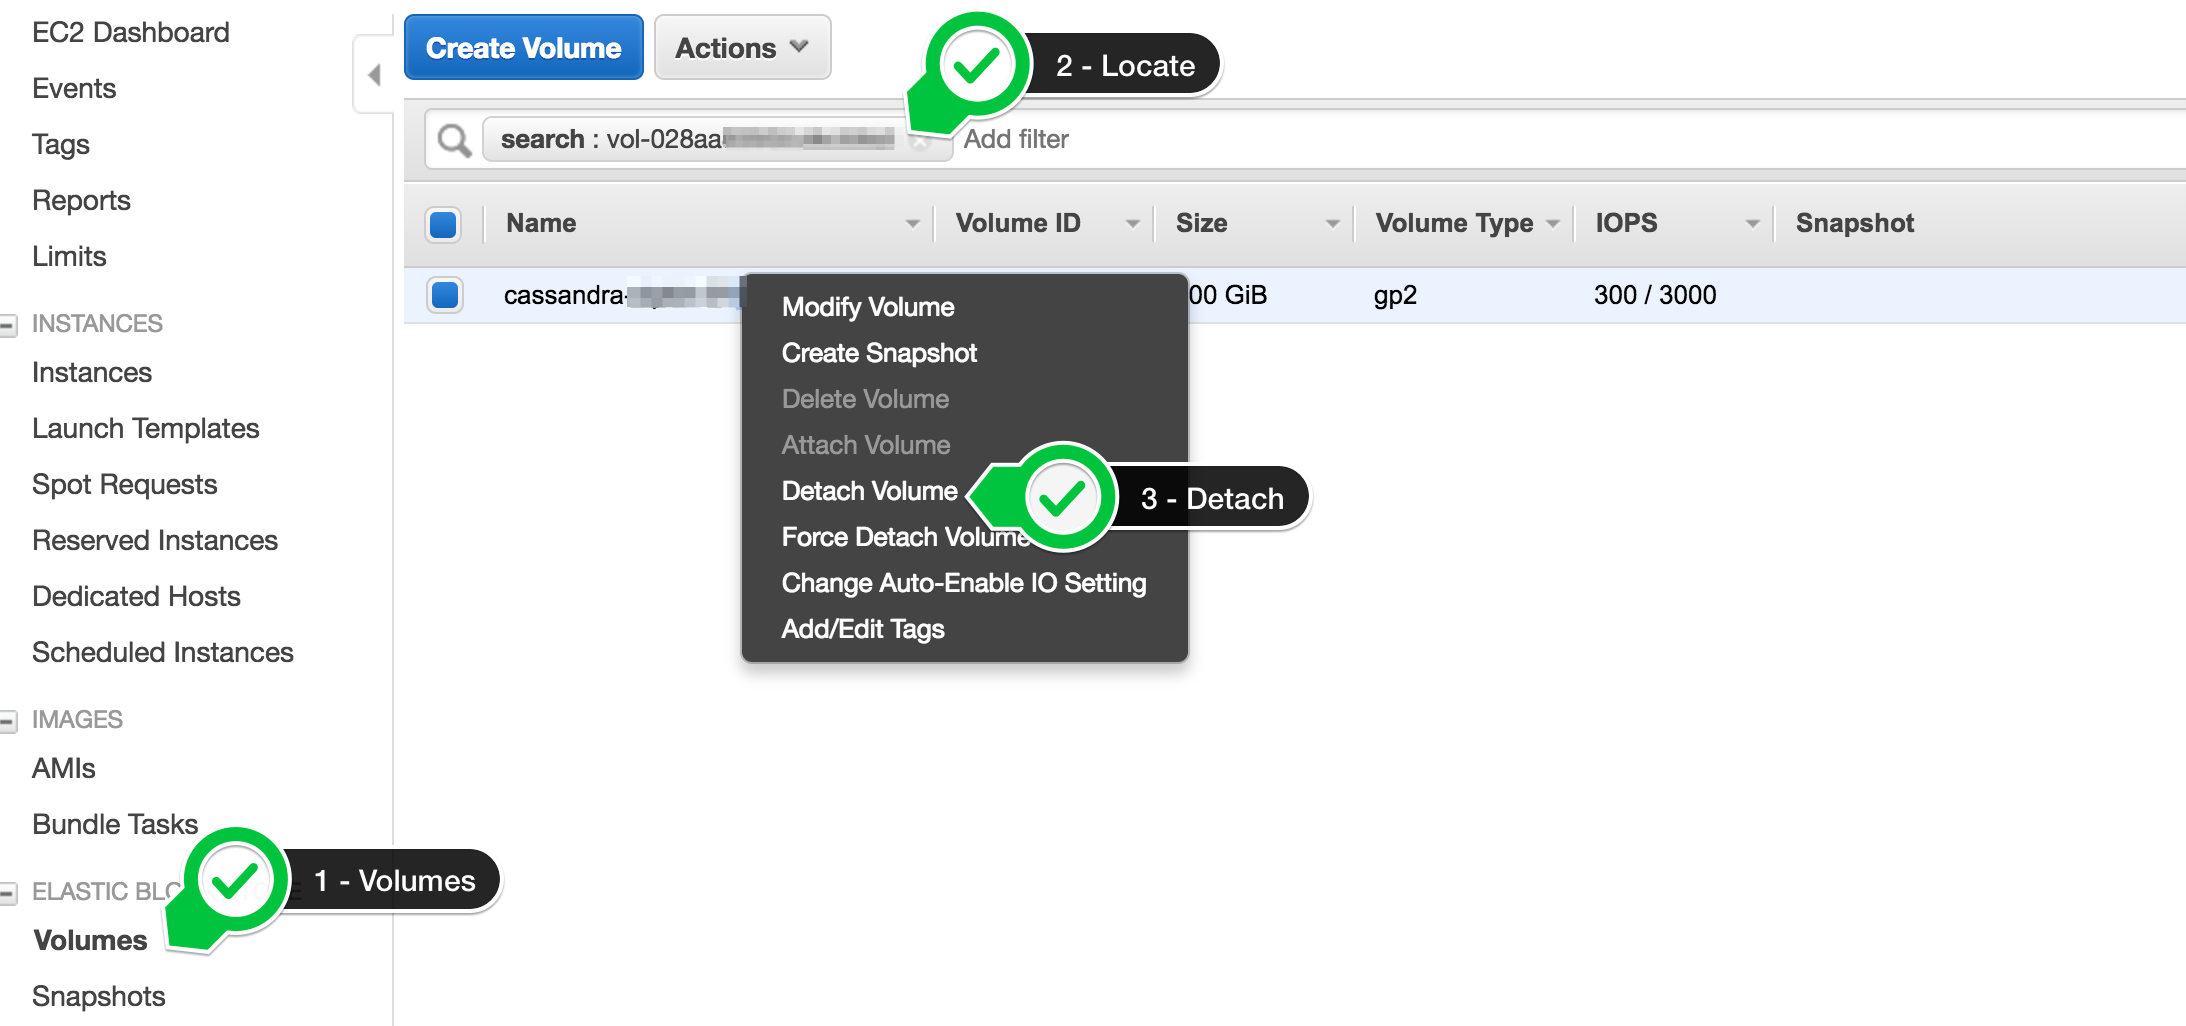
Stop Cassandra on the node to restore (if the node is not already down)
nodetool drain && sudo service cassandra stop
-
Unmount the currently attached EBS volume at the operating system level, supposing the EBS Volume is mounted as
/var/lib/cassandra/data/, from a bash console, run:umount /var/lib/cassandra/data/
-
Detach and terminate the old EBS volume from the AWS console or API.
-
…OR using new instances…:
- Create a new instance in the right AZ to replace all the nodes that need to be. The instances can be created without EBS attached to them, but all the other options must be exactly identical to a new node that you would add normally to the existing cluster.
-
Then restore:
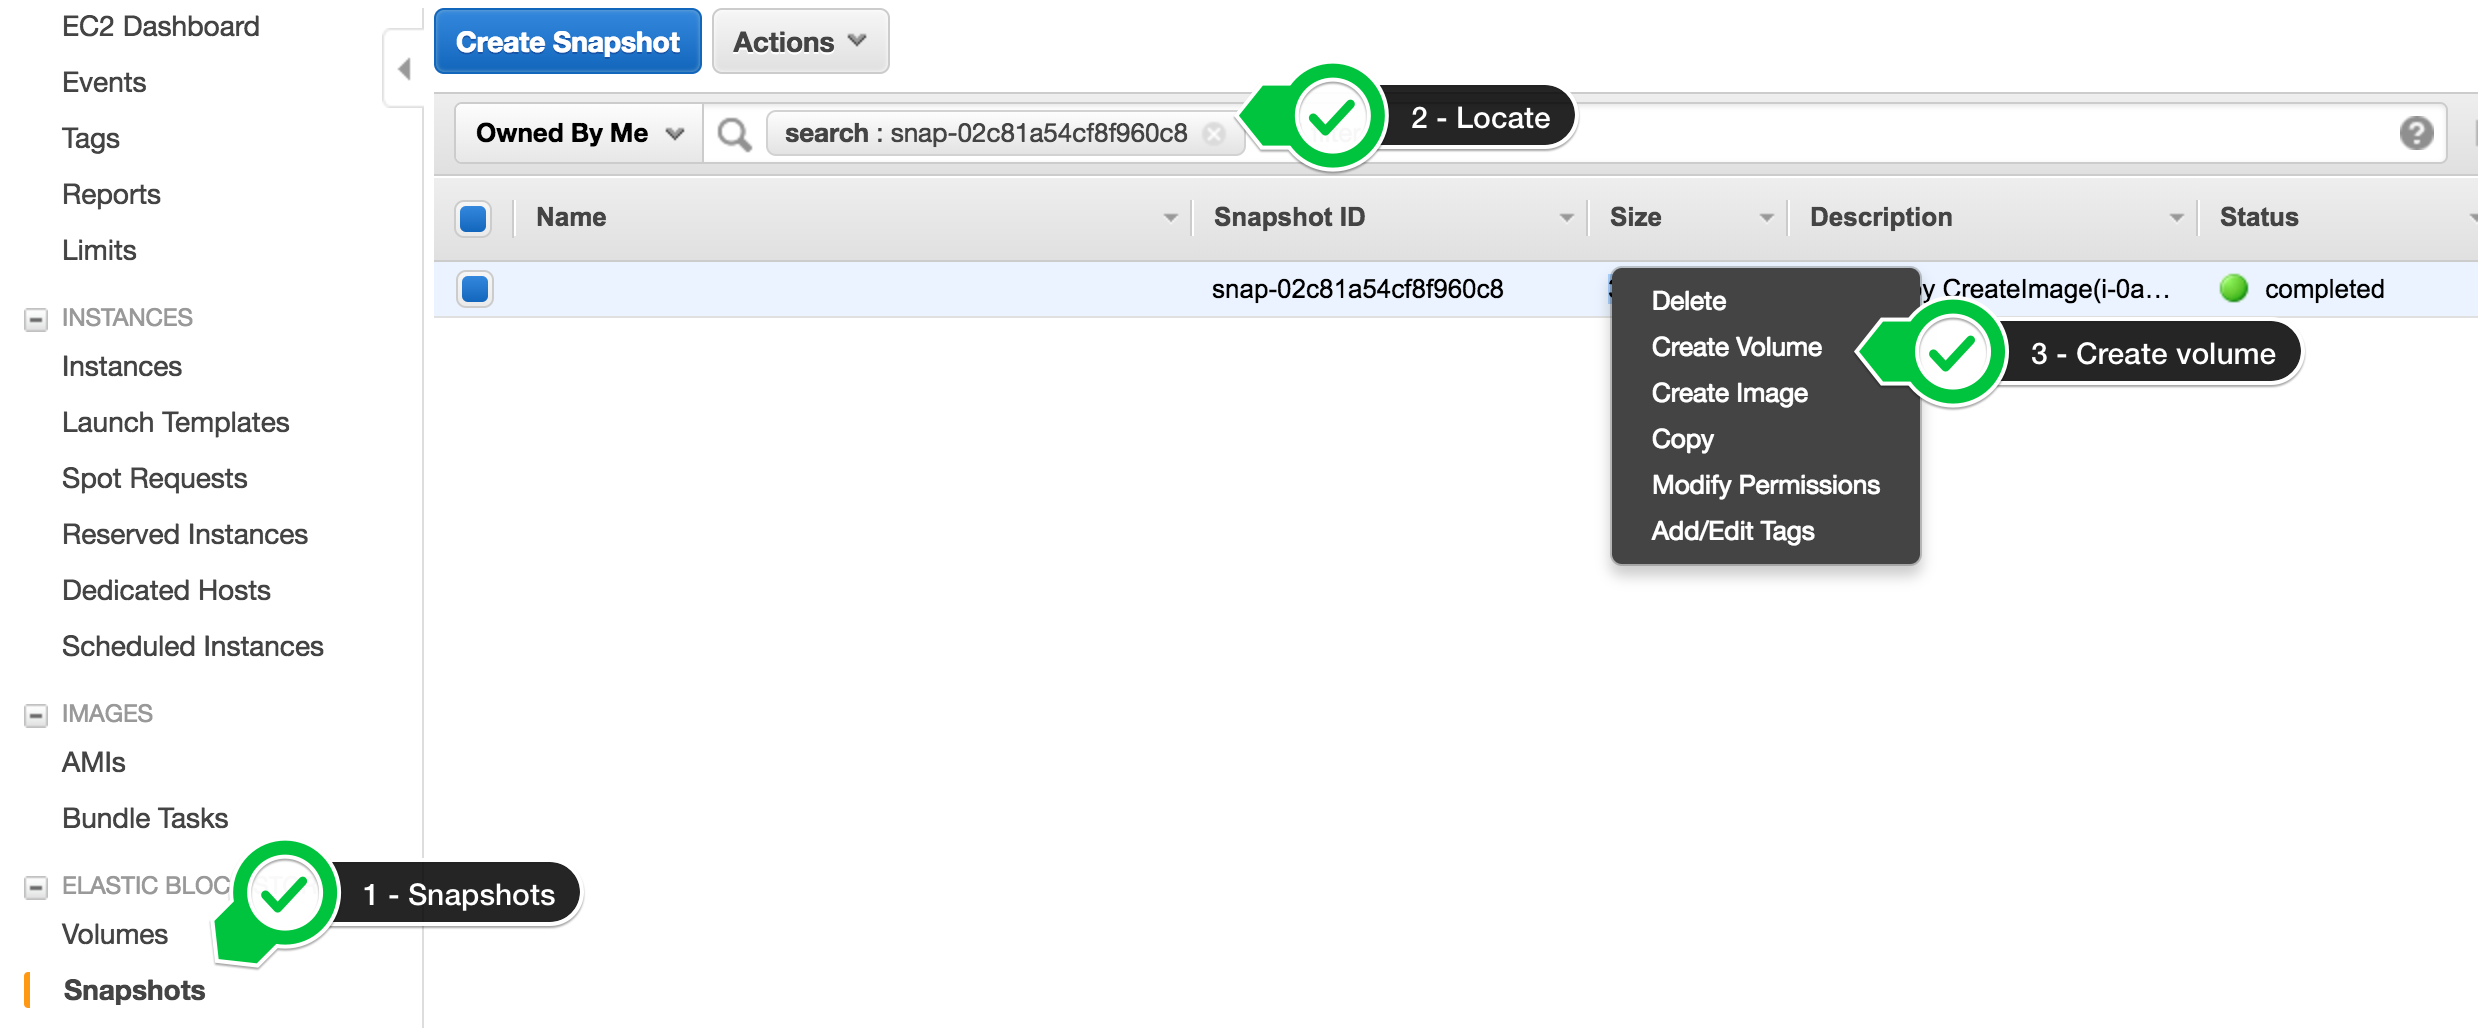
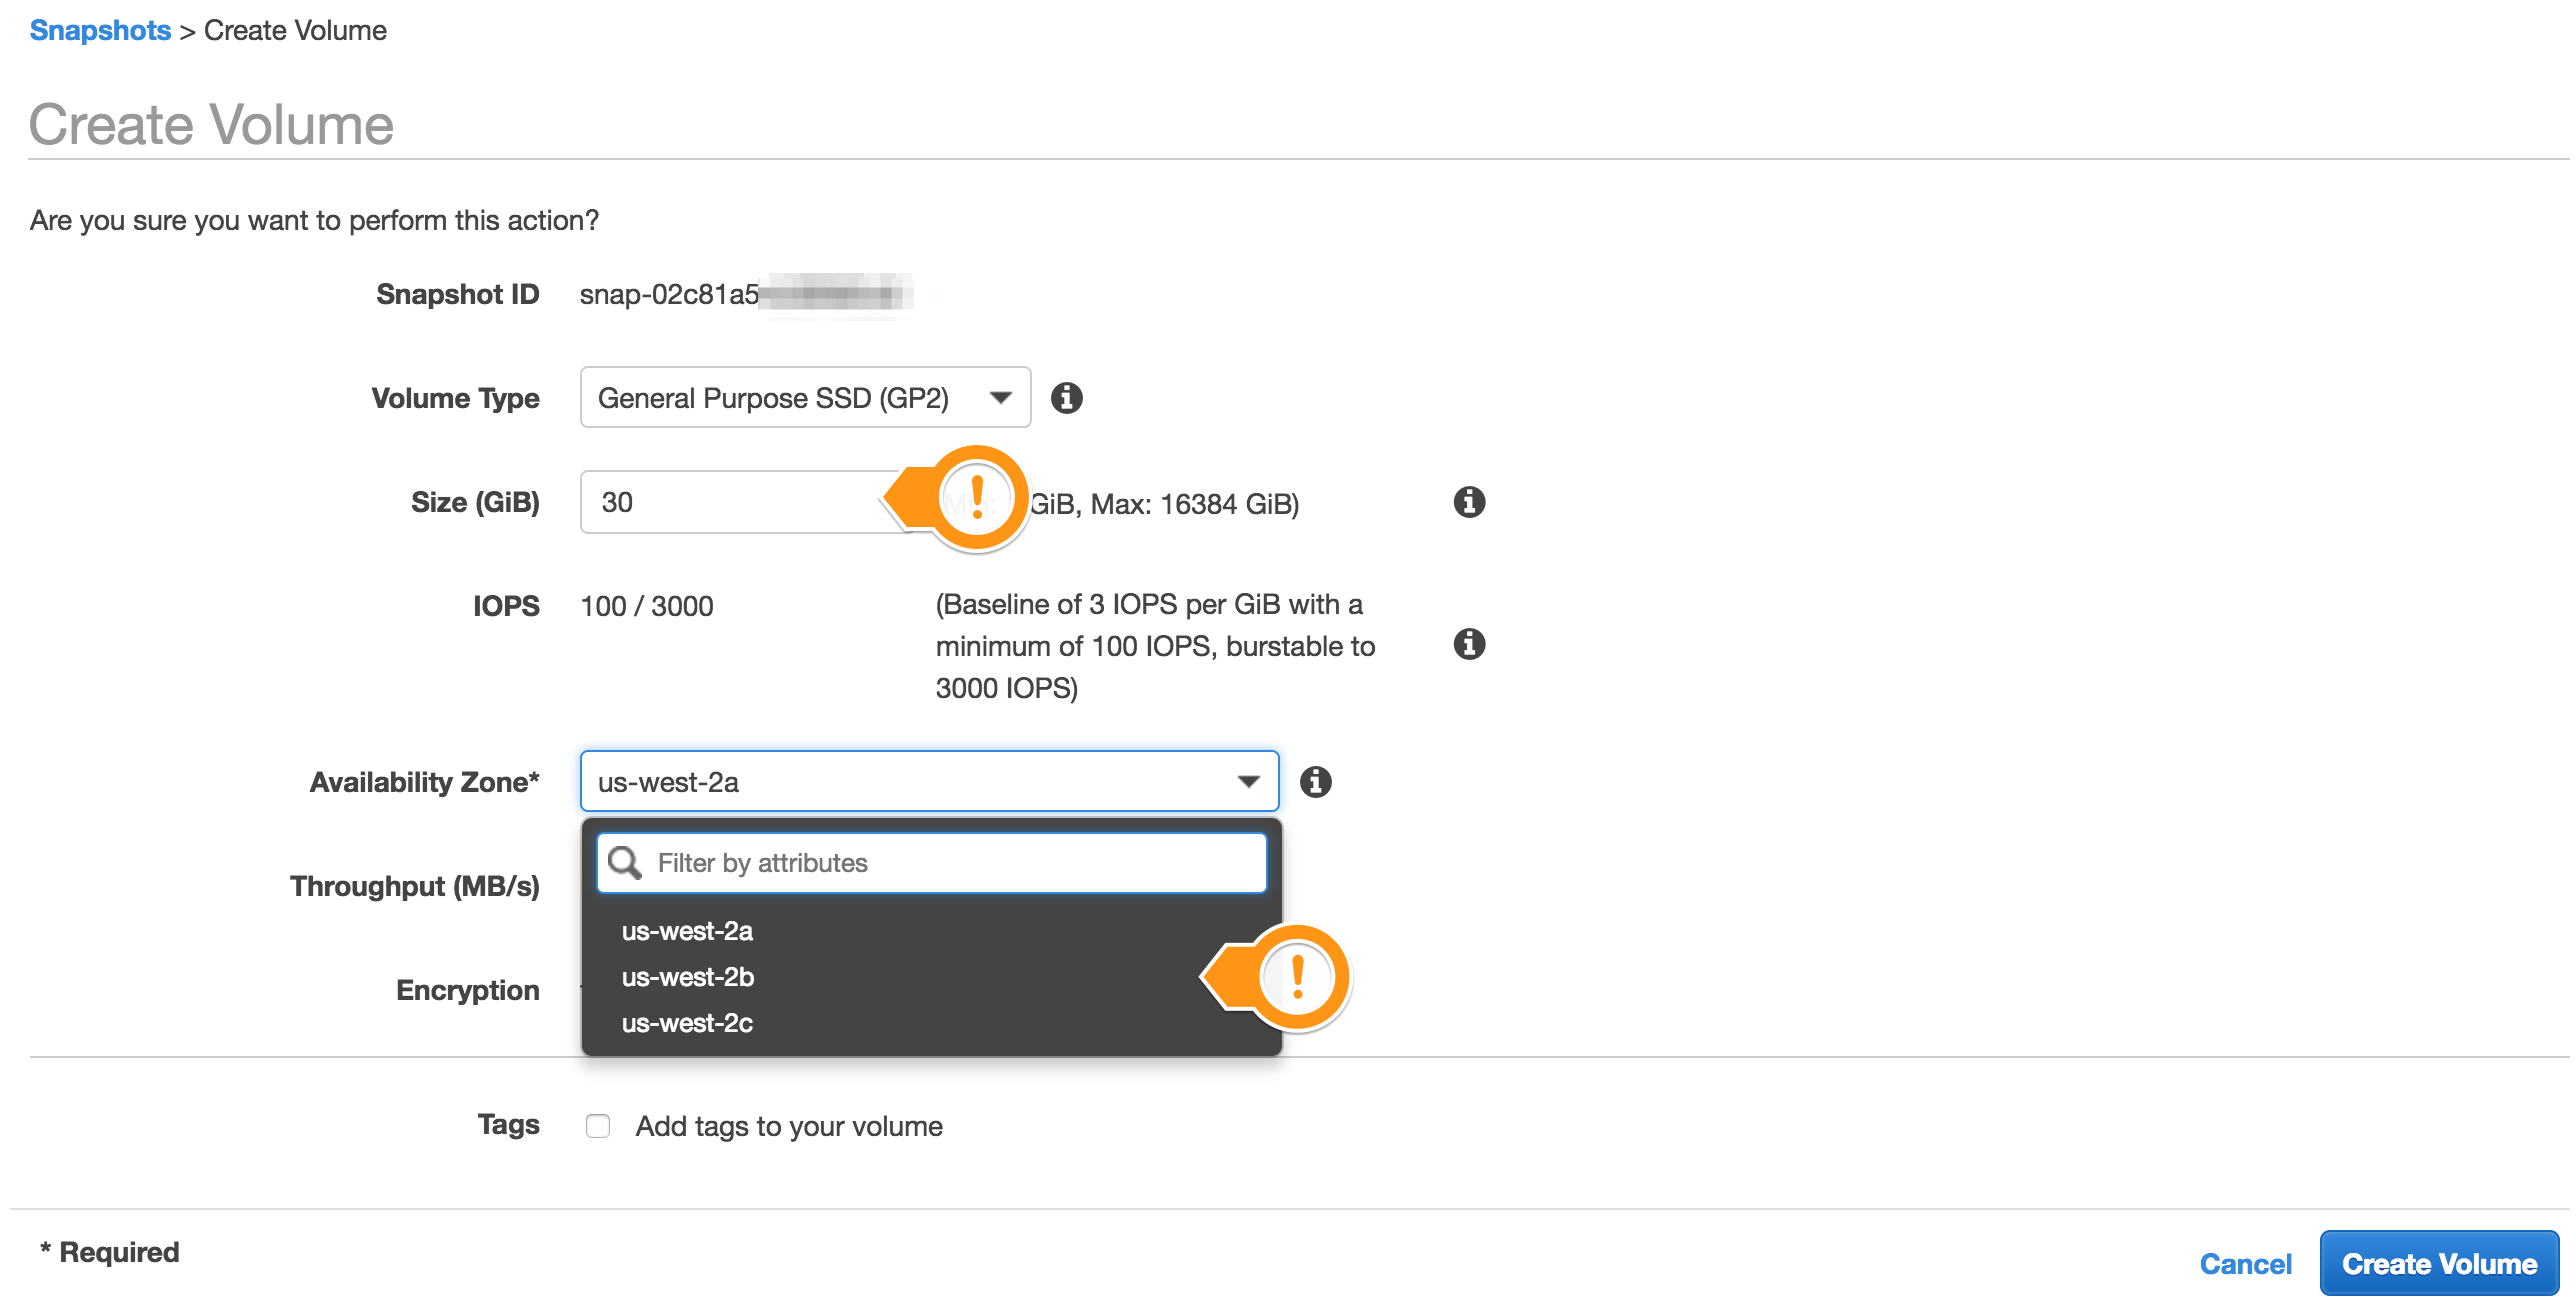
-
For each node that is down, create a new volume from the most recent associated snapshot taken. It is here that the snapshot tags are critical for ensuring the correct snapshot is restored for the node..
-
Attach the newly created volume to the instance; whether it was a newly created or the original instance..
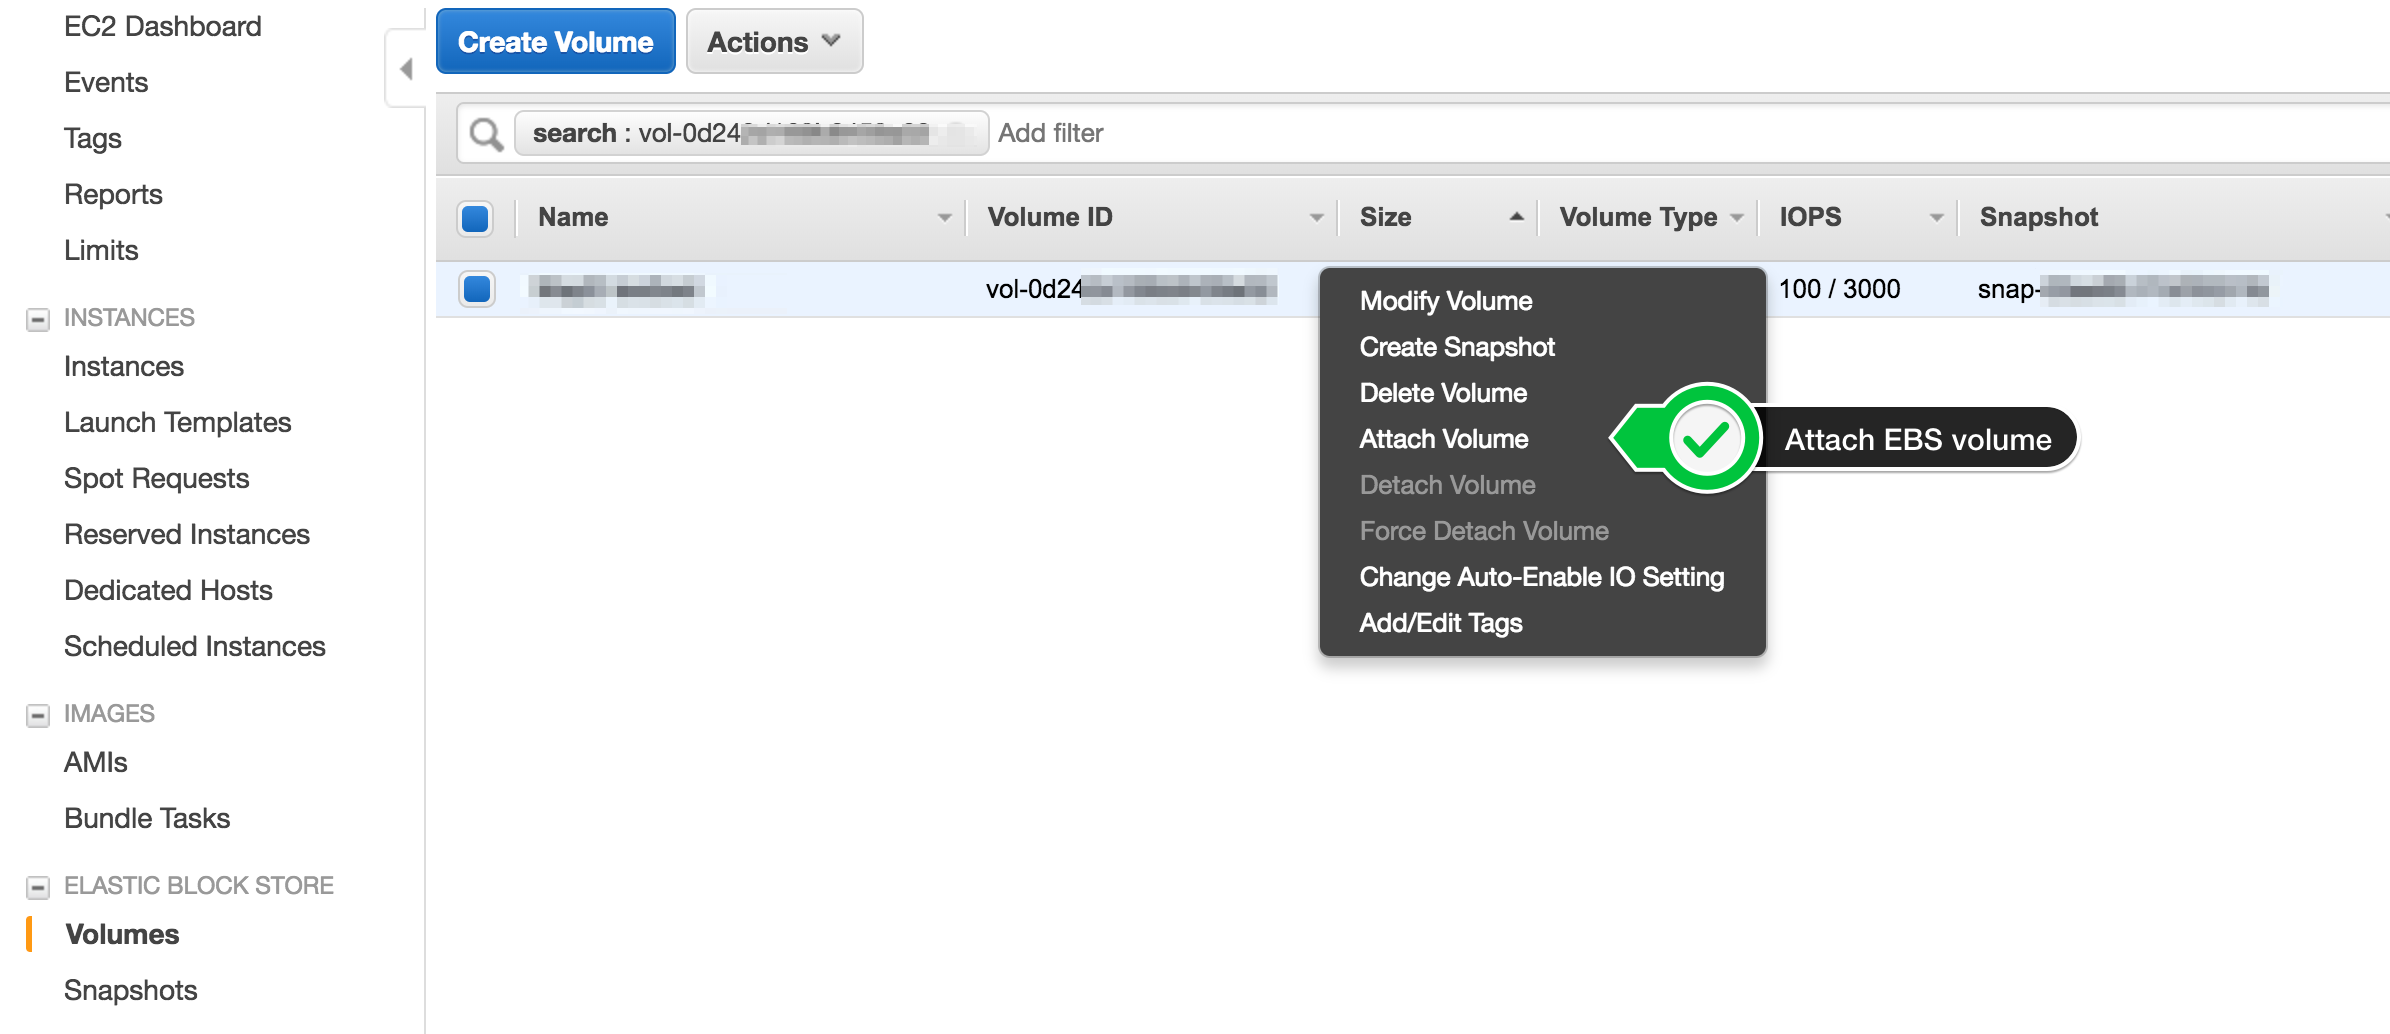
Note: If the instance started while the EBS volume was not yet attached, be sure to remove any newly created data, commitlog, and saved_caches directories that would have been created on the node’s local storage. Failure to do so could potentially mess up the token ownership as commit logs would be replayed when the node start, thus updating the system data with new token ownership from the previous ‘failed’ start. This breaks consistency guarantees and could eventually lead to a data loss.
-
Mount the new volume from the instance operating system perspective, for example:
mount /dev/xvdq1 /var/lib/cassandra/data/
-
Start Apache Cassandra:
service cassandra start && tail -100f /var/log/cassandra/system.log
-
Finally run a repair on all the nodes and for all the tables where consistency is a concern.
-
The node should join the cluster, and other nodes should detect the new IP replacing the old one. Repeat this procedure for all the nodes that need to be brought back (up to 100% of the nodes). Even with big datasets, the cluster should go back to normal fairly quickly and the service should go back online as soon as enough servers have been restored, depending on the configuration.
It is hard to be precise here as the speed will depend on the use of the API versus the use of the console and then the volume creation will depend on the data size.
Yet it is optimized by AWS and is definitely way faster than a standard backup transfer. Again, given the number of manual steps and considering how fast a cluster restore should be done in a critical situation, scripting this procedure using the API instead of the console is probably better in most (all?) cases.
Summing up
The AWS EBS backup solution comes with some drawbacks:
- The topology used for the restore cluster has to be identical to that of the original cluster. Same number of node, same cluster name, same data center name, same number of nodes per rack, vnodes configuration. The safest approach is not to change anything that does need to be changed.
- It is somewhat expensive. Enabling snapshots feature for EBS comes at a price.
- You have to code the snapshot retention policy yourself. Yet it is basic scripting in the language you prefer using AWS API; nothing new for most of AWS users.
- It is an advanced operation, that bypasses some Apache Cassandra’s safe guards around consistency. An incorrect operation can lead to a data loss. It is important to test the process then probably automate it.
On the bright side, with this operation we make important improvements on our backup / restore objectives:
- The AWS Snapshots feature provides an immediate snapshot and incremental transfer of the data asynchronously, and because of this it is possible to achieve a very good Recovery Point Objective. It can be seconds if needed and as long as machines can handle it.
- The Recovery Time Objective for this process is quick and consistent. That is, the time required to restore an EBS volume from a snapshot is fixed. As soon as the EBS volume is mounted and the instance joins the cluster, data is is available. You can expect degraded performances as data will be loading in the background. However this is probably bearable, given the cluster was recovered from complete data loss in a short amount of time. From AWS documentation:
New volumes created from existing EBS snapshots load lazily in the background. This means that after a volume is created from a snapshot, there is no need to wait for all of the data to transfer from Amazon S3 to your EBS volume before your attached instance can start accessing the volume and all its data. If your instance accesses data that hasn’t yet been loaded, the volume immediately downloads the requested data from Amazon S3, and continues loading the rest of the data in the background.
- AWS service comes at a cost, but:
- The incremental transfer of the data during the backup phase can save a lot of money compared to a full backup.
- The cost to setup the backup service is reduced if AWS Lambda, Events scheduler, Snapshots and API are configured to do all of the work.
- Restore comes at a negligible cost and is very efficient
- System tables are saved alongside the data, meaning the backup store almost everything we need to restore, including the schema, the token range owned, topology information.
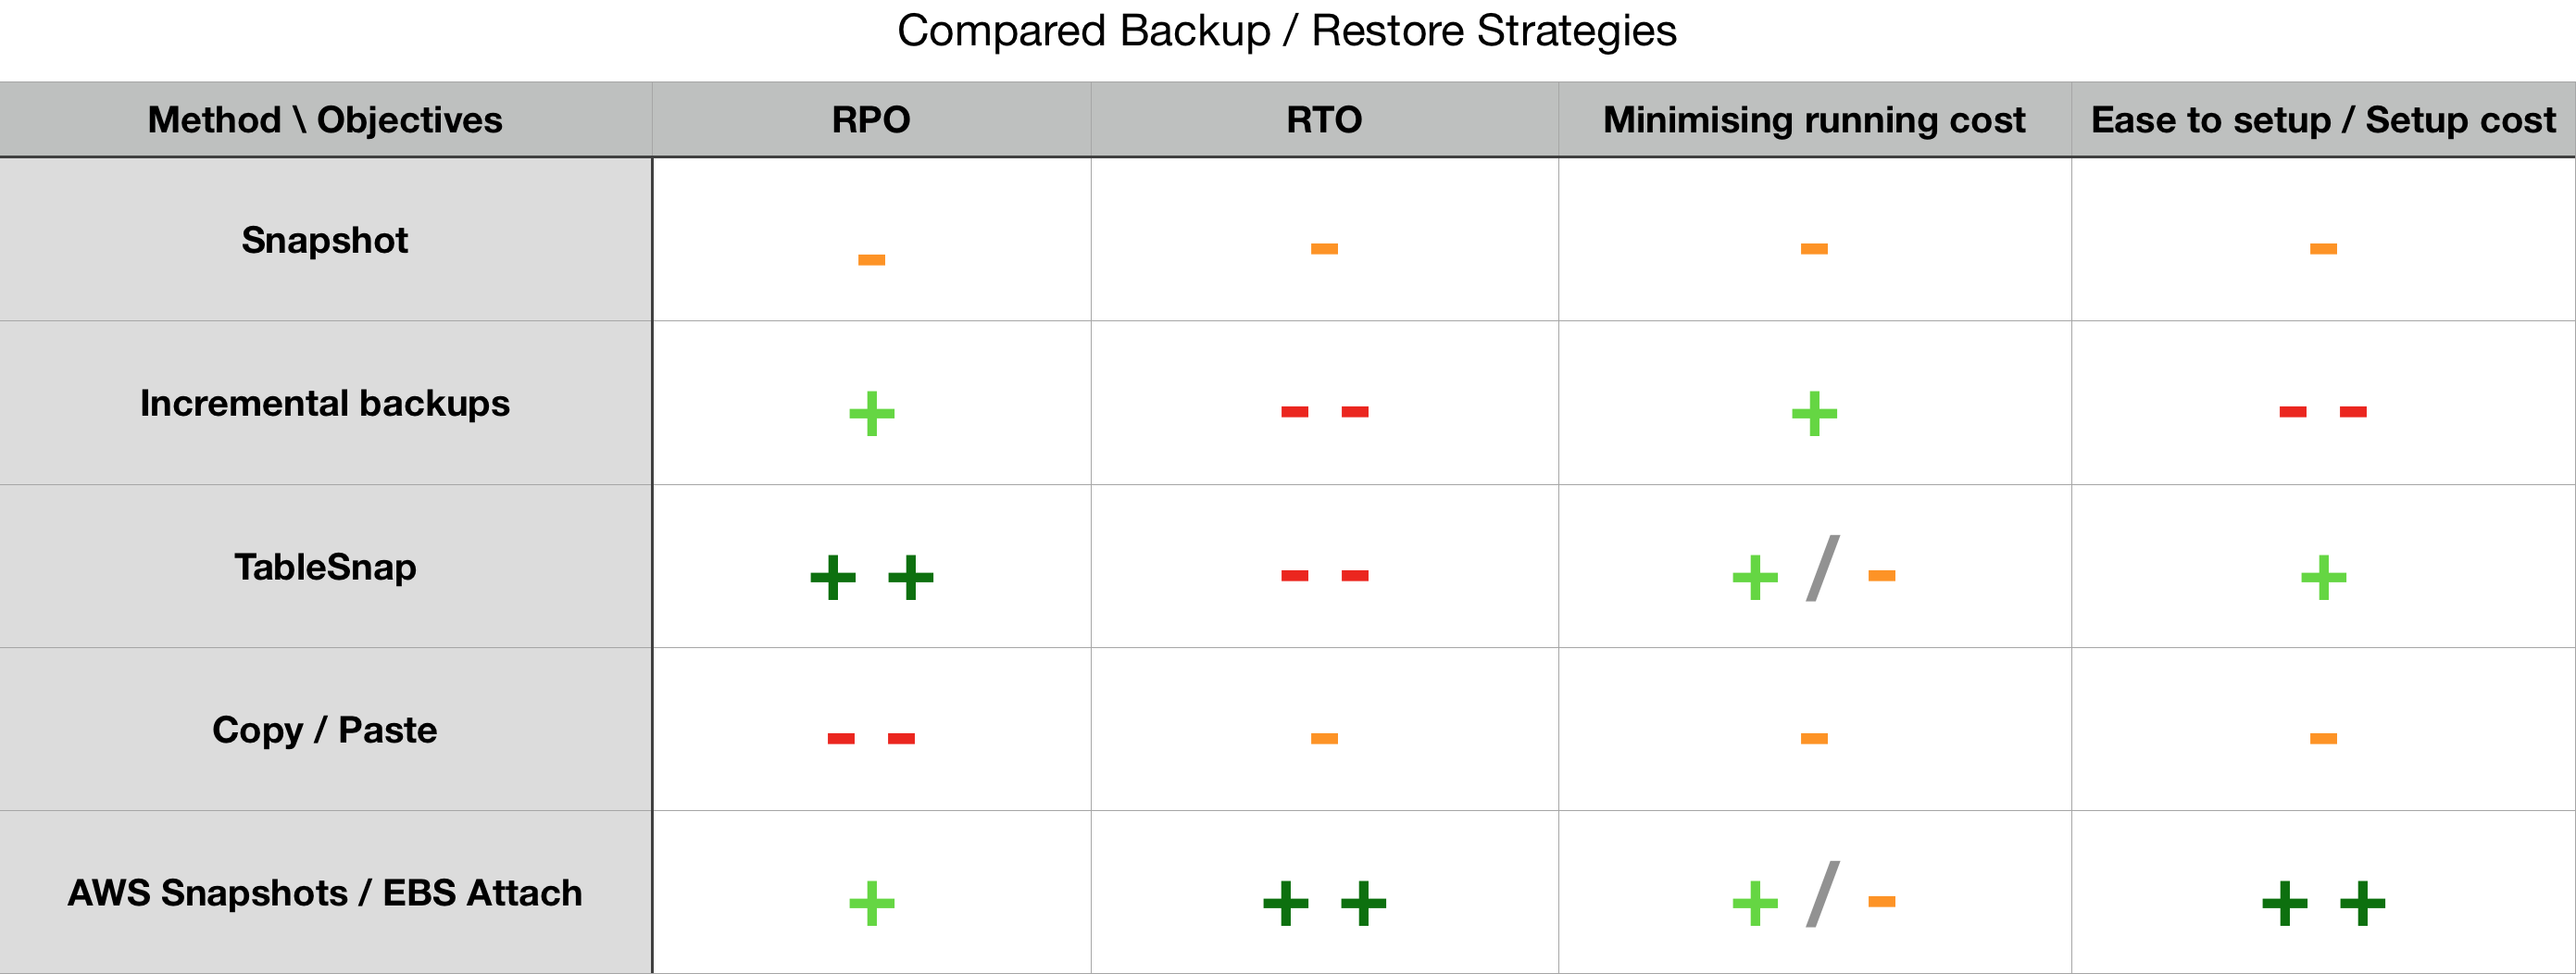
Let’s compare!
We have been through the overview of some available backup and restore solutions for Apache Cassandra. Hereafter is a table that aims at being a quick evaluation of them, a visual sum up of what is said herein.
To be fair, a backup was considered completed when the data was moved off the node to another location. For example snapshot or incremental backups solutions can easily have a RPO of 1 second, but the data still remains on the volume as the original data. Hence, if the machine is unreachable, the backup is useless. This reduces the backup efficiency to a smaller scope including for example when recovering from human errors. That is why snapshots have a bad RPO in the table below, we are considering all the data has to be extracted to some external storage. Incremental backups perform a bit better as only increments (ie. new data) are extracted.
We did not compare the commercial solutions. Those evolve quickly and all have a support that will answer any question better than I would. Thus I invite you to contact companies providing this service directly.
Note: We saw how an overall poorly performing solution such as ‘copy/paste’ can turn out to be one of the best option in a specific environment. It is reasonable for a process that performs poorly in the above table to be a reasonable solution that is suitable for your requirements. Feel free to share your experience with us in the comments here or share with the community in the Apache Cassandra User mailing list.