This is the second part of the Cassandra Monitoring miniseries, index of all parts below:
- Cassandra Monitoring - part I - Introduction
- Cassandra Monitoring - part II - Graphite/InfluxDB & Grafana on Docker
In this blogpost we will continue exploring the topic of Cassandra metric reporters mentioned in Part I. Our goal is to configure a reporter that sends metrics to an external time series database. For visualization we will use Grafana, which can read data directly from various time series databases. We are going to heavily leverage Docker, so that we can omit the irrelevant setup details of various projects. To make it easier to set up a full working example, we have prepared a Docker Compose script in our GitHub repository.
As a prerequisite for following this post, please install Docker and Docker Compose on your machine. For instructions please see the linked docs.
We are going to describe two configuration variants - Cassandra-Graphite-Grafana and Cassandra-InfluxDB-Grafana over the Graphite protocol.
Network
Both variants will require 3 containers each. Cassandra and Grafana will need access to the time series store. Links between Docker containers are currently a legacy feature, so we are going to use Docker networking. We are going to create just one network and attach all containers to it. Each of the containers will be accessible in our network under a hostname identical to their name.
To create the network you need to run:
docker network create monitoring-network
Note: In our Docker Compose example scripts we do not set up a network explicitly, because it generates one automatically for the application.
Let's start with setting up a time series database. We will now describe two mutually exclusive configuration options. Remember that you only need one of them to get the monitoring working.
Graphite
Unfortunately there is no official Graphite Docker image, so we have to use one of the non-official ones from Docker Hub.
In order to run the selected image, execute:
docker run -d  -p 8080:80 -p 2003:2003 --net monitoring-network \
    --name graphite sitespeedio/graphite:0.9.14
This means that we are running the sitespeedio/graphite:0.9.14 image, creating a container named graphite, attached to network monitoring-network, mapping the container’s internal ports to local 8080 and 2003. Everything is going to work in the background (-d).
The http://localhost:8080 presents a simple web interface. Port 2003 is for the API. Default user and password is guest and guest.
Graphite installation without Docker is a bit complicated, so one of the Graphite developers has created a separate project purely for making the installation easier.

Although the UI is a bit outdated, it is still capable of drawing graphs; moreover, Graphite itself also provides a graph rendering API. Graphite is a very powerful tool and it implements numerous functions which can be applied to the data.
Messages sent to Graphite have a very simple format: metric_path value timestamp\n. This means that a single metric path can have only a single value for a given timestamp.
InfluxDB
InfluxDB is a relatively new open source time series database written in Go. The 1.0 release is planned for summer 2016. Official InfluxDB Docker images are available on Docker Hub. In this post we are using InfluxDB 0.13.0.
In our demonstration we are going to report data from Cassandra using the Graphite format, so we need to enable InfluxDB support for receiving data in this format. In order to do that, we have to pass one additional environment variable when creating the container:
docker run -d -p 8083:8083 -p 8086:8086 \
    -e INFLUXDB_GRAPHITE_ENABLED=true \
    --net monitoring-network  \
    --name influxdb  \
    influxdb:0.13.0
The http://localhost:8083 presents a simple web UI. Port 8086 is for the API. Default user and password is admin and admin.

InfluxDB data model can be more complex than Graphite. For a given timestamp and measurement name, it is possible to store multiple fields and, additionally, every measurement can be described using multiple tags. Tags are indexed, so it is possible to query measurements efficiently, e.g. for a specific node or environment. However, in this blog post we are configuring InfluxDB to receive data using the Graphite protocol, so it does not leverage all these features. A single measurement for a given timestamp only contains one column named value.
Querying data stored in InfluxDB is possible via InfluxQL, which is an SQL-like language.
Cassandra
Official Cassandra images exist on Docker Hub - however, they do not satisfy our needs. There are 3 things which need to be done in order to report metrics from Cassandra to an external system:
- Cassandra distribution is minimalistic and does not include the JAR used for Graphite reporting. For Cassandra >= 2.2 the
metrics-graphite-3.1.0.jaris required and for <= 2.1 themetrics-graphite-2.2.0.jar. - Reporting configuration needs to be created.
- Edit
cassandra-env.shin order to add the following line:JVM_OPTS="$JVM_OPTS -Dcassandra.metricsReporterConfigFile=<reporting-configuration>.yaml"with the path to the configuration created in the previous step.
In this example we are going to use Cassandra 3.7.
Adding required files is pretty simple when you use a standalone Cassandra distribution; however, for Docker we need to create a new image. We will go with a "minimalistic" approach and extend the official one. To build the image, you need to create a directory in which we will place a Dockerfile, reporting configuration and the appropriate .jar.
Cassandra-Graphite-Grafana:
Dockerfile:
FROM cassandra:3.7
COPY graphite.yaml /etc/cassandra/
RUN echo "JVM_OPTS=\"\$JVM_OPTS -Dcassandra.metricsReporterConfigFile=graphite.yaml\"" \
    >> /etc/cassandra/cassandra-env.sh
COPY metrics-graphite-3.1.0.jar /usr/share/cassandra/lib/
graphite.yaml:
graphite:
-
  period: 60
  timeunit: 'SECONDS'
  prefix: 'Node1'
  hosts:
  - host: 'graphite'
    port: 2003
  predicate:
    color: "white"
    useQualifiedName: true
    patterns:
    - ".*"
Cassandra-InfluxDB-Grafana over Graphite protocol:
Dockerfile:
FROM cassandra:3.7
COPY influxdb.yaml /etc/cassandra/
RUN echo "JVM_OPTS=\"\$JVM_OPTS -Dcassandra.metricsReporterConfigFile=influxdb.yaml\"" \
    >> /etc/cassandra/cassandra-env.sh
COPY metrics-graphite-3.1.0.jar /usr/share/cassandra/lib/
influxdb.yaml:
graphite:
-
  period: 60
  timeunit: 'SECONDS'
  prefix: 'Node1'
  hosts:
  - host: 'influxdb'
    port: 2003
  predicate:
    color: "white"
    useQualifiedName: true
    patterns:
    - ".*"
Differences
Both of these setups use the Graphite protocol, so they are almost identical. The only difference is the hostname of the time series database. For Graphite, we reference the graphite container via its hostname and, for InfluxDB, the influxdb hostname. The prefix value will be prepended to every metric name - this way you can make metrics coming from different nodes distinguishable.
Additionally, in both cases you need to put the metrics-graphite-3.1.0.jar in the same directory with the Dockerfile and reporting configuration.
Both of these Cassandra scenarios are available on GitHub for Graphite and for InfluxDB over Graphite protocol.
Running
In order to build the image, you have to execute the following command in the directory with the Dockerfile:
docker build -t cassandra-graphite .
Then create the container and attach it to our network:
docker run -d -p 9042:9042 --net monitoring-network \
    --name cassandra-graphite cassandra-graphite
Please watch Cassandra logs for errors with docker logs -f cassandra-graphite. Every 60 seconds Cassandra should report its metrics to the corresponding time series database. You can check it in the web UI or using the CLI.
For Graphite, open http://localhost:8080 and look at the tree on the left side:

For InfluxDB, open http://localhost:8083, in the right upper corner set the graphite database (the database created by InfluxDB-Graphite integration is by default called graphite) and execute SHOW MEASUREMENTS query:

Grafana
Fortunately for Grafana there are official images on Docker Hub. In this post we are using Grafana 3.1.0. We already have Cassandra running, metrics are being stored in Graphite or InfluxDB, so as the last step we need to visualize them.
In order to run Grafana execute:
docker run -d -p 3000:3000 --net monitoring-network --name grafana grafana/grafana:3.1.0
Grafana UI should be working under http://localhost:3000. Default user and password is admin and admin. If you haven't used Grafana before see the Getting started guide for UI walkthrough.
In order to draw a graph you first need to create a Data Source referring to the specific time series database. You can click it through Grafana UI or just execute the API e.g. using curl:
Graphite
curl 'http://admin:admin@127.0.0.1:3000/api/datasources' -X POST \
-H 'Content-Type: application/json;charset=UTF-8' \
--data-binary '{"name":"graphite","type":"graphite","url":"http://graphite:80",
"access":"proxy","isDefault":true,
"basicAuth":true,"basicAuthUser":"guest","basicAuthPassword":"guest"}'
Url http://graphite:80 refers to Graphite container hostname.
InfluxDB
curl 'http://admin:admin@127.0.0.1:3000/api/datasources' -X POST \
-H 'Content-Type: application/json;charset=UTF-8' \
--data-binary '{"name":"influx","type":"influxdb","url":"http://influxdb:8086",
"access":"proxy","isDefault":true,"database":"graphite","user":"admin","password":"admin"}'
Url http://influxdb:8086 refers to InfluxDB container hostname.
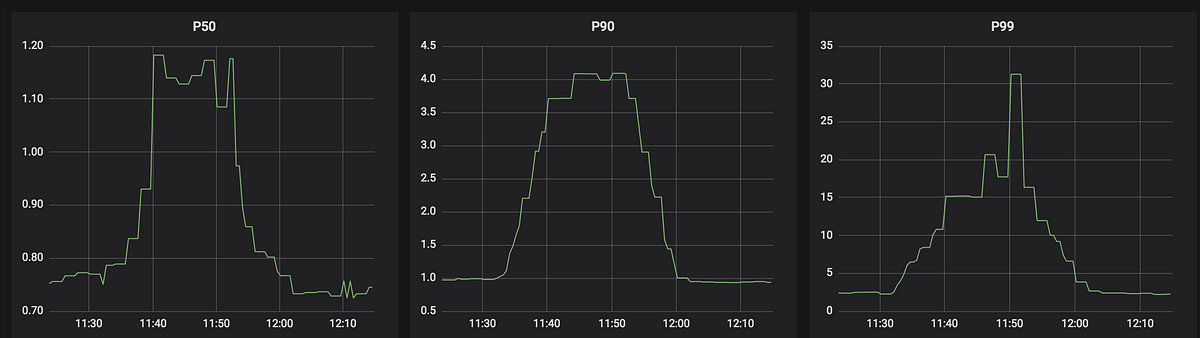
Graphs
Query editors in Grafana differ among various data sources. As you can see below, for Graphite the editor does not display the whole metric list at once, but allows to browse it in a tree-like manner, similarly to the Graphite UI. It is possible to apply a function to a chosen metric. In contrast, for the InfluxDB data source Grafana offers a more SQL-like editor, where all metrics for all nodes are shown in a single list.
 Graphite
 InfluxDB
We will focus more on graphing in one of the next parts of this blog series.
This post does not present a full, production ready configuration. When using Docker, it is important to remember that the data stored inside the container might be lost e.g. when a new version of an application is deployed. That is why it is recommended to use Docker Volumes for storing data. For more details please also read the docs of the specific Docker images.
Additionally be aware that by default Docker adds its own iptables rules potentially making the ports exposed by a container accessible from remote hosts.
In production you must never use default passwords, always remember to change them!
Monitoring Cassandra using Graphite or InfluxDB (with data sent over Graphite protocol) is very similar. There are differences on the Grafana level, where Graphite integration seems to be a bit more mature. However, Graphite development was practically dead over the last years. Grafana creators have recently posted a piece of information that they want to revive Graphite. In contrast, InfluxDB undergoes a very intensive development process, which e.g. improves performance with almost every release.
If you'd like to quickly run one of the described variants, see our GitHub leveraging Docker Compose.
In the next part of this series we will focus on the Cassandra-InfluxDB-Grafana stack. We will show improvements over Cassandra-InfluxDB reporting (omitting Graphite protocol) and the resulting advantages on the Grafana level.