This is part 2 of a Cassandra Cluster Tutorial series. Part 1 used Vagrant to setup a local Cassandra Cluster and installs Cassandra on boxes. Part 2 installs Cassandra Database SSL support and configures Cassandra nodes with SSL. Later parts of this Cassandra Cluster tutorial series will setup Ansible/ssh for DevOps/DBA tasks, use Packer to create EC2 AMIs and instances, and setup a Cassandra cluster in EC2.
The Cassandra database allows you to secure the client transport (cqlsh) as well as the cluster transport cluster transport (storage transport).
Remember that SSL and TLS have some overhead. This is especially true in the JVM world, which is not as performant for handling SSL/TLS unless you are using Netty/OpenSSL integration. If possible, use no encryption for the cluster transport (storage transport), and deploy your Cassandra nodes in a private subnet, and limit access to this subnet to the client transport. Also, if possible, avoid using TLS/SSL on the client transport and do client operations from your app tier, which is located in a non-public subnet.
However, it is not always possible to avoid using SSL/TLS. You may work in an industry that requires the use of encrypted transports based on regulations like the U.S. Health Insurance Portability and Accountability Act (HIPAA), the Payment Card Industry Data Security Standard (PCI DSS), or the U.S. Sarbanes-Oxley Act. Or you might work for a bank or other financial institution. Or it just might be a corporate policy to encrypt such network transports — even for internal networks.
An area of concern is for compliance is authorization and encrypted data at rest. Cassandra has essential security features for authentication, role-based authorization, transport encryption (JMX, client transport, cluster transport), as well as data at rest encryption (encrypting SSTables).
This article will focus just on setting up encryption for the Cassandra client transport (cqlsh) and the cluster transport. Later articles will cover various aspects of compliance and encryption.
Encrypting the Cassandra Database Transports
Data that travels over the client transport across a network could be accessed by someone you don’t want accessing said data with tools like wire shark. If data includes private information, like SSN numbers, credentials (password, username), credit card numbers or account numbers, then we want to make that data unreadable to any and all 3rd parties. This is especially important if we don’t control the network. You can also use TLS to make sure the data has not been tampered with whilst traveling the network. The Secure Sockets Layer (SSL) / Transport Layer Security (TLS) protocol are designed to provide these features (SSL is the old name for what became TLS but many people still refer to TLS as SSL).
Cassandra is written in Java. Java defines the JSSE framework which in turn uses the Java Cryptography Architecture (JCA). JSSE uses cryptographic service providers from JCA. If any of the above is new to you, please take a few minutes to read through the TLS/SSL Java guide. It does a good job explaining keystores vs. trust stores.
This article picks up right after this one – Setting up a Cassandra cluster with Cassandra image and Cassandra cloud project with Vagrant. If you want some more information on how we set up the cluster with Vagrant (and how we support EC2, etc.), please refer to that article as well.
Configuring Cassandra: Setting Up Client Config
The client transport encryption protects data as it moves from clients to server nodes in the cluster.
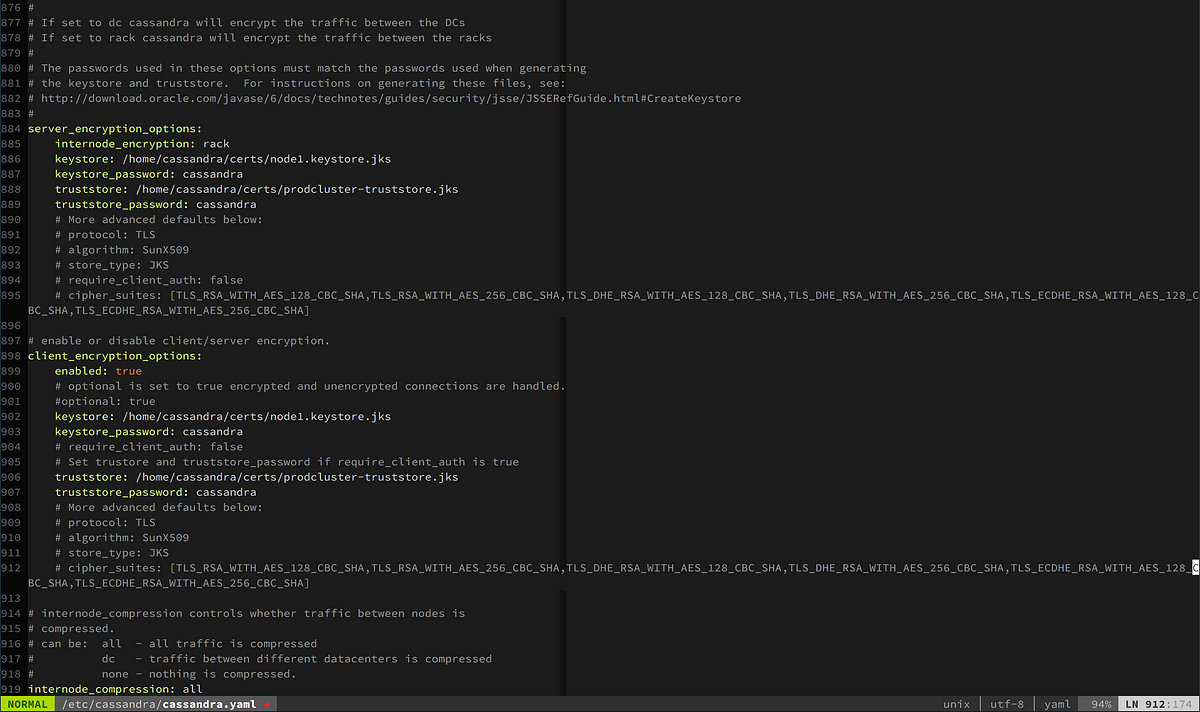
The client_encryption_options are stored in the cassandra.yaml. Here is an example config.
Cassandra YAML: Sample Config
# enable or disable client/server encryption.
client_encryption_options:
    enabled: false
    # If enabled and optional is set to true encrypted and unencrypted connections are handled.
    optional: false
    keystore: conf/.keystore
    keystore_password: cassandra
    require_client_auth: false
    # Set trustore and truststore_password if require_client_auth is true
    # truststore: conf/.truststore
    # truststore_password: cassandra
    protocol: TLS
    algorithm: SunX509
    store_type: JKS
    cipher_suites: [TLS_ECDHE_ECDSA_WITH_AES_256_GCM_SHA384,TLS_ECDHE_RSA_WITH_AES_256_GCM_SHA384, TLS_ECDH_anon_WITH_AES_256_CBC_SHA]
Cassandra Cluster: Setup SSL Keys
Before we go into the details of setting up the cassandra.yaml file, let’s create some trust stores, key stores, and export some keys with keytool (utility that ships with JDK). The following script generates cluster and client keys.
setupkeys-cassandra-security.sh - creates encyption keys for Cassandra
#!/bin/bash
KEY_STORE_PATH="$PWD/resources/opt/cassandra/conf/certs"
mkdir -p "$KEY_STORE_PATH"
KEY_STORE="$KEY_STORE_PATH/cassandra.keystore"
PKS_KEY_STORE="$KEY_STORE_PATH/cassandra.pks12.keystore"
TRUST_STORE="$KEY_STORE_PATH/cassandra.truststore"
PASSWORD=cassandra
CLUSTER_NAME=test
CLUSTER_PUBLIC_CERT="$KEY_STORE_PATH/CLUSTER_${CLUSTER_NAME}_PUBLIC.cer"
CLIENT_PUBLIC_CERT="$KEY_STORE_PATH/CLIENT_${CLUSTER_NAME}_PUBLIC.cer"
### Cluster key setup.
# Create the cluster key for cluster communication.
keytool -genkey -keyalg RSA -alias "${CLUSTER_NAME}_CLUSTER" -keystore "$KEY_STORE" -storepass "$PASSWORD" -keypass "$PASSWORD" \
-dname "CN=CloudDurable Image $CLUSTER_NAME cluster, OU=Cloudurable, O=Cloudurable, L=San Francisco, ST=CA, C=USA, DC=cloudurable, DC=com" \
-validity 36500
# Create the public key for the cluster which is used to identify nodes.
keytool -export -alias "${CLUSTER_NAME}_CLUSTER" -file "$CLUSTER_PUBLIC_CERT" -keystore "$KEY_STORE" \
-storepass "$PASSWORD" -keypass "$PASSWORD" -noprompt
# Import the identity of the cluster public cluster key into the trust store so that nodes can identify each other.
keytool -import -v -trustcacerts -alias "${CLUSTER_NAME}_CLUSTER" -file "$CLUSTER_PUBLIC_CERT" -keystore "$TRUST_STORE" \
-storepass "$PASSWORD" -keypass "$PASSWORD" -noprompt
### Client key setup.
# Create the client key for CQL.
keytool -genkey -keyalg RSA -alias "${CLUSTER_NAME}_CLIENT" -keystore "$KEY_STORE" -storepass "$PASSWORD" -keypass "$PASSWORD" \
-dname "CN=CloudDurable Image $CLUSTER_NAME client, OU=Cloudurable, O=Cloudurable, L=San Francisco, ST=CA, C=USA, DC=cloudurable, DC=com" \
-validity 36500
# Create the public key for the client to identify itself.
keytool -export -alias "${CLUSTER_NAME}_CLIENT" -file "$CLIENT_PUBLIC_CERT" -keystore "$KEY_STORE" \
-storepass "$PASSWORD" -keypass "$PASSWORD" -noprompt
# Import the identity of the client pub  key into the trust store so nodes can identify this client.
keytool -importcert -v -trustcacerts -alias "${CLUSTER_NAME}_CLIENT" -file "$CLIENT_PUBLIC_CERT" -keystore "$TRUST_STORE" \
-storepass "$PASSWORD" -keypass "$PASSWORD" -noprompt
keytool -importkeystore -srckeystore "$KEY_STORE" -destkeystore "$PKS_KEY_STORE" -deststoretype PKCS12 \
-srcstorepass "$PASSWORD" -deststorepass "$PASSWORD"
openssl pkcs12 -in "$PKS_KEY_STORE" -nokeys -out "${CLUSTER_NAME}_CLIENT.cer.pem" -passin pass:cassandra
openssl pkcs12 -in "$PKS_KEY_STORE" -nodes -nocerts -out "${CLUSTER_NAME}_CLIENT.key.pem" -passin pass:cassandra
The keytool utility ships with Java SDK. We use this keytool command to create the cluster key. Let’s break down the script that generates the keys and certificates.
First, we create a key store and add to that keystore our new cluster key. The keystore will contain all of the details about our key, and we can generate public keys, certificates, etc. from it.
Create the Cassanda Cluster Key with Java keytool
keytool -genkey -keyalg RSA -alias "${CLUSTER_NAME}_CLUSTER" -keystore "$KEY_STORE" -storepass "$PASSWORD" -keypass "$PASSWORD" \
-dname "CN=CloudDurable Image $CLUSTER_NAME cluster, OU=Cloudurable, O=Cloudurable, L=San Francisco, ST=CA, C=USA, DC=cloudurable, DC=com" \
-validity 36500
Once we create the Cassandra cluster key, we will want to export a public key from it. The public key can be used to identify and validate node members.
Export a Public Key for the Cassandra Cluster Key
# Create the public key for the client to identify itself.
keytool -export -alias "${CLUSTER_NAME}_CLIENT" -file "$CLIENT_PUBLIC_CERT" -keystore "$KEY_STORE" \
-storepass "$PASSWORD" -keypass "$PASSWORD" -noprompt
Then we will import the public key into the Cassandra trust store so that nodes can identify each other. The provision script will copy the Cassandra keystore and truststore to the various nodes. If we wanted to deploy additional keys, we could use a tool like Ansible or scp (secure copy) to add the keys to truststores on various nodes (we cover ansible in detail in other tutoirals).
Import Public Key for the Cassandra Cluster Key Into the Truststore so Cassandra Nodes Can Identify Each Other
# Import the identity of the cluster public cluster key into the trust store so that nodes can identify each other.
keytool -import -v -trustcacerts -alias "${CLUSTER_NAME}_CLUSTER" -file "$CLUSTER_PUBLIC_CERT" -keystore "$TRUST_STORE" \
-storepass "$PASSWORD" -keypass "$PASSWORD" -noprompt
We perform the same three tasks for the client keys (create a key, export a public key, and add the public key to the truststore). Then lastly, we create PEM files for the Cassandra client keys by exporting our Java JKS keystore as a PKCS12 keystore.
The Cassandra truststore is used to identify nodes and clients the Cassandra cluster nodes trust. You don't have to use a truststore with clients, you could use username and password (or both).
Next, we want to create PEM files to use with csqlsh (Cassandra client for cql). The Java keystore uses the JKS format, which is specific to Java. In order to convert our keys to the PEM format (more widely used format), we first must copy our JDK formatted keystore to a PKS12 formatted keystore (PKS12 is a standard keystore format). Then we use openssl to extract private and public keys from the PKS12 keytore.
Creating Cassandra Client PEM Files
keytool -importkeystore -srcalias "${CLUSTER_NAME}_CLIENT" \
  -srckeystore "$KEY_STORE" -destkeystore "$PKS_KEY_STORE" \
  -deststoretype PKCS12 \
  -srcstorepass "$PASSWORD" -deststorepass "$PASSWORD"
openssl pkcs12 -in "$PKS_KEY_STORE" -nokeys \
  -out "$KEY_STORE_PATH/${CLUSTER_NAME}_CLIENT.cer.pem" \
  -passin pass:cassandra
openssl pkcs12 -in "$PKS_KEY_STORE" -nodes -nocerts \
    -out "$KEY_STORE_PATH/${CLUSTER_NAME}_CLIENT.key.pem" \
    -passin pass:cassandra
If we are successful, we should have a whole lot of keys, keystore files, and such. Here are the files that get generated.
Cert Files, Stores, and Private Keys
$ pwd
~/github/cassandra-image
$ ls resources/opt/cassandra/conf/certs/
CLIENT_test_PUBLIC.cercassandra.pks12.keystoretest_CLIENT.key.pem
CLUSTER_test_PUBLIC.cercassandra.truststore
cassandra.keystoretest_CLIENT.cer.pem
Let's describe these files.
CLIENT_test_PUBLIC.cer: public client key for the test cassandra cluster.cassandra.pks12.keystore: PKS12 keystore for cassandra client used to generate the PEM.test_CLIENT.key.pem: private client key in PEM format used by csqlsh.CLUSTER_test_PUBLIC.cer: public cluster key for the test cluster.cassandra.truststore: truststore used by Cassandra.cassandra.keystore: keystore used by Cassandra.test_CLIENT.cer.pem: public client key in PEM format used by csqlsh.
For the cassandra_image project (github project), these files are copied to /opt/cassandra/conf/cert. To learn more about our Vagrant project (EC2, Docker, Packer too) see Setting up a Cassandra cluster with cassandra image and cassandra cloud project with Vagrant.
Installing Cassandra: Use the Keys That We Set Up
As part of the provision script for cassandra_image. We added the following to the Cassandra image project to improve the Cassandra install to work with these SSL keys:
scripts/040-install-certs.sh - Install Certs into Cassandra
#!/bin/bash
set -e
DESTINATION_DIRECTORY=/opt/cassandra/conf/certs
SOURCE_DIRECTORY="~/resources$DESTINATION_DIRECTORY"
if [ -d "$SOURCE_DIRECTORY" ]; then
    mkdir -p "$DESTINATION_DIRECTORY"
    cp -r "$SOURCE_DIRECTORY" "$DESTINATION_DIRECTORY"
fi
if [ ! -d "$SOURCE_DIRECTORY" ]; then
    echo "UNABLE TO INSTALL CERTS AS THEY WERE NOT FOUND"
fi
This will copy the certs to the right location if you generated a folder in resources (cassandra_image/resources/opt/cassandra/conf/cert), which the last script that we covered does.
Configure Cassandra to use keys in Cassandra Config
/opt/cassandra/conf/cassandra.yaml
server_encryption_options:
    internode_encryption: all
    keystore: /opt/cassandra/conf/certs/cassandra.keystore
    keystore_password: cassandra
    truststore: /opt/cassandra/conf/certs/cassandra.truststore
    truststore_password: cassandra
    # More advanced defaults below:
    protocol: TLS
client_encryption_options:
    enabled: true
    # If enabled and optional is set to true encrypted and unencrypted connections are handled.
    optional: false
    keystore: /opt/cassandra/conf/certs/cassandra.keystore
    keystore_password: cassandra
    truststore: /opt/cassandra/conf/certs/cassandra.truststore
    truststore_password: cassandra
    require_client_auth: true
    protocol: TLS
Now let’s test it. We can log into one of our nodes and use nodetool to describe the cluster. If it is successful, we will see all three nodes.
Testing That our Cassandra Nodes Can Talk to Each Other
$ vagrant up
# Get a coffee and otherwise relax for a minute.
# Now log into one of the nodes.
$ vagrant ssh node0
# Now check to see if the cluster is formed.
[vagrant@localhost ~]$ /opt/cassandra/bin/nodetool describecluster
Cluster Information:
Name: test
Snitch: org.apache.cassandra.locator.DynamicEndpointSnitch
Partitioner: org.apache.cassandra.dht.Murmur3Partitioner
Schema versions:
86afa796-d883-3932-aa73-6b017cef0d19: [192.168.50.4, 192.168.50.5, 192.168.50.6]
We can see that the servers in the cluster can connect to each other (see Setting up a Cassandra cluster with Cassandra image and Cassandra cloud project with Vagrant).
We now use this SSL keys with a local cluster, but later tutorials in this series will cover using these same keys with AWS instances running in AWS cloud. We will use Packer to create AMIs and Cloudformation to create cluster infrastructure like VPCs, subnets, etc.
Set Up the Cassandra csqlsh Client
This part we are doing on a MacBook Pro running OSX — aka my client machine (could be Linux or Windows). In this example, we have the virtual machines running CentOS 7 with Vagrant on VirtualBox. We can connect to those instances with Cassandra cqlsh.
To connect with cqlsh, we will need to setup our keys on the client machine.
Let’s copy cert files so we can access them from the client (MacBook pro / OSX).
Copy Cert Files Created Earlier to install for Cassandra Client
$ cd ~/github/cassandra-image/resources/opt/cassandra/conf/certs
$ mkdir /opt/cassandra/conf/certs
$ cp * /opt/cassandra/conf/certs
Now we will create a cqlshrc, which is a Cassadra config file that dictates how the client (csql) connects to Cassandra.
First, we create the cqlshrc file in ~/.cassandra.
Cassandra Config for client: Create the cqlshrc in ~/.cassandra
$ mkdir ~/.cassandra
$ cd ~/.cassandra
$ touch cqlshrc
# edit this file
Next, we edit the Cassandra client config file and add the following.
~/.cassandra/cqlshrc Contents for Cassandra Configuration for client
[connection]
hostname = 192.168.50.4
port = 9042
factory = cqlshlib.ssl.ssl_transport_factory
[ssl]
certfile =  /opt/cassandra/conf/certs/test_CLIENT.cer.pem
validate = false
# Next 2 lines must be provided when require_client_auth = true in the cassandra.yaml file
userkey = /opt/cassandra/conf/certs/test_CLIENT.key.pem
usercert = /opt/cassandra/conf/certs/test_CLIENT.cer.pem
Note that we specify the Cassandra nodes, and we are using the PEM file as our credentials via SSL to prove who we are (a valid client) instead of a username/password. (We could use both username/password and usercert/userkey.)
We need the userkey and usercert in the cqlshrc because we set require_client_auth = true in the cassandra.yaml file for the cluster nodes.
Now let’s test that the client connection works with SSL via cqlsh.
Testing Cassandra Client Connection Using cqlsh
$ /opt/cassandra/bin/cqlsh --ssl
Connected to test at 192.168.50.4:9042.
[cqlsh 5.0.1 | Cassandra 3.9 | CQL spec 3.4.2 | Native protocol v4]
Use HELP for help.
Notice we can connect to Cassandra using SSL. Notice that we are connected to the test cluster, which is the cluster we setup in the previous article — Setting up a Cassandra cluster with Cassandra image and Cassandra cloud project with Vagrant.
Review of this Cassandra Tutorial
We set up keys for client and clustering. We deployed keys to three Linux boxes using Vagrant provisioning. We then setup cqlsh to use SSL. We then logged into one of the nodes and checked that the network was setup with the nodetool describecluster. Then we locally setup csqlsh to connect to the cluster using SSL.
More to Come from Cassandra Cluster Tutorial series
Check back with us at the Cloudurable blog to find out more about cassandra-image and cassandra-cloud.
- Carpenter, Jeff; Hewitt, Eben (2016-06-29). Cassandra: The Definitive Guide: Distributed Data at Web Scale. O’Reilly Media.
- JKS Cheatsheet
- Java SSL support
- FIPS
- Using Nodetool securely
- Cassandra SSL certificates
- Cassandra SSL transport for clients
- Using cqlsh with SSL
- Setting up a Cassandra cluster with Cassandra image and Cassandra cloud project with Vagrant (first article in this series)
- Configuring cqlsh from a file.
- Cassandra Cloud Github project
- Cassandra Image Project on Github (source code for this article)
Cloudurable provides cassandra support, cassandra consulting, and cassandra training, as well as Cassandra examples like AWS CloudFormation templates, Packer, ansible to do common cassandra DBA and cassandra DevOps tasks. We also provide monitoring tools and images (AMI/Docker) to support Cassandra in production running in EC2. Our advanced Cassandra courses teaches how one could develop, support and deploy Cassandra to production in AWS EC2 and is geared towards DevOps, architects and DBAs.