Prerequites
We need to make sure Java is installed:
$ java -version
openjdk version "1.8.0_111"
OpenJDK Runtime Environment (build 1.8.0_111-8u111-b14-2ubuntu0.16.04.2-b14)
OpenJDK 64-Bit Server VM (build 25.111-b14, mixed mode)
Eclipse with Maven is needed as well.
Also, note that we're using Spark 2.0 and Scala 2.11 to avoid version mismatch:
- Scala 2.11.6
- Kafka 0.10.1.0
- Spark 2.0.2
- Spark Cassandra Connector 2.0.0-M3
- Cassandra 3.0.2

Apache Cassandra install
We'll work on Ubuntu 16.04.
$ echo "deb http://www.apache.org/dist/cassandra/debian 36x main" | sudo tee -a /etc/apt/sources.list.d/cassandra.list
$ gpg --keyserver pgp.mit.edu --recv-keys 749D6EEC0353B12C
$ gpg --export --armor 749D6EEC0353B12C | sudo apt-key add -
$ sudo apt-get update
$ sudo apt-get install cassandra
$ sudo service cassandra start
To verify the Cassandra cluster:
$ nodetool status
Datacenter: datacenter
=======================
Status=Up/Down
|/ State=Normal/Leaving/Joining/Moving
--  Address    Load       Tokens       Owns (effective)  Host ID                               Rack
UN  127.0.0.1  102.68 KiB  256          100.0%            726f8c94-dc2a-428f-8070-1b6bcb99ebf5  rack1
Cassandra is Up and running Normally!
Connect to Cassandra cluster using its command line interface cqlsh (Cassandra Query Language shell):
$ cqlsh
Connection error: ('Unable to connect to any servers', {'127.0.0.1': error(111, "Tried connecting to [('127.0.0.1', 9042)]. Last error: Connection refused")})
To fix the issue, we need to define environment variable CQLSH_NO_BUNDLED and export it:
$ sudo pip install cassandra-driver
$ export CQLSH_NO_BUNDLED=true
We install the latest Python Cassandra driver and tell cqlsh (which is Python program) to use the external Cassandra Python driver, not the one bundled with the distribution.
$ cqlsh
Connected to Test Cluster at 127.0.0.1:9042.
[cqlsh 5.0.1 | Cassandra 3.6 | CQL spec 3.4.2 | Native protocol v4]
Use HELP for help.
CQL
CQL is Cassandra's version of SQL. Let's try it:
$ cqlsh
Connected to Test Cluster at 127.0.0.1:9042.
[cqlsh 5.0.1 | Cassandra 3.6 | CQL spec 3.4.2 | Native protocol v4]
Use HELP for help.
cqlsh> CREATE KEYSPACE test WITH replication = {'class': 'SimpleStrategy', 'replication_factor': 1 };
cqlsh> USE "test";
cqlsh:test> CREATE TABLE my_table(key text PRIMARY KEY, value int);
cqlsh:test> INSERT INTO my_table(key, value) VALUES ('key1', 1);
cqlsh:test> INSERT INTO my_table(key, value) VALUES ('key2', 2);
cqlsh:test> SELECT * from my_table;
 key  | value
------+-------
 key1 |     1
 key2 |     2
In the code, we created a keyspace "test" and a table ("my_table") in that keyspace. Then we stored (kev, value) pairs and displayed them.
Cassandra datasax distribution
We may want to add the DataStax community repository:
$ echo "deb http://debian.datastax.com/community stable main" | sudo tee -a /etc/apt/sources.list.d/cassandra.sources.list
$ curl -L http://debian.datastax.com/debian/repo_key | sudo apt-key add -
Then, install it:
$ sudo apt-get update
$ sudo apt-get install dsc30=3.0.2-1 cassandra=3.0.2
Because the Debian packages start the Cassandra service automatically, we must stop the server and clear the data. Doing the following removes the default cluster_name (Test Cluster) from the system table. All nodes must use the same cluster name.
$ sudo service cassandra stop
$ sudo rm -rf /var/lib/cassandra/data/system/*
We can use cql now:
$ cqlsh
Connected to Test Cluster at 127.0.0.1:9042.
[cqlsh 5.0.1 | Cassandra 3.0.2 | CQL spec 3.3.1 | Native protocol v4]
Use HELP for help.
cqlsh>
$ nodetool status
Datacenter: datacenter1
=======================
Status=Up/Down
|/ State=Normal/Leaving/Joining/Moving
--  Address    Load       Tokens       Owns    Host ID                               Rack
UN  127.0.0.1  230.76 KB  256          ?       926eafc7-9aca-4dea-ba46-6cdee3b6ac2d  rack1
Note: Non-system keyspaces don't have the same replication settings, effective ownership information is meaningless
We got an error (or warning). It is an informative message when using 'nodetool status' without specifying a keyspace. That's because we've created "test" keyspace in earlier section.
$ nodetool status test
Datacenter: datacenter1
=======================
Status=Up/Down
|/ State=Normal/Leaving/Joining/Moving
--  Address    Load       Tokens       Owns (effective)  Host ID                               Rack
UN  127.0.0.1  230.76 KB  256          100.0%            926eafc7-9aca-4dea-ba46-6cdee3b6ac2d  rack1

So, we may want to drop it:
cqlsh> drop keyspace test;

Apache spark install
Download the latest pre-built Apache spark version for Hadoop2.6:
$ wget d3kbcqa49mib13.cloudfront.net/spark-2.0.2-bin-hadoop2.6.tgz
$ sudo tar xvzf spark-2.0.2-bin-hadoop2.6.tgz -C /usr/local
Let's modify ~/.bashrc:
export SPARK_HOME=/usr/local/spark-2.0.2-bin-hadoop2.6
export PATH=$SPARK_HOME/bin:$PATH
Now, we're ready to use spark:

Let's test it out. Open up a spark shell:
$ $SPARK_HOME/bin/spark-shell
Using Spark's default log4j profile: org/apache/spark/log4j-defaults.properties
Setting default log level to "WARN".
To adjust logging level use sc.setLogLevel(newLevel).
...
Spark context Web UI available at http://192.168.200.180:4040
Spark context available as 'sc' (master = local[*], app id = local-1482501175177).
Spark session available as 'spark'.
Welcome to
      ____              __
     / __/__  ___ _____/ /__
    _\ \/ _ \/ _ `/ __/  '_/
   /___/ .__/\_,_/_/ /_/\_\   version 2.0.2
      /_/

Using Scala version 2.11.8 (OpenJDK 64-Bit Server VM, Java 1.8.0_111)
Type in expressions to have them evaluated.
Type :help for more information.
scala>
Now let's get spark to do a calculation on the Scala prompt:
scala> sc.parallelize( 1 to 100 ).sum()
res0: Double = 5050.0
sbt install
We may want to skip if we want to install scala provided by debian package. If so, go to next section.
sbt is an open source build tool for Scala and Java projects, similar to Java's Maven or Ant. Let's install the sbt:
$ echo "deb https://dl.bintray.com/sbt/debian /" | sudo tee -a /etc/apt/sources.list.d/sbt.list
$ sudo apt-key adv --keyserver hkp://keyserver.ubuntu.com:80 --recv 2EE0EA64E40A89B84B2DF73499E82A75642AC823
$ sudo apt-get update
$ sudo apt-get install sbt
scala 2.11 install
Let's install scala:
$ sudo apt-get install scala
$ scala -version
Scala code runner version 2.11.6 -- Copyright 2002-2013, LAMP/EPFL
$ which sbt
/usr/bin/sbt
Spark Cassandra Connector
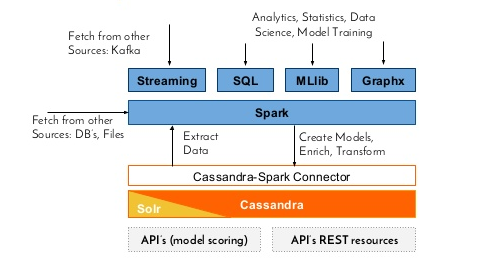
Spark doesn't natively know how to talk Cassandra, but it's functionality can be extended by using connectors.
To connect Spark to a Cassandra cluster, the Cassandra Connector will need to be added to the Spark project. DataStax provides their own Cassandra Connector on GitHub and we can download from GitHub:
$ git clone https://github.com/datastax/spark-cassandra-connector.git
Once it's cloned it then we'll need to build it using the sbt that comes with the connector:
$ cd spark-cassandra-connector
$ sbt assembly -Dscala-2.11=true
When the build is finished, there will be a jar files in a target directory:
$ ls ~/spark-cassandra-connector/spark-cassandra-connector/target/full/scala-2.10
classes  spark-cassandra-connector-assembly-2.0.0-M3-104-g7c8c546.jar  test-classes
Using Spark Cassandra Connector
Just for now, let's move the file into home(~):
$ cp ~/spark-cassandra-connector/spark-cassandra-connector/target/full/scala-2.10/spark-cassandra-connector-assembly-2.0.0-M3-104-g7c8c546.jar ~
Then, start the spark shell again from within spark directory with the jar:
$ $SPARK_HOME/bin/spark-shell --jars ~/spark-cassandra-connector-assembly-2.0.0-M3-104-g7c8c546.jar
...
Spark context Web UI available at http://192.168.200.180:4040
Spark context available as 'sc' (master = local[*], app id = local-1482560890957).
Spark session available as 'spark'.
Welcome to
      ____              __
     / __/__  ___ _____/ /__
    _\ \/ _ \/ _ `/ __/  '_/
   /___/ .__/\_,_/_/ /_/\_\   version 2.0.2
      /_/

Using Scala version 2.11.8 (OpenJDK 64-Bit Server VM, Java 1.8.0_111)
scala>
Before connecting the Spark Context to the Cassandra cluster, let's stop the default context:
scala> sc.stop
Import the necessary jar files:
scala> import com.datastax.spark.connector._, org.apache.spark.SparkContext, org.apache.spark.SparkContext._, org.apache.spark.SparkConf
import com.datastax.spark.connector._
import org.apache.spark.SparkContext
import org.apache.spark.SparkContext._
import org.apache.spark.SparkConf
Make a new SparkConf with the Cassandra connection details:
scala> val conf = new SparkConf(true).set("spark.cassandra.connection.host", "localhost")
conf: org.apache.spark.SparkConf = org.apache.spark.SparkConf@3ef2b8e5
Create a new Spark Context:
scala> val sc = new SparkContext(conf)
sc: org.apache.spark.SparkContext = org.apache.spark.SparkContext@35010a6b
Now we have a new SparkContext which is connected to our Cassandra cluster!
Spark with Cassandra's keyspace and table
Since we deleted keyspace and table, we need to create them again for Cassandra cluster testing.
$ cqlsh
Connected to Test Cluster at 127.0.0.1:9042.
[cqlsh 5.0.1 | Cassandra 3.6 | CQL spec 3.4.2 | Native protocol v4]
Use HELP for help.
cqlsh> CREATE KEYSPACE test WITH replication = {'class': 'SimpleStrategy', 'replication_factor': 1 };
cqlsh> USE "test";
cqlsh:test> CREATE TABLE my_table(key text PRIMARY KEY, value int);
cqlsh:test> INSERT INTO my_table(key, value) VALUES ('key1', 1);
cqlsh:test> INSERT INTO my_table(key, value) VALUES ('key2', 2);
cqlsh:test> SELECT * from my_table;
 key  | value
------+-------
 key1 |     1
 key2 |     2
(2 rows)
cqlsh:test>
Now we can use the keyspace called "test" and a table called "my_table". To read data from Cassandra, we create an RDD (Resilient Distributed DataSet) from a specific table. The RDD is a fundamental data structure of Spark. Each dataset in RDD is divided into logical partitions, which may be computed on different nodes of the cluster. RDDs can contain any type of Python, Java, or Scala objects, including user-defined classes.
On a scala prompt of spark-shell:
scala> val test_spark_rdd = sc.cassandraTable("test", "my_table")
Lets check what's the first element in this RDD:
scala> test_spark_rdd.first
res1: com.datastax.spark.connector.CassandraRow = CassandraRow{key: key1, value: 1}
Kafka & Zookeeper
Let's install Kafka. Download:
$ wget http://apache.mirror.cdnetworks.com/kafka/0.10.1.0/kafka_2.11-0.10.1.0.tgz
$ tar -tzf kafka_2.11-0.10.1.0.tgz
Kafka uses ZooKeeper so we need to first start a ZooKeeper server if we don't already have one. We can use the convenience script packaged with kafka to get a quick-and-dirty single-node ZooKeeper instance:
$ bin/zookeeper-server-start.sh config/zookeeper.properties
Now start the Kafka server:
$ bin/kafka-server-start.sh config/server.properties
Create a Kafka topic
Let's create a topic named "test" with a single partition and only one replica:
To test Kafka, create a sample topic with name "testing" in Apache Kafka using the following command:
$ bin/kafka-topics.sh --create --zookeeper localhost:2181 --replication-factor 1 --partitions 1 --topic test
We should see the following output:
Created topic "testing"
Here the behavior of first() is identical to take(1).
We can ask Zookeeper to list available topics on Apache Kafka by running the following command:
$ bin/kafka-topics.sh --list --zookeeper localhost:2181
testing
Kafka's producer/consumer command
Now, publish a sample messages to Apache Kafka topic called testing by using the following producer command:
$ bin/kafka-console-producer.sh --broker-list localhost:9092 --topic testing
After running above command, enter some messages like "Spooky action at a distance?" press enter, then enter another message like "Quantum entanglement":
$ bin/kafka-console-producer.sh --broker-list localhost:9092 --topic testing
Spooky action at a distance?
Quantum entanglement
Type Ctrl-D to finish the message.
Now, use consumer command to retrieve messages on Apache Kafka Topic called "testing" by running the following command, and we should see the messages we typed in earlier played back to us:
$ bin/kafka-console-consumer.sh --zookeeper localhost:2181 --topic testing --from-beginning
Spooky action at a distance?
Quantum entanglement
Hadoop 2.6 - Installing on Ubuntu 14.04 (Single-Node Cluster)
Hadoop 2.6.5 - Installing on Ubuntu 16.04 (Single-Node Cluster)
Hadoop - Running MapReduce Job
CDH5.3 Install on four EC2 instances (1 Name node and 3 Datanodes) using Cloudera Manager 5
QuickStart VMs for CDH 5.3 II - Testing with wordcount
QuickStart VMs for CDH 5.3 II - Hive DB query
Scheduled start and stop CDH services
CDH 5.8 Install with QuickStarts Docker
Zookeeper & Kafka - single node single broker
Zookeeper & Kafka - Single node and multiple brokers
Apache Hadoop Tutorial I with CDH - Overview
Apache Hadoop Tutorial II with CDH - MapReduce Word Count
Apache Hadoop Tutorial III with CDH - MapReduce Word Count 2
Apache Hadoop (CDH 5) Hive Introduction
CDH5 - Hive Upgrade to 1.3 to from 1.2
Apache Hive 2.1.0 install on Ubuntu 16.04
Apache Hadoop : HBase in Pseudo-Distributed mode
Apache Hadoop : Creating HBase table with HBase shell and HUE
Apache Hadoop : Hue 3.11 install on Ubuntu 16.04
Apache Hadoop : Creating HBase table with Java API
Apache HBase : Map, Persistent, Sparse, Sorted, Distributed and Multidimensional
Apache Hadoop - Flume with CDH5: a single-node Flume deployment (telnet example)
Apache Hadoop (CDH 5) Flume with VirtualBox : syslog example via NettyAvroRpcClient
List of Apache Hadoop hdfs commands
Apache Hadoop : Creating Wordcount Java Project with Eclipse Part 1
Apache Hadoop : Creating Wordcount Java Project with Eclipse Part 2
Apache Hadoop : Creating Wordcount Maven Project with Eclipse
Spark 1.2 using VirtualBox and QuickStart VM - wordcount
Spark Programming Model : Resilient Distributed Dataset (RDD) with CDH
Apache Spark 1.2 with PySpark (Spark Python API) Wordcount using CDH5
Apache Spark 2.0.2 with PySpark (Spark Python API) Shell
Apache Spark 2.0.2 tutorial with PySpark : RDD
Apache Spark 2.0.0 tutorial with PySpark : Analyzing Neuroimaging Data with Thunder
Apache Spark Streaming with Kafka and Cassandra
Apache Drill with ZooKeeper - Install on Ubuntu 16.04


