Data security is a major concern and is given top priority in every organization. Securing sensitive data and keeping it out of hands from those who should not have access is challenging even in traditional database environments, let alone a cloud hosted database. Data should be secured on the fly and on rest. In this blog, we will talk about securing data in Cassandra database on cloud environment specifically on AWS. We will divide the blog into two
- Secure Cassandra on AWS
- Cassandra data access security
Secure Cassandra on AWS
Cassandra is best used when hosted across multiple datacenters. Hosting it on cloud across multiple datacenters will reduce lot of cost and peace of mind knowing that you can survive regional outages. However, securing cloud infra is most fundamental activity that need to be carried when hosted on cloud.
Securing Ports
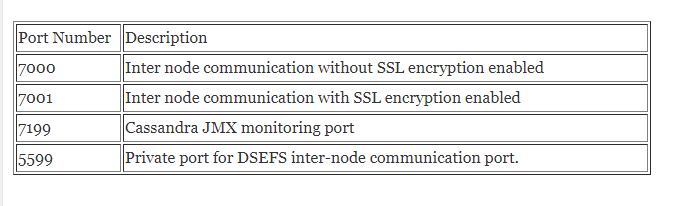
Securing ports and unknown host access is the foremost think when hosted on cloud. Cassandra needs the following ports to be opened on your firewall for a multi-node cluster else it will act as standalone cluster.
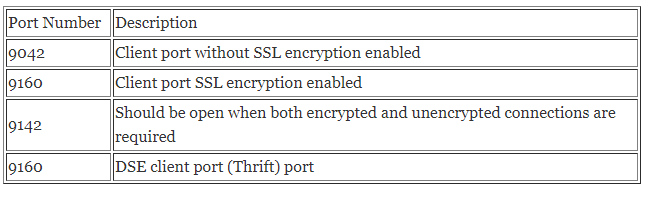
Public ports
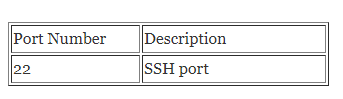
Create a Security Group with default rule as SSH traffic allowed on port 22 (both inbound and outbound).
- Click ‘ADD RULE’ (both inbound and outbound)
- Choose ‘SSH’ from the ‘Type’ dropdown
- Enter only allowed IPs from the ‘Source’ (inbound) / ‘Destination’ (outbound).
Private – Cassandra inter node ports
Ports used by the Cassandra cluster for inter-node communication must be restricted to communicate within the node, restricting the traffic flow from and to the external resources.
To configure inter-node communication ports in a Security Group:
- Click ‘ADD RULE’.
- Choose ‘Custom TCP Rule’ from the ‘Type’ dropdown.
- Enter the port number in the ‘Port Range’ column.
- Choose ‘Custom’ from the ‘Source’ (inbound) / ‘Destination’ (outbound) dropdown and enter the same Security Group ID as the value. This allows communication only within the cluster over the configured port, when this Security Group would be attached to all the nodes in the Cassandra cluster.
Private – Cassandra inter node ports
The following port needs to be secured and opened only for the clients which will be connecting with our cluster.
To configure public ports in a Security Group:
- Click ‘ADD RULE’.
- Choose ‘Custom TCP Rule’ from the ‘Type’ dropdown.
- Enter the port number in the ‘Port Range’ column.
- Choose ‘Anywhere’ from the ‘Source’ (inbound) / ‘Destination’ (outbound).
To restrict the public ports to certain known IP or IP Range:
5.Choose ‘Custom’ from the ‘Source’ (inbound) / ‘Destination’ (outbound) dropdown and provide the IP value or CIDR block corresponding to the IP Range.
Now that we have configured the firewall, our VMS are secured for unknown access. It is recommended to create Cassandra clusters in a private subnet within your VPC which does not have Internet access.
Create a NAT instance in a public subnet or configure NAT Gateway that can route the traffic from the Cassandra cluster in the private subnet for software updates.
Cassandra Data Access Security
Securing data involves the following security accesses,
- Node to node communication
- Client to node communication
- Encryption at rest
- Authentication and authorization
Node to Node and Client to Node Communication Encryption
Cassandra is a master-less database. Master-less design offers no single point of failure for any database process or function. Every node is same on Cassandra. Read and write is served by every node for any query on the database. So, there is lot of data transfer between each node on the cluster. When the database is hosted on public cloud network, this communication needs to be secured. Likewise, the data transferred between the database and client on the public network is always at risk. To secure the data on flight during these scenarios, usually encryption of data by sending over a SSL is preferred widely.
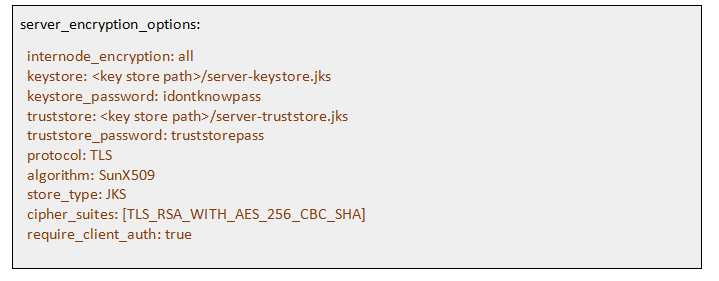
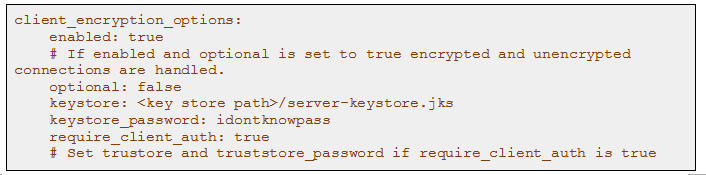
Most developers are not exposed to encryption in their day to day work. And setting up an encryption layer is always a tedious process. Cassandra helps this by providing a built-in feature. All we need to do is enable the server_encryption_options: and client_encryption_options: configurations on your cassandra.yaml file and provide the required certificates and keys. Cassandra takes care of the encryption of data during node to node and client to server communications.
Additionally, Cassandra follows Client Certificate Authentication. Imagine, without authentication that we are talking to another Cassandra node, the cluster is only expecting a SSL key, we can write programs to attach to a cluster and execute any commands, listen to writes on arbitrary token ranges, even create a admin account into the system_auth table.
To avoid this, Cassandra follows Client Certificate Authentication. Using this approach Cassandra takes the extra step of verifying the client against a local trust store. If it does not recognize the client’s certificate, it will not accept the connection. This additional verification can be enabled by setting require_client_auth:true in cassandra.yaml configuration file.
In the rest of the blog we will see step by step process of enabling and configuring the cluster for SSL connection. If you have a certificate already, you can skip Generating certificates using OpenSSL.
Generating Certificates using OpenSSL
Most of the UNIX system should have OpenSSL tool installed on it. If not available, install OpenSSL before proceeding further.
Steps:
1.Create a configuration file gen_ca_cert.conf with the below configurations.
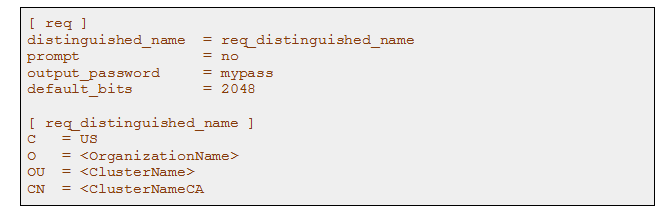
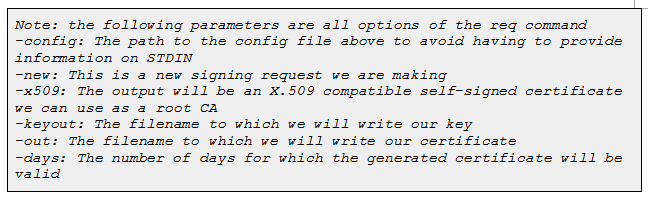
2.Run the following OpenSSL command to create the CA :

3.You can verify the contents of the certificate you just created with the following command :

You can generate certificate for each node if required, but doing that is not recommended. Because it is very tough to maintain separate key for each node. Imagine, when a new node is added to the cluster, the certificate for that node needs to be added to all other nodes which is tedious process. So, we recommend using the same certificate for all the nodes. Following steps will help you to use the same certificate for all the nodes.
Building Keystore
I will be explaining the keystore building for a 3-node cluster. Same can be followed for a n node cluster.
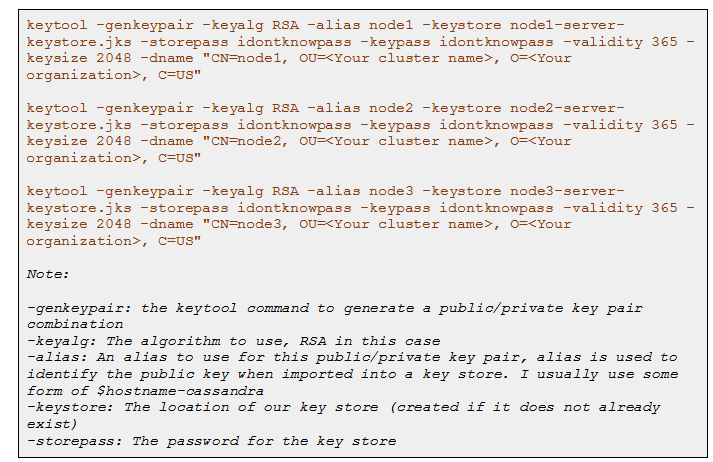

To verify that the keystore is generated with correct key pair information and accessible, execute the below command

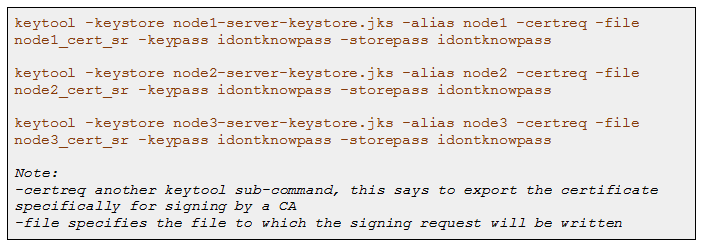
With our key stores created and populated, we now need to export a certificate from each node’s key store as a “Signing Request” for our CA:
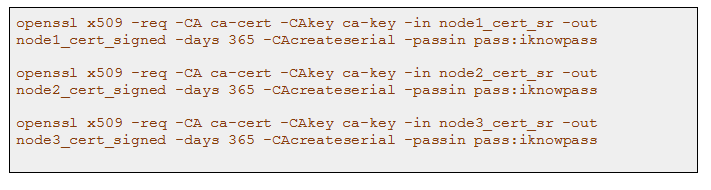
With the certificate signing requests ready to go, it’s now time to sign each with our CA’s public key via OpenSSL :
Add CA to the keystore into each node’s keystore via -import sub command of keytool.


Building Trust Store
Since Cassandra uses Client Certificate Authentication, we need to add a trust store to each node. This is how each node will verify incoming connections from the rest of the cluster.
We need to create trust store by importing CA root certificate’s public key :

Since all our instance-specific keys have now been signed by the CA, we can share this trust store instance across the cluster.
Configuring the Cluster
After creating all the required files, you can keep the keystore and truststore files in /usr/local/lib/cassandra/conf/ or any directory of your choice. But make sure that the cassandra demon has access to the directory. By making he below configuration in cassandra.yaml file the inbound and outbound requests will be encrypted.
Enable Node to Node Encryption
Enable Client to Node Encryption

Repeat the above process on all the nodes on the cluster and your cluster data is secured on flight and from unknowns.
Author Credits : This article was written by Bharathiraja S, Senior Data Engineer at SecureKloud Technologies.