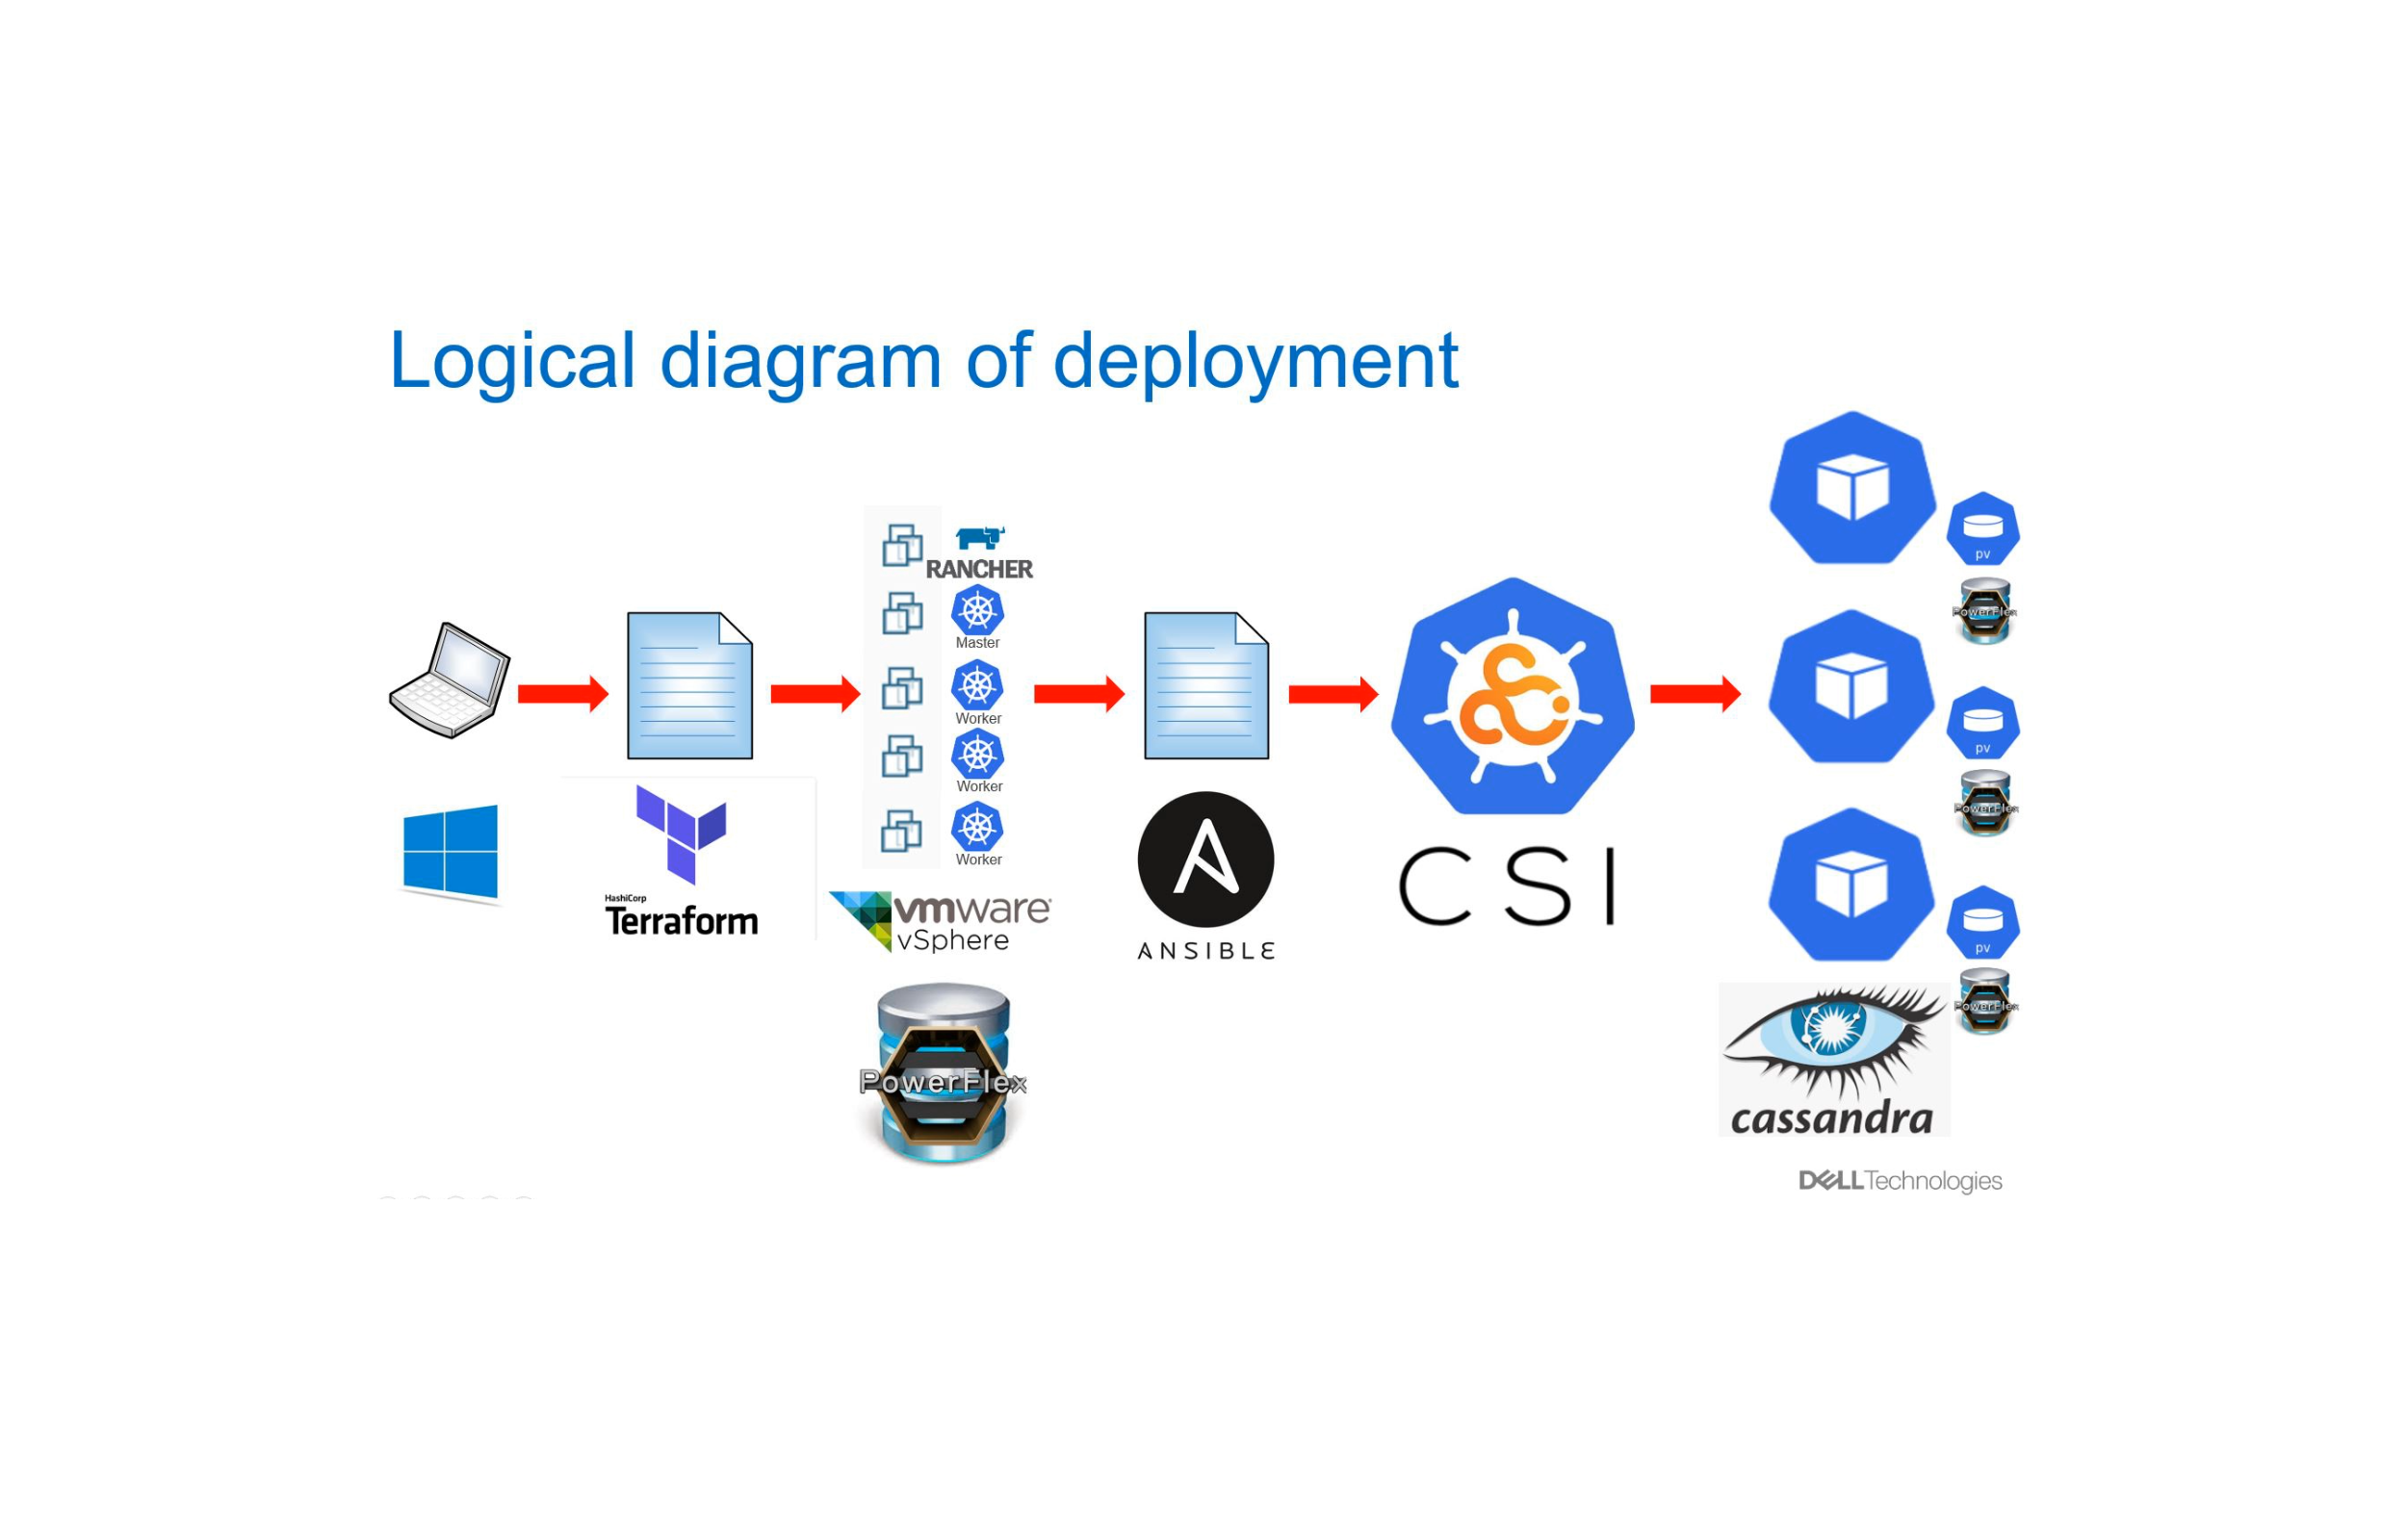
May 4 · 6 min read
This post explains about deploying a 3-node Cassandra cluster in your laptop by simply using a ‘vagrant up’ command.
Usually, developers struggle in setting up tools and project environment in their laptop especially in Windows. If the purpose is just to check the connectivity with their program and a third party tool, its time consuming to understand the configurations of the third party tool and manually do the setup. It will be a more difficult task if its a database cluster setup. Therefore, the following automation can be a good friend in such cases.
I prepared an Ansible role to automate Cassandra cluster deployment. Details of vagrant setup and Ansible role will be explained below.
Required tools set:
- Virtualbox
- Vagrant
Execution steps:
- Install virtual box and vagrant
- git clone https://github.com/apkan/vagrant-cassandra-ansible.git
- cd vagrant-cassandra-ansible
- vagrant up
Output:
Ansible playbook will execute a set of tasks and eventually a Cassandra cluster status will be displayed.
Vagrant
In vagrant, Ansible local provisioner is used for this automated deployment. This helps to avoid initial difficulties in Ansible installation and setup, especially, you do not need to worry about SSH key exchanges.
This vagrant file will deploy 3 nodes and 1 controller which will be used as Ansible controller node. Ansible will be installed automatically and execute ‘cassandraCluster’ playbook from the controller node when you issue ‘ vagrant up’ command.
machine.vm.provider "virtualbox" do |vbox|
vbox.memory = "1024"
vbox.cpus = "1"
vbox.customize ["modifyvm", :id, "--natdnshostresolver1", "on"]
vbox.customize ["modifyvm", :id, "--natdnsproxy1", "on"]
end
Hardware resources for each vagrant nodes can be customized as per your hardware availability. ‘natdnshostresolver1’ and ‘natdnsproxy1’ will be enabled on all nodes to give a boost on networking performance.
---
all:
hosts:
controller:
ansible_connection: local
ansible_ssh_host: x.x.x.x
node1:
ansible_ssh_host: x.x.x.x
ansible_ssh_private_key_file: /vagrant/.vagrant/machines/node1/virtualbox/private_key
node2:
ansible_ssh_host: x.x.x.x
ansible_ssh_private_key_file: /vagrant/.vagrant/machines/node2/virtualbox/private_key
node3:
ansible_ssh_host: x.x.x.x
ansible_ssh_private_key_file: /vagrant/.vagrant/machines/node3/virtualbox/private_key
children:
cluster-nodes:
hosts:
node1:
node2:
node3:
seed-nodes:
hosts:
node1:
node2:
This inventory file plays a key role in this setup. This will be the global configuration for host IPs, private keys and cassandra seed nodes. Vagrant and Ansible roles will fetch the IP address from this inventory yml file.
config.vm.define "node1" do |machine|
machine.vm.network "private_network",
ip: inventory["all"]["hosts"]["node1"]["ansible_ssh_host"]
...
end
Ansible role
└── cassandra-cluster
├── handlers
│   └── main.yml
├── tasks
│   └── main.yml
├── templates
│   ├── cassandra.sh
│   └── cassandra.yaml.j2
└── vars
└── main.yml
This is a simple Ansible role to deploy 3 node cassandra cluster. Following shows the tasks used in the role:
- name: Check if java 8 alread installed
command: java -version 2>&1 | grep version | awk '{print $3}' | sed 's/"//g'
register: java_version
ignore_errors: True- debug:  msg="Java not installed"
when: java_version is failed- name: installJavaRepo
apt_repository: repo='ppa:openjdk-r/ppa'
when: java_version is failed- name: updateCache
apt: update_cache=yes
when: java_version is failed- name: installJava
apt: name=openjdk-8-jdk state=present
when: java_version is failed- stat:
path: /opt/apache-cassandra-3.7-bin.tar.gz
register: cassandra_source_file- name: download the source
get_url:
url: https://archive.apache.org/dist/cassandra/3.7/apache-cassandra-3.7-bin.tar.gz
dest: /opt/apache-cassandra-3.7-bin.tar.gz
mode: 0440
when: cassandra_source_file.stat.exists == False- stat:
path: /opt/apache-cassandra-3.7-bin.tar.gz
checksum_algorithm: sha1
register: downloaded_file_checksum- name: download checksum from apache page
uri: url=https://archive.apache.org/dist/cassandra/3.7/apache-cassandra-3.7-bin.tar.gz.sha1 return_content=yes
register: apache_page_checksum
failed_when: downloaded_file_checksum.stat.checksum != apache_page_checksum.content- name: Create home directory
file:
path: "{{ cassandra_home }}"
state: directory
mode: 0755  - name: Extract cassandra source
unarchive:
src: /opt/apache-cassandra-3.7-bin.tar.gz
dest: "{{ cassandra_home }}"
extra_opts: [--strip-components=1]
remote_src: yes  - name: Export path
shell: "echo 'PATH=$PATH:{{ cassandra_path }}' > /etc/profile.d/custom-path.sh && . /etc/profile.d/custom-path.sh"- name: install the configuration file
template: src=cassandra.yaml.j2 dest='{{ cassandra_home }}/conf/cassandra.yaml' mode=750- name: copy the startup script
template: src=cassandra.sh dest=/etc/init.d/cassandra owner=root group=root mode=755- name: Enable the daemon
shell: update-rc.d cassandra "{{ item }}"
with_items:
- "defaults"
- "enable"- name: start cassandra service
service: name=cassandra state=started
notify:
- CheckClusterStatus
- GetClusterStatusOutput
- DisplayClusterStatusOutput
Most of the important parameters in Cassandra.yaml are configured using Ansible template. Following shows the variables used in this role:
cluster_name: MyCluster#Directory locations
cassandra_home: /opt/cassandra
cassandra_path: /opt/cassandra/bin
cassandra_data_directory: /opt/cassandra/data
cassandra_hints_directory: /opt/cassandra/data/hints
cassandra_commitlog_directory: /opt/cassandra/data/commitlogs
cassandra_saved_caches_directory: /opt/cassandra/data/saved_cachescassandra_seeds_resolved: "{{ groups['seed-nodes'] | map('extract', hostvars, ['ansible_ssh_host']) | join(',') }}"#For IP Address configuration in YML
broadcast_address: "{{ hostvars[inventory_hostname]['ansible_ssh_host'] }}"
listen_address: "{{ hostvars[inventory_hostname]['ansible_ssh_host'] }}"
broadcast_rpc_address: "{{ hostvars[inventory_hostname]['ansible_ssh_host'] }}"#Port configurations
cassandra_port: 9042
rpc_port: 9160
storage_port: 7000
ssl_storage_port: 7001
It was an interesting challenge to configure a list of Cassandra seed IPs. I have mentioned node 2 and node 3 as seed nodes in inventory file. Those two IPs will be passed to cassandra.yaml file from ‘cassandra_seeds_resolved’ variable.
Best practice tips:
- Make use of variable as much as possible and avoid hard coding in Ansible tasks.
- Prepare Ansible roles with the concept of idempotency. This is to ensure that your environment is consistent. Also, this will help in reusing the same environment to test the changes in your Ansible roles.
- I used an Ansible task to check if java already installed. These sort of verification can help if we want to run this playbook in some other environment.
- Display cluster status at last of all tasks, so you can easily identify whether playbook execution successfully created the cluster.
Connectivity Testing
In addition, I prepared a simple java program to check the connectivity. You just need to parse one of the node IP and port (mentioned in inventory file), then the driver can fetch the other node’s IP and display the cluster details.
Destroying the setup
Just like how we deployed this setup, destroying it is also super easy. Anytime, you can destroy this whole setup by simply using the ‘vagrant destroy’ command.
Conclusion
I hope this post helps to give an idea about how deployment in local environment can be automated using tools like Vagrant and Ansible.
Please note that this can be faster and more efficient if you use cloud environment instead of Vagrant.( I will write that in another post — “Deployment using Terraform and Ansible”).
References
- Full source code available in https://github.com/apkan/vagrant-cassandra-ansible.git
- https://www.vagrantup.com/docs/provisioning/ansible_local.html
- https://galaxy.ansible.com/andrewrothstein/cassandra-cluster
- https://docs.datastax.com/en/developer/java-driver/3.6/manual/
Follow us on Twitter 🐦 and Facebook 👥 and join our Facebook Group 💬.
To join our community Slack 🗣️ and read our weekly Faun topics 🗞️, click here⬇