This application uses Spring Data Cassandra and DataStax Astra to build a REST API for a backend service that interacts with products and orders.
- 1. Create an Apache Cassandra DB-as-a-service with DataStax Astra
- 2. Copy your credentials from your Cassandra instance
- 3. Run the application
- 4. Test the application
1. Create an Apache Cassandra DB-as-a-service with DataStax Astra
DataStax ASTRA service is available at url https://astra.datastax.com
✅ Step 1a.Register (if needed) and Sign In to Astra : You can use your Github, Google accounts or register with an email
✅ Step 1b. Fill the Create New Database Form : As you don't have have any instances the login will route through the instance creation form. You will find below which values to enter for each field.
-
Set the Compute Size: For the work we are doing please use
Free tier. You instance will be there forever, free of charge. If you already have a free tier db that you created in a previous workshop (killrvideo) you can reuse it. -
Select region: This is the region where your database will reside physically (choose one close to you or your users). For people in EMEA please use
europe-west-1idea here is to reduce latency. -
Fill in the database name - Proposed value
dev-workshop-db. You can use any alphanumeric value it is not part of the connection fields. Now it will be part of a file downloaded later and you should avoid capital letters.
With the 3 fields below you can pick any name
-
Fill in the keyspace name - Proposed value
todoapp(no spaces, alpha numeric) -
Fill in the user name -
todouser. Note the user name is case-sensitive. Please use the case we suggest here. -
Fill in the user password -
todopassword. Fill in both the password and the confirmation fields. Note that the password is also case-sensitive. Please use the case we suggest here. -
Launch the database. Review all the fields to make sure they are as shown, and click the Launch Database button.
👁️ Expected output
✅ Step 1c. View your Database and connect : View your database. It may take 2-3 minutes for your database to spin up. You will receive an email at that point.
👁️ Expected output
2. Copy your credentials from your Cassandra instance
✅ Step 2a: Click on Manage Organization at the top navigation
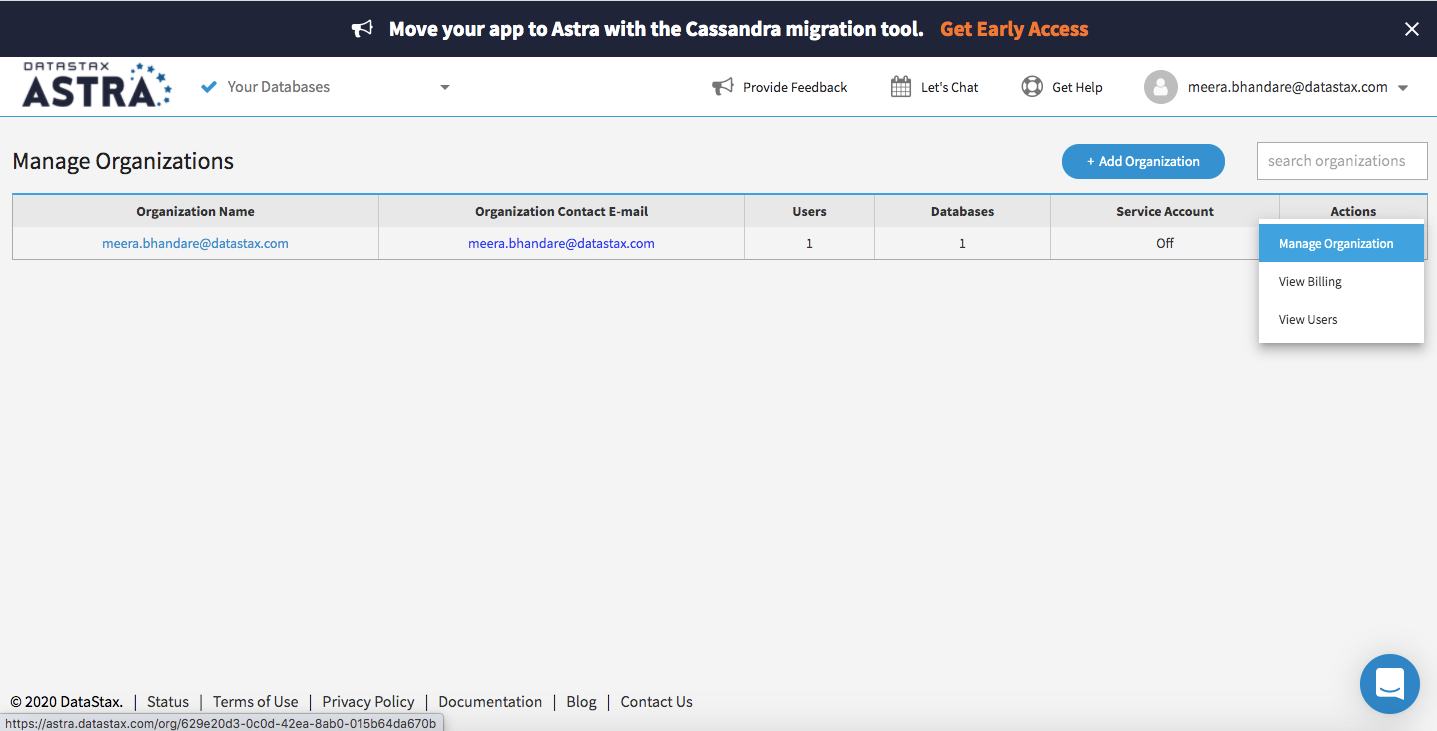
✅ Step 2b. Go to actions, and click manage organizations on the right side of the screen:
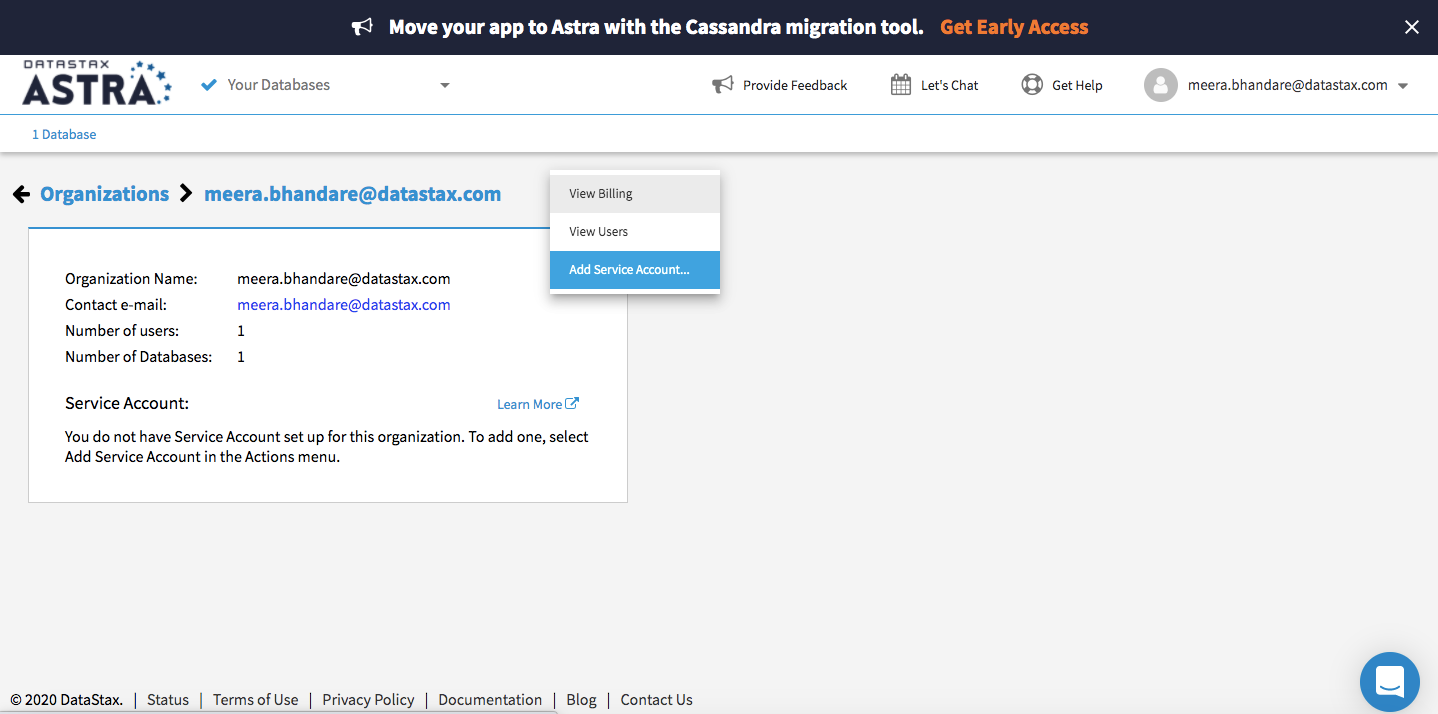
✅ Step 2c. Go to the top and click add service account
✅ Step 2d. Then click the logo to copy your credentials.
✅ Step 2e. Once you have copied your credentials, click to Open in Gitpod:
The credentials is a Json String that look like:
{
  "clientId":"51926aea-0509-45c4-a2ee-4797574b92d6",
  "clientName":"your_email",
  "clientSecret":"your_secret"
}
3. Run the application in Gitpod
✅ Step 3a. Click on the button below to open gitpod *(the cookie have to be enabled or you have to navigate to here)
✅ Step 3b. Once your gitpod workspace has loaded paste your service account credentials and enter in the bottom of the screen
✅ Step 3c. After entering, open this link in your browser: http://localhost:8081/swagger-ui/
The application is now started.
4. Use the Application
TodoMVC is a fabulous community contribution that helps developers compare frameworks on the basis of actual project code, not just claims and anecdotes. TodoMVC is an immensely valuable attempt at a difficult problem - providing a structured way of comparing JS libraries and frameworks.
✅ Step 4a. Test TodoBackEnd Spec Runner : Locate the spec runner and use the endpoints of your application it should look like https://8081-b8553e52-d31f-4b6a-9d46-7db0074e29a5.ws-eu01.gitpod.io/todos where you substitute your own gitpod instance id and region.
✅ Step 4b. Test TodoBackEnd Web Client : todoBackend.com provides a client to work with the API. As before pick one of the endpoints listed before and try the client.


